MAS 863 – Laser printer info – Fall 2003, Shelly Levy-Tzedek
I will be continuously updating this document to make it more comprehensive, as we all learn more on how to use the printer. In the meantime, you are welcome to check out a previous tutorial at: http://www.media.mit.edu/physics/pedagogy/fab/laserprint/tutorial.html
Shelly.
Safety
Remember – it is anticipated that you may break something along the way, but the only bad thing you can do is break something and not tell anybody. As a backup for the honor system, there are cameras alongside each machine that broadcast what’s happening with it in real time, and allows tracking of who was there at what time.
- Never
leave the machine unattended while it is running, regardless of how
long you need it to operate. If you need to leave while it is printing
your design, you can use the ‘pause’ key,
 and when you’re back hit ‘resume’
  .
. - Always know what you are cutting – some materials (e.g., PVC) can produce toxic fumes that may corrupt the machine to the point where it can no longer be used. No chlorinated materials are allowed in the machine.
- If the lab phone rings – pick it up. It is likely to be John (DiFrancesco, difran@media.mit.edu), seeing you through the online camera broadcast, and figuring you could use some help. You can always also e-mail him with any questions.
- If fire breaks inside the machine:
- Open lid to stop laser from working, and turn the machine off
- Put an acrylic sheet over the burning material to smother the fire
- Push up on the blast gate to stop air flow, if you can reach it

- Call 100 if all else fails, or you feel you are in danger
Drawing
Software
CorelDraw is the software installed on the computer that is connected to the laser printer. You can either draw your design using CorelDraw, or import it as a .dxf file.
One of the useful features of using the computer next to the machine is that when you open a new file, your sheet size corresponds to the dimensions of the laser-printer platform.
If you import a bitmap, the gray levels will automatically be set according to the darkest and lightest colors in the drawing.
Tricks
- In order to not waste material, especially if you're using a scrap that has lots of things already on it, you can set a new origin point by using the X-Y button and moving the laser pointer to the upper left corner of where you want to start. You hit the check mark a few times. Once set, make sure your drawing has the part in the upper left corner, then go.
- One can also draw a dummy rectangle around the part, just to make sure it will fit. Then do a test run with that and see right away if it will or will not!
- While making test runs, you might want to set the rastered colors to ‘SKIP’, so that you won’t waste time on them when all you want is to see if the part fits in the space. Don’t forget to switch it back to ‘RAST’ when you’re ready to print!
- To save time on designing a box, you can use the BoxMaker. See http://www.instituteofthefuture.org/boxmaker/index.html
Specifications for the machine
There are two basic types of actions we can perform using the printer: one is a vector cut, meaning it cuts all the way through, and the other is a raster cut, which etches the surface, but does not go through all the way.
Notice that in order to specify a vector cut, your line must have a hairline width – any thicker line would produce a raster cut. Similarly, a raster cut should not be outlined, but only have a fill. You will later specify the different intensities for the different fill colors.
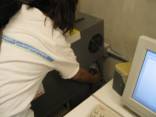
Using the printer
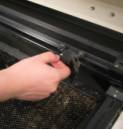
- Inspect
the lens and the mirror – unscrew the three screws (careful not to
drop them onto and through the platform)
 .
.
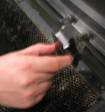 Then pull out the lens and mirror. If
they appear to be clean, that’s good. If not, clean them with a cotton
swab and the cleaning material found above the computer.
Then pull out the lens and mirror. If
they appear to be clean, that’s good. If not, clean them with a cotton
swab and the cleaning material found above the computer.
Accumulated gunk may get burned when the laser is used, resulting in the need to get a new lens.
A little trivia: you will almost always use the 2-inch lens, which has a about 1/10,000 inch beam width. However, there is also the 4-inch lens, which has a 1/15,000 inch beam width.
- Turn
the machine on using the orange switch.
You will hear the ‘swoosh’ of air rushing in, whose purpose is to cool the chamber to avoid fires, and to channel out and filter fumes, which may be toxic.
- Focus
the lens – you want the shoulder of the lens-house to sit on the white
focusing tool, which should be placed on top of the piece you are about to
cut – see picture. Also, make sure you are using the 2” focusing tool for
the 2” lens.
o On the machine, press the Z button.
o Use the up and down buttons on the machine to raise or lower the platform.
o
For a finer movement up/down hit the check mark once,
then use the arrows again. 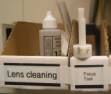
o Hit the Z button once again.
- In CorelDraw, hit Print - and change the properties:
- Make sure all ‘gas assist’ options (on the right) are on either High or Low
- Assign VECT, RAST or SKIP functions to the different colors (on the left)
- Change the POWER, SPEED and PPI settings for each color and DON’T forget to hit SET, or your entry will not be saved. Suggestions for some tested settings can be found in a wordpad file on the desktop. You are welcome to include new entries as you discover new settings that work.
- ‘OK’, then ‘Print’
- On
the printer, make sure it will execute the current job you sent by
clicking on what looks like a fast-forward button

- With the cover open, hit the green start button on the machine, and watch the head trace the drawing. It will first trace all rasters, then the vector lines. You can always stop it in mid-action by hitting the ‘pause’ button. You can change the order of vector-line cutting by changing the order of the different components of your object in CorelDraw (e.g., ‘send to back’, ‘bring to front’.) Make sure there is enough space on you piece for your cuts. If you are not satisfied, change whatever details, then hit ‘print’ once more, fast-forward on the machine, and ‘start’ with the cover open.
- If you are satisfied, close the lid and hit start. Keep your attention on the machine, in case anything goes wrong. While it is working, you can always hit ’pause’ – it will stop, and will start from the same point upon hitting ‘resume’.
- Once the job is done, wait at least a minute before opening the cover for the fumes to at least partially clear from the chamber.
- Clean up after yourself and turn the machine off