
If the lab phone rings, answer it. It is probably John DiFrancesco watching you via the lab surveillance camera and figuring you could use some help.
Never leave the laser
cutter unattended.
Your stock might
ignite, and an unchecked fire in the laser cutter could be both dangerous
and costly. John will NEVER let you come back if you do this. If you
absolutely need to leave, press and hold the pause button & leave a note
on the machine saying you will return shortly.
Never cut PVC or
chlorinated plastic.
You should always know what material you are cutting, and chlorinated
plastics should be avoided because they release chlorine gas when cut.
Do not try to cut metal
in the laser cutter.
Metal is cut in the waterjet.
Check that the lens is
clean before using the laser cutter.
As the laser
cutter is used, vaporized material will collect on the lens. This material
must be cleaned from the lens before further use or it will get cooked into
the lens and cause the lens to crack. New lenses are not cheap.
To check the lens, unscrew the three screws (careful not to drop them), and
pull out the lens and mirror. If they appear clean, return them. If not,
clean AND dry them with a cotton swab and the cleaning material found above
the computer. If you lose one screw, you can still run the laser cutter. If
you drop two screws, you cannot run the laser cutter.
Know how to stop the
machine and what to do in the case of a fire.
To turn off the laser,
simply open the lid of the laser cutter. If you want to keep the lid closed,
you can press and hold the pause button.
If there is a fire:
Setting up the
laser cutter
To turn on the laser
cutter, flip the orange switch on the right side of the laser cutter. It
is low and towards the back.
You must focus the lens
to each new material. This must be done through the somewhat
non-intuitive menu display on the laser cutter. The x-in-a-circle button
takes you up one menu level or answers "no." The check button
selects a menu item or answers "yes." You must go up to the
level where the laser cutter's bed height can be adjusted. Select that
option, and the up and down arrows beside the display will move the bed
up and down. To focus the laser, use the focusing tool for the two-inch
lens. You can move the laser our with the x and y arrow keys. Place the
tool under and to the side of the laser so that it into the large
rectangular part of the laser. Lower the laser until it meets the tool.
Once you print your
file to the laser cutter, use the left and right arrows (the ones that
look like forward and backwards on a CD player) to make sure that your
print job is selected. Note: the cutter will not necessarily default to
the most recent job.
You will probably want
to run a test run before you actually start cutting. To do this, simply
hit the green print button while the lid is still open. A red dot will
trace the laser's path. To make the actual cut, press the green button
when the lid is closed. A little bit of fire is natural for the laser
cutter, but keep an eye on your job to make sure things don't get out of
hand.
Tip: if you are using
really big stock, you can open the front of the laser cutter to put it
in. Make sure to lower the bed so that you don't hit the laser.
Tip: You may want to check the origin of the laser
press "xy" button
between the 4 arrows
send laser to top LEFT corner manually
press "enter" in the menu when it asks you if you want to reset the
origin
press "z" button to send the laser home
Printing with the laser
cutter
First do your drawing in OpenOffice Draw (probably best from you own computer). You probably don't want to use the beta 2 version. Save and export this drawing as a ".svg".
Tip: Make sure that your object color is set to "Invisible" rather than "white" or cam.py will consider it grayscale.
At the laser cutter, you will need to open "cam.py" by double clicking on it on the desktop.
Tip: If this does
not work, you can also open Cygwin shell and type "cam cam.py" (no
quotes).
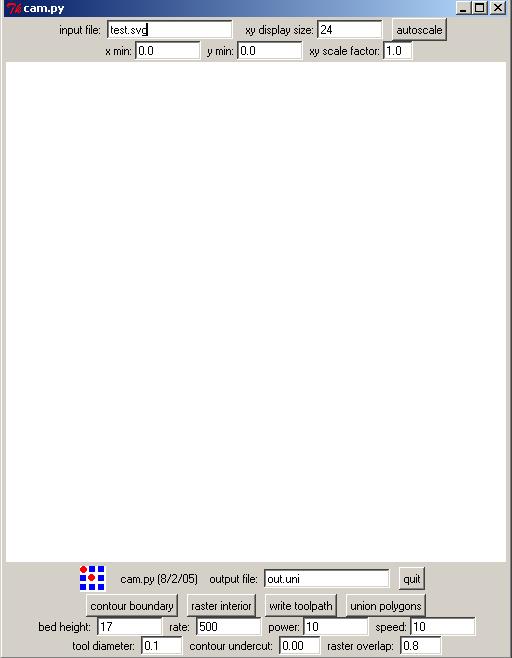
Figure 1. Cam.py tool interface.
Updating the settings in the window:
Change the input file to "myinputfile.svg", and change the output file to "output.uni"
Tip: You can run cam.py from the Cygwin shell. For example, the filename can be changed by typing "cam filename". Other settings can also be changed in this way.
If you are having problems seeing your image in the window, you can press "autoscale" to allow you to see everything. Also the "xy scale factor" will actually change the sizes of your drawing for printing.
In the window, "x min" and "y min" will relocate your drawing on the axis of the laser. You may want to use this if your drawing is on the edge of the window.
To figure out what settings (rate in ppi, speed, and power) you will need for your material, there is a file with suggested values that should open automatically on the desktop. At the bottom of the cam.py interface, you will need to specify these values. Change the bed height to 18.
"Contour boundary" locates and traces the edges in your drawing. You can change where these lines are placed by tweaking "contour undercut".
"Raster interior" will trace inside the boundaries of your drawing. "Raster overlap" will change how close or far these lines are apart from each other.
Tip: If you make changes to the contour and rastering, make sure they stay the same before you send it to the printer as they may change.
Send image to the laser cutterOnce you have finished changing all of your settings, you should Press "write toolpath"
If you are logged on as a Media Lab User
If you are NOT logged on as a Media Lab User
Useful Tips
Tip: The origin for cam.py is at the bottom left, while the origin of the laser cutter is at the top left.
Tip: Remember to wait at least a minute after the job is done before opening the laser cutter to let the fumes and smoke clear out. Also remember to clean up and turn off the laser cutter if no one else is going to be using it.
Tip: There is an example of the settings for the laser for rastering your object
Other Useful Tips