
figure 1
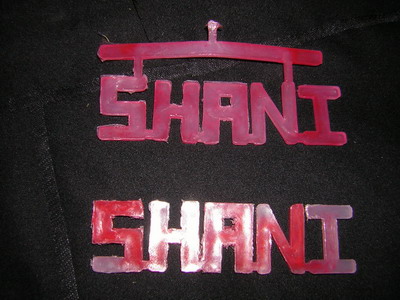
figure 2

figure 3
WEEK 9
This week we made worked with injection molding and forming. Our assignment was to first make a simple mold and then a 3D construction kit. I decided to try and use my name as both. First I generated the image in Open Office Draw by connecting rectangles and squares and merging them. I made the letters close enough so they could slide together. I also made the hold in the "A" match the size of the tops of the "S" and "I" so that they could later slide in.
For once, I didn't have 10hours worth of problems to deal with and the process was relatively simple. When I brought the file in to work with John, he said my letters were a little too close and the plastic would probably bleed over. So I used Omax to spread the letters a little bit and to make connections at the bottom of the letter for the plastic to flow through.
I worked with John and started the mini Haas Mill. Figure 1 shows the result. The slots for the injection molding (at the top of the "S" and "N") did not completly come out, so I had to bend them up. This worked fine and the injection worked well. Figure 2 shows the result. We didn't have enough time to do more than two molds but you can see in figure 3 that the shapes fit nicely together.
I also have a teddy bear that I would like to try to use for molding. More to come on this...