Who cares about outsourcing when you can make chips that program for you? This week's assignment involved milling and stuffing a microcontroller programmer -- which is a device that normally would cost about $40 and allows you to upload your programs onto another board with a microcontroller. The design was provided to us -- which is good since I know nothing about how circuits work (although I've since learned more about how the parts on a circuit manipulate electricity!)
Milling
This assignment had two key parts -- the first one was actually creating the board without any components on it. Apparently industry tends to use a process called "etching" which creates a lot of nasty waste. We, however, are using milling machines -- this means you just put a copper-coated plate down on a machine, and that machine scrapes away copper where you don't want it to be.
As the milling guru for CBA I decided it would be a good idea to attend both group's milling sessions. I'm glad I did, since only CBA learned how to use the Mantis!
The Mantis (shown below) is a $100 milling machine (as opposed to its $2500 counterpart in the shop). The best part about it is that it ends up actually being easier and faster to use!

A few notes:
- End mills are NOT drill bits. (Google "end mill" to see what I mean)
- Just about anything can break your end mill, so be careful. Some examples:
- Having your plate unlevel.
- Letting it "fall" when you are zeroing the z-index.
- Dropping it.
- Trying to mill too quickly.
- Trying to mill too far in.
- Looking at it the wrong way, or saying mean things about it behind its back.
- Remember to check your board for leftover copper that the mill somehow missed. This stuff could cause a "short circuit" by creating an electric connection that isn't supposed to be there. Just scrape it away with a knife.
Stuffing
Unfortunately I didn't have my camera for the soldering session, but it was very crowded and (I thought) incredibly fun. I had never soldered before, so I spend the first 10 minutes being paranoid that I would burn off my hand, but it ended up being both easy and rewarding. Plus, the skin will grow back with a little grafting!
I found for the tiny parts (like the USB and the microprocessor) it becomes a lot easier to if you put solder tiny balls on the bottoms of the feet BEFORE putting the component on the board. That way you can just run your iron across the legs once without having to try to avoid the other areas of the board. Another helpful technique for the microprocessor in particular was coating all the legs in solder, and then wicking away any solder that was creating short circuits. That second one is probably a bad idea, but whatever works, right?
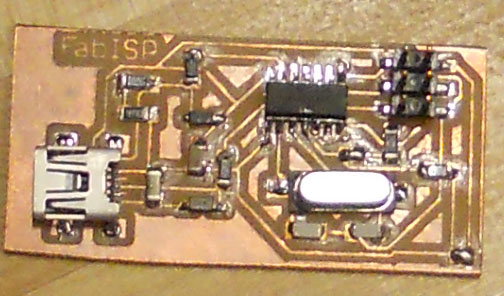
It's not a high resolution image, but you can still see how freakin' clean my USB connections are. Woo! *pats self on back*
You'll also notice that there is a lot of copper on the left, meaning you can't plug in a USB cable... I need to sand that this afternoon.