Week 3: make a FabISP
This week we made our own FabISP, or "fab-able in-system programmer" using directions and files from the class website (here). Following directions is not as easy as it sounds, so a big thank you to Ed Baafi and Brian Mayton for helping me with the fabrication and debug process!
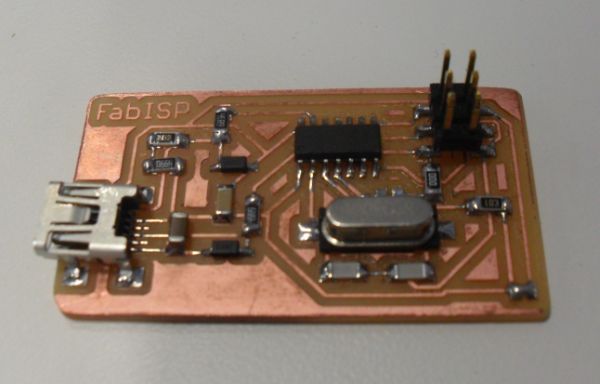
STEP 1: fabricating the board
I used the Modela milling machine and an 1/64" drill bit to mill out the traces. To go from a PNG image of the board to an RML file read by the milling machine, I used scripts from the tutorial page. I had to slow down the drill speed and decrease the depth of cut since using the given settings ended up breaking a drill bit. I then used a 1/16" drill bit to cut out the board from the original copper plate. Alternatively, the boards can be milled on David Carr's Mantis milling machine (which seemed to be quite a bit faster and less prone to break drill bits).
Boards can also be etched (where a mild chemical dissolves away copper from the board, leaving the traces) or cut from copper foil on the vinyl cutter and then stuck to any surface. Looking forward to experimenting with these process later!
STEP 2: stuffing the board
"Stuffing," I learned, just means soldering the electronic stuff onto the board. Since the components were all surface mount (i.e. tiny) this was pretty tricky. A youtube video called Surface Mount Soldering 101 is a great tutorial and has some good tips. For components with smaller legs (the microchip and the USB connector) I put solder directly onto the tip of the iron and then touched the iron to both the leg of the component and the trace, rather than soldering directly with the solder wire. This trick really helped prevent putting down too much solder (and thus shorting two legs).
I used quite a bit of flux to help with the soldering process, though made the mistake of leaving the flux on overnight which caused the copper to tarnish slightly. Flux remover (which comes in a spray bottle) did a good job of cleaning off the flux, though rubbing alcohol works too. Apparently rinsing with water is not enough.
STEP 3: programming the board
The trick to making the board function is to program the firmware onto the ATtiny44 chip, paying close attention to set the fuses on the chip correctly. I didn't set the fuses properly the first time so that even though the chip was programmed, it wasn't being recognizes as a USB device by the computer.
Finally, the completed and working board!
Back to index