Week 4: Molding and Casting
Tired of technology and looking for a little artistic sculpture? Then look no further, because this week's molding and casting unit was definitely one of the more artistic projects we have had so far! We learned this week the basic workflow for producing a mold and then casting parts in it. It was a mind-bending experience because the challenge of converting from positive to negative to positive shapes can be very complex when you also have to think about ventholes, registration marks and seams...But I managed to get a working part, so let me show you what I did!
Basic Workflow
Our molding and casting workflow ran as follows:
- Create a 3-D computer model of the final part you want to make - make two models; one for each side of the mold (if you are doing a 2-sided mold - its possible to do more).
- Convert the CAD file into an STL file and import using fab modules as a Roland Modela path (you can also use the Shopbot and mill foam - generally this is done if you want a bigger part or more molds).
- Mill the mold into a block of wax. You will be milling out the NEGATIVE space, leaving the POSITIVE behind.
- Mix silicone and pour into the wax mold - this will form a NEGATIVE mold with POSITIVE space.
- Fill the silicone mold with HydroStone to make the final POSITIVE piece.
Each step involved its own challenges which I've listed below, along with my solutions. I also have pictures of the process from milling to the final parts I made - the intention was to make a winding staircase of plaster steps - unfortunately I didn't have time to go into mass production, but you can imagine what it could have looked like...
|
|
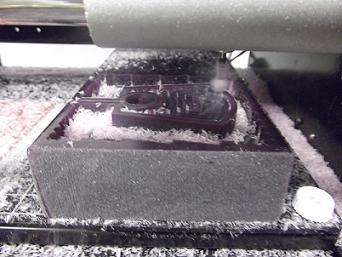
The Roland Modela in the middle of milling out the mold in the wax - notice all the shavings, a lot of vacuuming was needed to prevent the chips from clogging the endmill. |
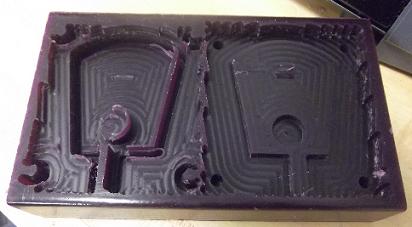
The completed mold after milling is complete. There are still parts that the Modela missed and which I had to remove with an Exacto knife. I did not run a finish pass which is why you can still see the individual traces. |
|
|
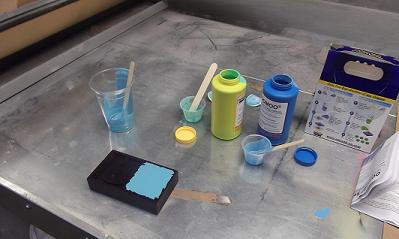
Mixing the silicone together and pouring it into the mold. |
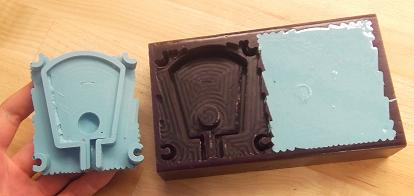
After I have removed the first silicone mold from the wax block. |
|
|
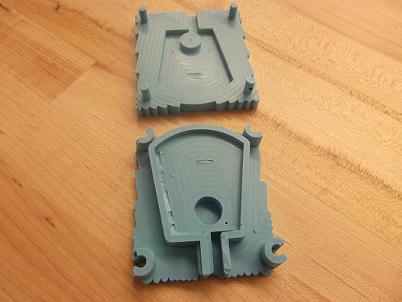
The two molds back to back - see the registration marks and how they will fit into each other once I put the molds together. |
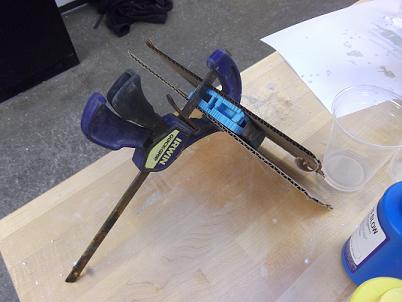
I used duct tape and two pieces of cardboard to hold the mold together when I poured the HydroStone into it. The mold was held at an angle so that the HydroStone could flow in and air could still flow out at the same time. |
|
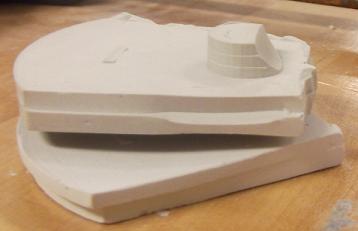
My finished product! The two blocks fit into each other very well (fortunately the plaster is a little giving) and can be twisted at an angle. |
1. Computer Model
The key here was to model just the positive part you wanted to produce; only you had to model each side separately and include registration marks, as well as a vent. Registration marks are used to fit the parts of the mold together - usually they're half-spheres, where one side has the stub and the other has the indentation. On one side I modelled the stubs as coming out of the same level as the part, on the other side I modelled a level of material below the part with holes in them to match the registration marks. (You can see my models here: hole and stub.) I ended up making cylindrical registration marks which didn't work very well - if I did this again, I would use spheres because they are more structurally stable and less prone to getting air bubbles in the silicone mold than the cylinders!
You also needed to include a vent that would allow you to pour the Hydrostone into the mold - I modelled this by adding a rectangle onto the top of both my molds. There were a couple considerations in making this vent:
- Make it AS BIG AS POSSIBLE! It will make your life easier when you need to pour and then you can vent out of the same hole you pour in (you can make separate holes too if you need to).
- Place the vent on an axis of symmetry so that you don't also have to worry about lining up the vents when you make the molds.
- Place the vent at the top of the part! You don't want to vent out of the bottom of the part because then material will just pour out!
- Make sure there are no parts of the mold that will obstruct the path of the Hydrostone as you pour it into the mold - you want to be sure that you can completely fill the mold, which is harder if you have bits sticking up in the path of the HydroStone.
2. Making the STL and Roland Modela Files
Here the first trick I learned was that when I imported my STL file from Solidworks onto the shop computer, it did not recognize the file as an STL because the extension was lower-case. This is easy to solve - just rename the file and change the case of the extension to upper-case and the computer should be able to recognize the file.
When milling the mold, you don't want any of the positive material to be at the same level as the height of the wax block, because you want to form a back on the silicone mold. In other words, everything you cut needs to be below the top of the block by a couple of mm. In order to do this, I ran a rough cut first normally, then I took my .png file (made from the original .stl file) and inverted the colors and told the computer to cut the positive material down by 5mm - this lowered everything below the top of the block so that when I poured the silicone, it would have a back to it.
You should also run a finishing pass in the opposite direction - I didn't in the interests of time, however...
3. Milling the Mold
Vacuum. Vacuum. Vacuum. It will clog the endmill in deep, narrow traces if you don't!
4. Mixing and Pouring Silicone
Just follow the directions on this step, they're pretty self-explanatory. Be sure that you mix thoroughly - 5 to 10 minutes are best. Also, make shear stirring motions so that you incorporate as little air as possible. The worst thing that can happen in this step is that you get a ton of air bubbles in the silicone; stir slowly and try not to mix in any air! When you pour the silicone into the mold, be sure that you pour slowly in a thin stream onto the mold, and let it spread out by itself.
Also, keep the leftover silicone in the cup so that you can use it as a check to see when the silicone has cured (its also fun to play with!). And be sure to clean off the bottles when you finish with them, but wipe each bottle with a different paper towel - you don't want to mix A with B and cure silicone around the cap so that you can never open it again!
5. Casting the HydroStone
The best trick I discovered in this step was that if you use warm water instead of cool water, the HydroStone is much less viscous and sets much better! Seriously, let the water run hot before using any - you'll be glad you waited, because otherwise not all the HydroStone will dissolve (its 22 parts water to 100 parts water, so you need all the help you can get in dissolving the powder!).
Also, be sure to tare the scale AFTER you've placed the empty cup on the scale - when you're measuring 22g of water, a 10g plastic cup can make a HUGE difference! Once you've sprinkled all the powder into the water, let it dissolve for 1 - 2 minutes before starting to stir. Stir for a good 5 minutes before pouring, and use cardboard when clamping the mold - it spreads the force out over the entire mold. When you pour, bend the cup so that you have a good spout to pour the HyrdoStone out of, and pour slowly - again, you don't want any air bubbles! Tilt the mold so that its sitting at an angle. Cure time is 45 minutes to 1 hour.