![]()
![]()
- 1. project description
- 2. details
1.1. Concept:
This week I made something big with a big history. In 2007 my parents, sister and I were visiting Paris. In an early Sunday morning walk in Saint Germain, passing outside a furniture store my father saw the Chair, standing there, behind the closed store glass facade. This Chair became a family object of unfulfilled desire, a recurrent theme in every discussion who would as much as mention the word "furniture". All we had were pictures and a quick sketch with rough dimensions. We had always discussed about making it; this time I finally did!
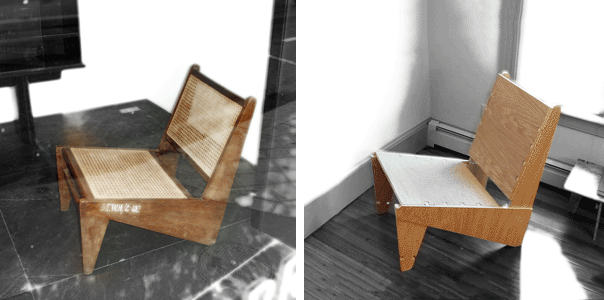
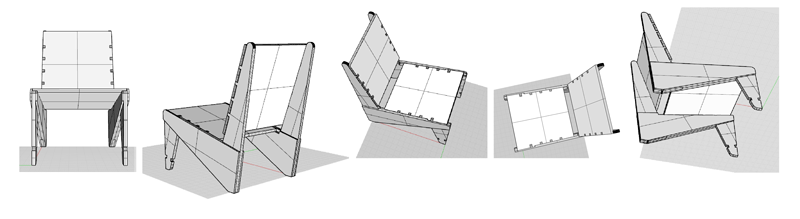
Figure 1: the Chair - Saint Germain, Paris, 2007 and my Chair - Cambridge, MA, 2011
1.2. Modeling:
The first part of the project was to use the photograph and the sketch to recreate the design. I had to do multiple iterations in the Rhino OSX 3D model in order to be able to design the chair legs with angles and dimensions that made it both comfortable for sitting and preserved the geometric characteristics of the initial Chair. In redesigning it I had the opportunity to introduce the following modifications of the initial design: First, I made the bottom and the back solid surfaces which press-fit into the legs without having to be glued. Second, I introduced a pocket joint in the legs, where the horizontal element consists of two pieces, in which the vertical elements are pocketed. These modifications are described in more detail in the "Pieces and Assembly" section.
Figure 2: Chair views. The model was made in Rhino OSX
1.3. Pieces:
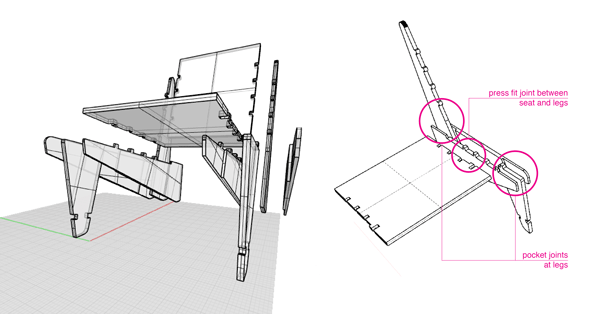
The chair consists of a total of 11 pieces (I ended up not using the lower horizontal element between the legs). In each leg, the vertical pieces are "sadwiched" between two horizontal pieces. The horizontal pieces have half-width pockets in the areas where they are in contact with the vertical elements so that there is no gap between them. The seat and the back are flat surfaces which press-fit on the legs.
Figure 3: The parts and their connections
1.4. Cutting:
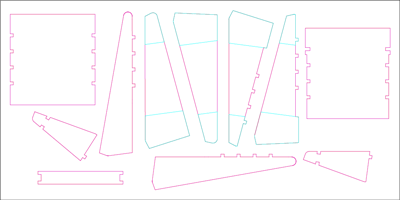
I used a 4*8 ft, 3/4" thick plywood sheet for the chair. Below is the layout of the pieces on the sheet.
Figure 4: the chair pieces on a 4*8 ft sheet of 3/4" plywood; the cyan denotes pocket profiles and the magenta cut profiles
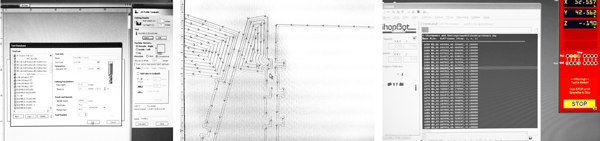
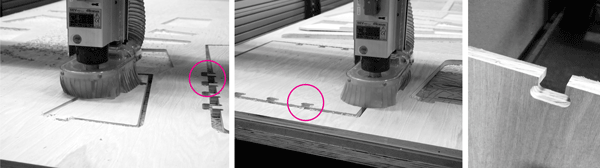
The pieces were cut in the PRSalpha 120-60 ShopBot at the CBA shop. In order to generate the file I used Partworks. I used a 1/2" bit for my first cut, set at 10000rpm (spindle speed), 160 feed rate and 60 plunge rate. For the pocket cut I used a cut depth of half of the thickness of the material (0.742") plus a small tolerance (0.375") to make sure that the pieces would fit together well at the pocket joint. I also accounted for 1/100" tolerance in all of the press-fit joints to facilitate the assembly.
Figure 5: Snapshots from Partworks and ShopBot
In retrospect I would have chosen a smaller bit because although the 1/2" endmill had little risk of breaking, it mandated a large T-Bone radius (1/4") which is very discernible in the chair.
Figure 6: the ShopBot in action; the 1/2" Endmill caused the T-Bones to be large; I would recommend using a smaller endmill
1.5. Troubleshooting:
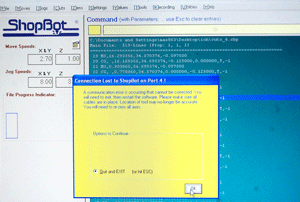
1. ShopBot lost connection while cutting
Apparently this can happen because of static electricity. It can be quite a disaster because the x,y,z axes need to be re-zeroed so that when the machine starts again it cuts at exactly the same paths. Especially when you have already made pocket cuts and then you need to do profile cuts around them, as I did in my case, this can be very problematic.
Figure 7: Communication Error Message; "Connection Lost to ShopBot on Port 4!"What to do:
There is good chance that if you are lucky the ShopBot will keep the x,y,z coordinates but you definitely need to test. In my case the ShopBot had kept the y but not the x and I had to try multiple times to rezero the machine.
When the message comes out take a picture of the screen or write down the current x,y,z coordinates Restart the ShopBot and move the spindle to 0,0,0 (without cutting of course!) Then move the spindle to the coordinates you have written down. If the spindle moves to back to the exact spot where the error occured then it has preserved the initial zeros and you can reload the file and restart cutting. If not, then through the numerical controls of the spindle position you can try guess-moving it in the x or y and test it as described above, until you manage to closely approximate the initial zero. It is tedious but better than throwing away the entire sheet!2. My bad (as usual)
When I was assembling the chair I realized that I had miscalculated the width of the seat in relation to the width of the back. A big lesson to be learned is to always test the assembly in a 3d model to confirm that the pieces are correct, even though when you think they are correct.
Having run out of material I decided to try to recut on the same pieces making them narrower. However, when I returned to the CBA shop to do this things did not go as planned. After having taken extra care to zero the machine at precisely the edge of my piece I started cutting. The ShopBot cut air at the x axis (as planned) but when it came in contact with the material the spindle started shaking, making a very high pitched noise, to the point where I had to stop it because it was ruining the material. Apparently the problem was caused by high vibrations in the spindle when someone attempted to cut a piece of aluminum with the wrong settings. Thanks to John DiFrancesco's efforts (on Columbus Day too!) the ShopBot was soon back in order. I ended up cutting the back and the seat of the chair in scrap plywood pieces so as to avoid having to make the chair even narrower.
Figure 8: ShopBot out of order; you can see the gap between the spindle part and the ShopBot plate - This caused the endmill to vibrate resulting in very large errors in cutting (see last image) - The source of the problem seems to have been an attempt for aluminum cut with wrong settings
1.6 Assembly:
Once I had all the pieces I assembled the chair with the great help of Josh. We used wood glue to "sandwich" the legs of the chair (see video). We hammered the back and the seat surfaces on the legs of the chair. The fit is tight and the chair is very stable although the two surfaces are not glued to the legs.
Figure 10: Video of the assembly process
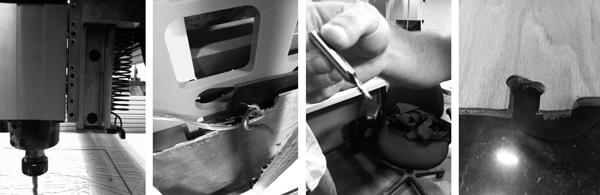
1.7 Details:
Figure 9: Chair details
1.8 the Chair:
Figure 11: the Chair in the Building 7 studio woodshop; carried out of the woodshop by Josh; in the SMArchS room (3-309); in front of MIT; in front of my apartment; in my backyard; in my living room
1.9 Important lessons learned:
[1] Make sure that you test the assembly of your pieces prior to cutting them even when you are confident you have drawn them correctly. Parametric software such as Autodesk Inventor, Solidworks or Catiais very good for testing assemblies, while it also allows you to automatically update the parts of your model according to the thickness of your material.
[2] Choose intermediate diameter endmills (for example 1/4"). Although large diameter endmills have lower risk of breaking they require large T-bone fillets which are noticeable in the final object. For 3/4" plywood, I would recommend a 1/4" endmill instead of a 1/2"
[3] Measure the exact thickness of the material before you make the notch (if you plan on having notches). Make the pass depth a little deeper than that. For example my material was 0.742" and I made the pass depth 0.77".
[4] Account for tolerances or chamfer the notch edges if you are planning on press-fitting pieces together. This will considerably facilitate the assembly.
[5] Double check that you have oriented your file correctly in Partworks in relation to the ShopBot bed. The x and y axes are opposite than the screen and it is very easy to make a mistake and have the ShopBot cut in the wrong direction. Also, always uncheck "set origin offset".
[6] Save you file in Partworks. There is a good chance you might have to remake the paths if something goes wrong and having the .crv file will save you the time from having to place again the parts in the bed, remake fillets etc.
[7] Keep your hand close to the spacebar. Hiting the spacebar pauses the cutting process and prompts you if you want to quit or resume. The spacebar is preferrable to the red button because it allows you to resume the process from where you stopped it and does not require rezeroing or starting everything from scratch.
[8] Make sure that you have fastened your material well to the bed and that it is as level as possible. Differences in Z can cause problems when cutting.
Figure 12: Excited that this is allowed; make sure the machine is off though!
tool description: 3 axis router/spindle
model:PRSalpha 120-60
manufacturer: Shopbot
specifications: 120" x 60" x 6" 3.05m x 1.52m x . 20m Step resolution of .0004". Positional accuracy of +/- .002"Pocket profile:
Endmill: 1/2"
Pass Depth: 0.28"
Stepover: 0.4" (80%) - for the pockets
Spindle speed: 10000 r.p.m
Feed rate: 160 inches/min
Plunge rate: 60 inches/minOn Wednesday morning John and Tom gave us a tutorial on how to use the laser cutter. Here is a transcript of the notes that I kept along with some tips from personal experience.
3.1. Safety first:
It is quite usual to see a small flame when the laser is cutting the material. If a small flame worries you then you can open the lid and cover the flame with a piece of acrylic. If the flame is big or the material catches on fire then you open the lid, close the air valve and call 100.3.2. How to put the material on the laser bed:
The origin point is the top left corner. Make sure your material is the right size; in the Universal Laser Cutter at the CBA shop the bed is 32*18". You might need to use some tape to attach the material to the edges of the bed if it is not completely flat (this is for example very usual with cardboard)3.3. How to adjust the height of the laser bed:
Use the marked metal rod to measure the height between the cutting tool and the material you have placed on the laser cutter board. Press Z and use the Up and Down arrows to bring the cutting material to the edge of the metal rod. You will know that the height is right when the pin does not let the board to go any further up.
The check button moves to smaller digit precision for height refinements with the up and down arrows. Once you have found the right height press Z again to exit.3.4. How to send your files:
3.4.1. If you are using Inkscape:
1. Prepare your file and export it in 300dpi. Keep in mind that the white part is the one cut with precision so your offsets are "eating" off the black part.
2. Go to fab > run in terminal
3. Select the Universal laser cutter and define power and speed. Make sure that you set the pulses per inch (ppi) to be less than 500 if you are cutting cardboard. If you are cutting acrylic you can do almost 300.
4. Specify xmin and ymin. This is how far from the top left corner (origin) the machine will start cutting the file.
Hit make .uni
6. Send!3.4.2. If you are using CorelDraw (Windows):
1. Import your file
2. Make sure all your lines are Hairline (No thickness)
3. Optional step: You might want to offset your lines for precision. Go to Effects>Contour and do an Outside offset of 0.005 (or around that) Then do Arrange and break contour group apart.
4. Go to File>Print>Properties and set Power and Speed per color
Press Set to register your changes
6. Print!3.4.3. If you are using Rhino or AutoCAD (Windows) you can set the speed and power per layer through the print menu. Make sure you SKIP all the layers you do not want to cut and that you select the area you want to cut with a print window and that all your lines are 0 thickness or hairlines. In Rhino you can set the size of the print window and then Move it in the correct spot in the screen. You send your file by hitting print.
3.5 How to cut your files:
Find the right file! If you send multiple files you can navigate through them with the >> and << buttons.
2. Do a test run. It is recommended that you do a test run to confirm that the path is right. Just press the green button <|> while the lid is open.
3. Cut! If all looks fine close the lid and press <|> to cut.