Programming
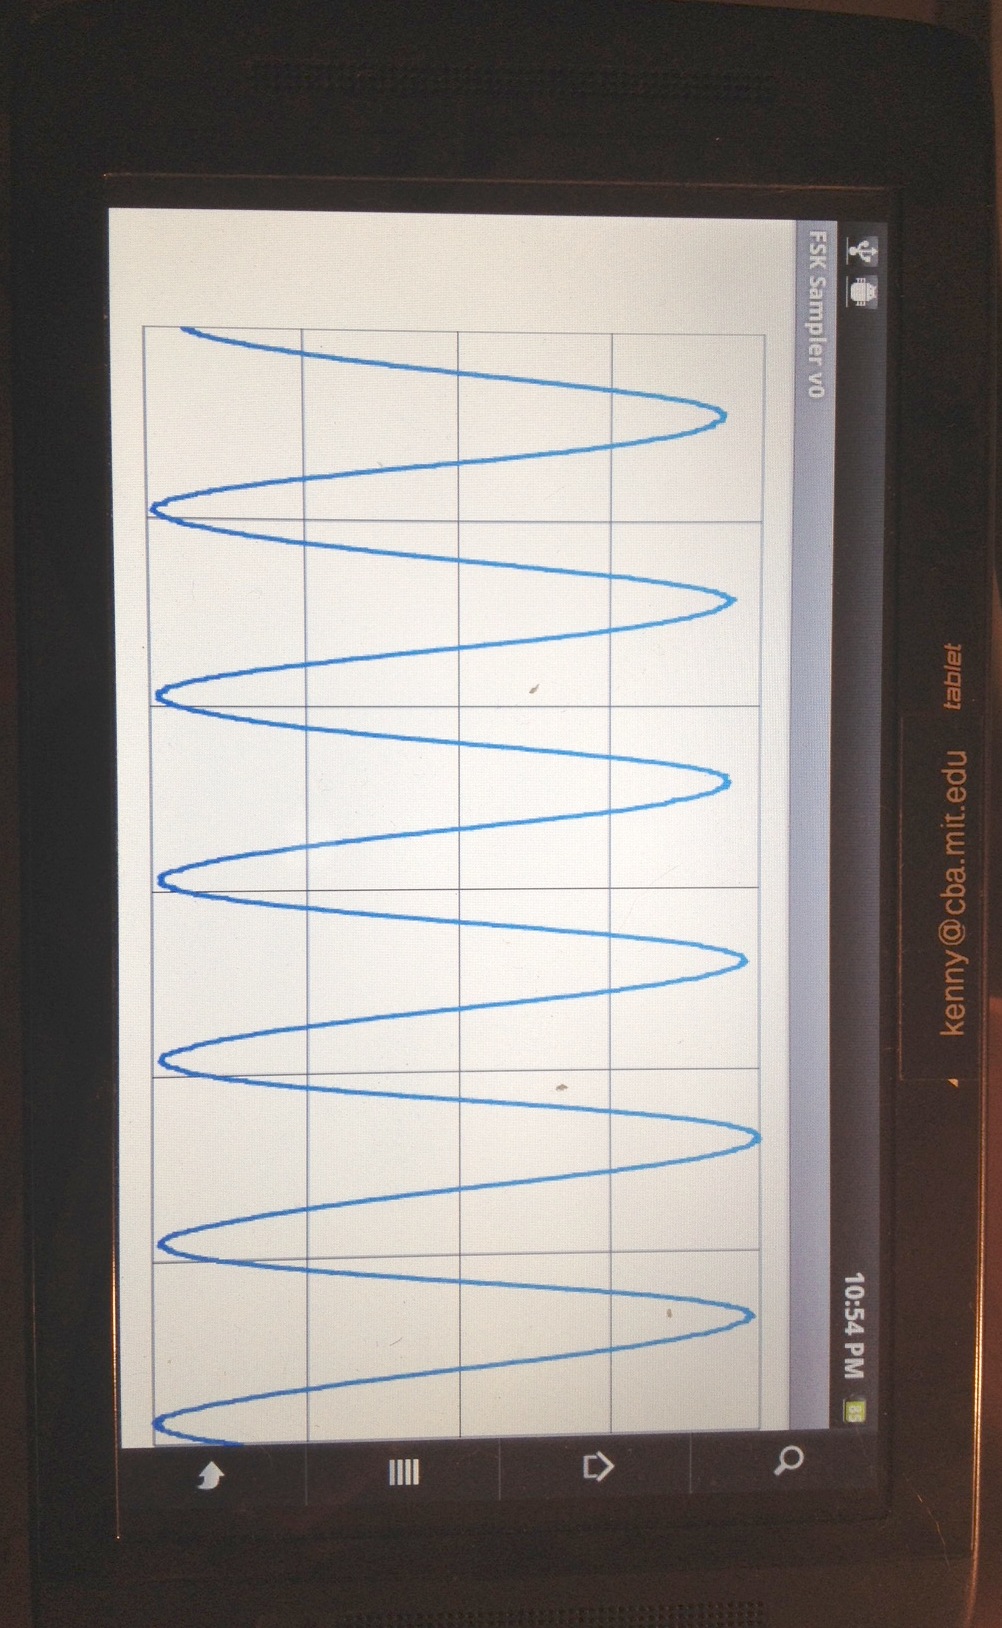
This week I programmed an Android phone (by stitching together code / libraries found online) to record and play back audio, and display part of the audio waveform as a graph. This is another step towards the smartphone-powered EEG/ECG idea that I am pursuing for my final project. Next week I will implement FSK demodulation through the Android's microphone port as a way to receive digitized data from the Tiny44 sampler board sampling the analog EEG/ECG signal.
"Singing" a sound to the phone: (double-click on the image to play)
Playing a pure 2000 Hz tone from the computer to the phone: (double-click on the image to play)
In case that leaves any doubt, here's a 500 Hz tone: (double-click on the image to play)
Source code (as an Eclipse project folder): .zip
The design is based on several useful sources online:
Hello world for Android: http://developer.android.com/training/basics/firstapp/index.html
Androino terminal app source code: http://code.google.com/p/androino/ (this will be more useful later for FSK demodulation)
Guide to audio recording: http://eurodev.blogspot.com/2009/09/raw-audio-manipulation-in-android.html
Another nice guide: http://andrewbrobinson.com/2011/11/27/capturing-raw-audio-data-in-android/ and this guy (Andrew Robinson from U Michigan) works on the HiJack project which is my inspiration for the smart-phone powered sensor idea
I used GraphView (with some modification) to plot graphs in Android: http://stackoverflow.com/questions/2271248/how-to-draw-charts-in-android
Another pure tone (this time successfully "sung"):
Hello World app:
Complete notes:
Hello world for Android: http://developer.android.com/training/basics/firstapp/index.html
One simple option: Arabela Audio Recorder
Getting Androino terminal app source code: http://code.google.com/p/androino/
cd desktop
svn checkout http://androino.googlecode.com/svn/trunk/ androino-read-only
on the arduino side they are using the same SoftModem library as I am
they also check a parity checksum, and doing this seems to reduce their input int size from 256 down to 16 = 2^4 = 4 bits
void sendMessage(int number, boolean persistent){
// encodes and sends the message to the modem
// number must [0,16]
int msg = encodeMessage(number);
modem.write(msg);
if (persistent) {
lastMessageSent = number;
lastMessageTime = millis();
lastMessageAckReceived = false;
}
}
int encodeMessage(int number){
// adds the checksum
// Example: 3 (000.00011) => (101.00011)
int cSum = checkSum(number);
int msg = number + cSum;
Serial.print(" encodeMessage:number="); Serial.print(number, DEC); Serial.print(":"); Serial.println(number, BIN);
Serial.print(" encodeMessage:chk="); Serial.print(cSum, DEC); Serial.print(":"); Serial.println(cSum, BIN);
Serial.print(" encodeMessage:message="); Serial.print(msg, DEC); Serial.print(":"); Serial.println(msg, BIN);
return msg;
}
int checkSum(int number){
// calculates the checkSum for error correction
// simple implementation even => 010, odd =>001
int sign = 1;
for (int i=0; i < 5; i++){
int b = bitRead(number, i);
if (b==1){
sign = sign * (-1);
}
}
if (sign>0)
return PARITY_EVEN;
else
return PARITY_ODD;
}
on the android side there is a program MainActivity.java which runs the main app, as well as supporting functions like those in FSKDecoder.java
Downloaded Android SDK and Eclipse Java IDE and ADT 21.0.0. plugin for Eclipse. After messing around with this I just downloaded it as an SDK bundle:
http://developer.android.com/sdk/index.html#download
and using these instructions
http://developer.android.com/sdk/installing/bundle.html
That's awesome because this is basically all we need, since the IDT settings inside the bundle are pre-set.
Then moved on to: http://developer.android.com/training/basics/firstapp/index.html
This makes the hello world app by default.
Settings > Applications > Development on the phone and enable USB debugging
To load it onto the phone
Adam-Marblestones-MacBook-Pro:desktop adammarblestone$ cd FSKSamplerV0/
Adam-Marblestones-MacBook-Pro:FSKSamplerV0 adammarblestone$ ant debug
Buildfile: build.xml does not exist!
Build failed
So I'm trying it via the "run" button in Eclipse. This crashed my computer and forced me to re-start. It said something about not finding a compatible connected device.
So I tried this: http://stackoverflow.com/questions/7135999/adb-not-finding-my-device-phone-macos-x
Adam-Marblestones-MacBook-Pro:~ adammarblestone$ /Applications/adt-bundle-mac/sdk/platform-tools/adb devices
List of devices attached
gave me no devices attached.
Restarted dab using
Adam-Marblestones-MacBook-Pro:~ adammarblestone$ /Applications/adt-bundle-mac/sdk/platform-tools/adb kill-server
Adam-Marblestones-MacBook-Pro:~ adammarblestone$ /Applications/adt-bundle-mac/sdk/platform-tools/adb devices
* daemon not running. starting it now on port 5037 *
* daemon started successfully *
List of devices attached
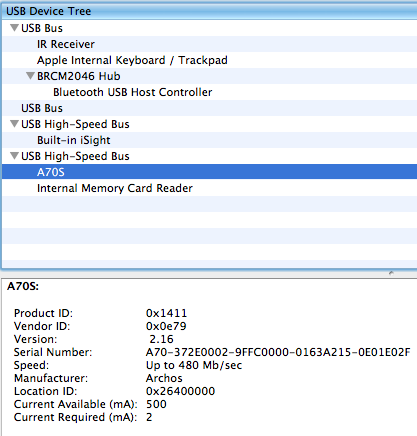
but didn't give me any devices attached. But I do see the A70S in the USB device manager. Now seeing the vendor ID, 0x0e79, typed:
Adam-Marblestones-MacBook-Pro:~ adammarblestone$ echo 0x0e79 >> ~/.android/adb_usb.ini
Adam-Marblestones-MacBook-Pro:~ adammarblestone$ /Applications/adt-bundle-mac/sdk/platform-tools/adb kill-server
Adam-Marblestones-MacBook-Pro:~ adammarblestone$ /Applications/adt-bundle-mac/sdk/platform-tools/adb devices
List of devices attached
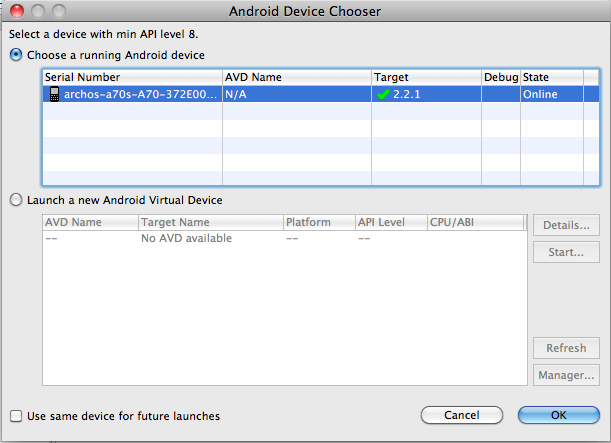
A70-372E0002-9FFC0000-0163A215-0E01E02F device
So now we've got our device!
Now I could actually run the "hello world" on the android via clicking the Run button in Eclipse.
Next running the AndroinoTerm app, by copying the AndroinoTerm source folder to my desktop and using the desktop as the Eclipse workspace.
New Java Project in Eclipse, give it its name, which is the same as the existing folder, and it finds the existing folder!
Got some errors when trying to run this, so have to fix these. These ones are already big problems:
Multiple markers at this line
- The type java.lang.String cannot be resolved. It is indirectly referenced from required .class
files
- The type java.lang.Object cannot be resolved. It is indirectly referenced from required .class
files
- The type java.lang.Object cannot be resolved. It is indirectly referenced from required .class
files
The import android cannot be resolved
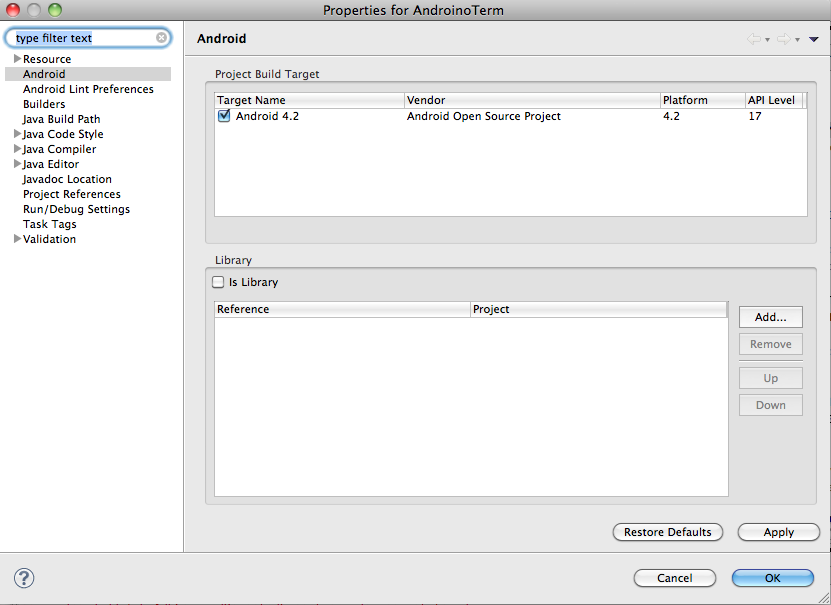
So I went to Project > Properties and set a build target as Android 4.2
And it ran (once I made sure that the Android was showing up again in the USB device manager)
Alas, hooking up the FSKFabSampler, the android app does not receive any signals passing the checksum.
Now trying to edit the code to just display the raw audio signal coming in.
First turned off the Error handlers by commenting out some lines in FSKDecoder.java as in the below. Then I get nothing printed to the screen in Android.
private void decodeFSK(byte[] audioData) {
double[] sound = byte2double(audioData);
Log.d(TAG, "decodeFSK: bytes length=" + audioData.length);
Log.i(TAG, "decodeFSK: doubles length=" + sound.length);
try {
int message = FSKModule.decodeSound(sound);
Log.w(TAG, "decodeFSK():message=" + message + ":" + Integer.toBinaryString(message));
//validate message integrity
message = ErrorDetection.decodeMessage(message);
Log.w(TAG, "decodeFSK():message number=" + message + ":" + Integer.toBinaryString(message));
//this.mClientHandler.obtainMessage(ArduinoService.HANDLER_MESSAGE_FROM_ARDUINO, message, 0).sendToTarget();
}
catch (AndroinoException ae){
Log.e(TAG, "decodeFSK():Androino ERROR="+ ae.getMessage());
//this.mClientHandler.obtainMessage(ArduinoService.HANDLER_MESSAGE_FROM_ARDUINO, ae.getType(), 0).sendToTarget();
}
catch (Exception e) {
Log.e(TAG, "decodeFSK():ERROR="+ e.getMessage(), e);
//this.mClientHandler.obtainMessage(ArduinoService.HANDLER_MESSAGE_FROM_ARDUINO, -2, 0).sendToTarget();
}
}
After playing around I can manipulate what it displays in the android terminal.
But I want to go back and get the raw audio.
Tracing back in the code to where this is happens:
private void decodeFSK(byte[] audioData) {
double[] sound = byte2double(audioData);
Log.d(TAG, "decodeFSK: bytes length=" + audioData.length);
Log.i(TAG, "decodeFSK: doubles length=" + sound.length);
try {
int message = FSKModule.decodeSound(sound);
Log.w(TAG, "decodeFSK():message=" + message + ":" + Integer.toBinaryString(message));
//validate message integrity
//message = ErrorDetection.decodeMessage(message);
Log.w(TAG, "decodeFSK():message number=" + message + ":" + Integer.toBinaryString(message));
this.mClientHandler.obtainMessage(ArduinoService.HANDLER_MESSAGE_FROM_ARDUINO, message, 0).sendToTarget();
}
catch (AndroinoException ae){
Log.e(TAG, "decodeFSK():Androino ERROR="+ ae.getMessage());
//this.mClientHandler.obtainMessage(ArduinoService.HANDLER_MESSAGE_FROM_ARDUINO, ae.getType(), 0).sendToTarget();
}
catch (Exception e) {
Log.e(TAG, "decodeFSK():ERROR="+ e.getMessage(), e);
//this.mClientHandler.obtainMessage(ArduinoService.HANDLER_MESSAGE_FROM_ARDUINO, -2, 0).sendToTarget();
}
}
aha, here in ArduinoService
private void audioRecordingRun(){
int AUDIO_BUFFER_SIZE = ACQ_AUDIO_BUFFER_SIZE; //44000;//200000;// 16000;
int minBufferSize = AudioTrack.getMinBufferSize(AUDIO_SAMPLE_FREQ, 2, AudioFormat.ENCODING_PCM_16BIT);
if (AUDIO_BUFFER_SIZE < minBufferSize) AUDIO_BUFFER_SIZE = minBufferSize;
Log.i(TAG, "buffer size:" + AUDIO_BUFFER_SIZE);
byte[] audioData = new byte[AUDIO_BUFFER_SIZE];
AudioRecord aR = new AudioRecord(MediaRecorder.AudioSource.MIC,
AUDIO_SAMPLE_FREQ, 2, AudioFormat.ENCODING_PCM_16BIT,
AUDIO_BUFFER_SIZE);
// audio recording
aR.startRecording();
int nBytes = 0;
int index = 0;
this.forceStop = false;
// continuous loop
while (true) {
nBytes = aR.read(audioData, index, AUDIO_BUFFER_SIZE);
Log.d(TAG, "audio acq: length=" + nBytes);
// Log.v(TAG, "nBytes=" + nBytes);
if (nBytes < 0) {
Log.e(TAG, "audioRecordingRun() read error=" + nBytes);
this.mClientHandler.obtainMessage(ArduinoService.HANDLER_MESSAGE_FROM_ARDUINO, RECORDING_ERROR, 0).sendToTarget();
}
this.mDecoder.addSound(audioData, nBytes);
if (this.forceStop) {
this.mDecoder.stopAndClean();
break;
}
}
aR.stop();
aR.release();
Log.i(TAG, "STOP audio recording stoped");
}
particularly here is where they've got some audio data as a byte[] and are sending it to the decoder
this.mDecoder.addSound(audioData, nBytes);
so in Android they're using the AudioRecord class. And here is some more info on how to use that in a simpler context:
http://eurodev.blogspot.com/2009/09/raw-audio-manipulation-in-android.html
Want to convert that to the following to see the raw audio coming in:
this.mDecoder.addSound(audioData, nBytes);
String file_string = "";
for(int i = 0; i < audioData.length; i++)
{
file_string += (char)audioData[i];
}
Log.d(TAG,file_string); // sends the acquired bytes to the computer via the debug stream for Eclipse
That takes a long time, since we have nBytes = 16000, so it stalls the program. But if I use i < audioData.length/100 then we do the byte strings printed out to the debug window. Of course we can improve this situation by changing
public static int ACQ_AUDIO_BUFFER_SIZE = 16000;
to be something smaller.
Next step is to just add a variant of the above Eurodev code for raw audio acquisition to the basic hello world android program.
Putting this into the hello world program with various modifications to prevent errors and import the right classes.
Learned to send debug messages using things like this:
Log.d("MainActivity", "Got here!");
Another nice guide: http://andrewbrobinson.com/2011/11/27/capturing-raw-audio-data-in-android/ and this guy (Andrew Robinson from U Michigan) works on HiJack
The below code in MainActivity.java is apparently able to record sound and play it back: although have not yet had a microphone with which to test it
we also put this line into AndroidManifest.xml
-------------------
package org.adammarblestone.fsksamplerv0;
import android.os.Bundle;
import android.app.Activity;
import android.view.Menu;
import android.media.*;
import java.io.*;
import android.os.Environment;
import android.util.Log;
import android.content.Context;
public class MainActivity extends Activity {
public boolean isRecording;
public String filename = "localAudioStorage";
@Override
protected void onCreate(Bundle savedInstanceState) {
super.onCreate(savedInstanceState);
setContentView(R.layout.activity_main);
// From http://eurodev.blogspot.com/2009/09/raw-audio-manipulation-in-android.html
Thread thread = new Thread(new Runnable() {
public void run() {
record();
}
});
isRecording = true; // added this
thread.start();
try {
// wait(10000);
// got an error here: object not locked by thread before wait()
// so switched to using synchronization
synchronized(this){
this.wait(10000);
}
} catch (InterruptedException e) {}
isRecording = false;
try {
thread.join();
} catch (InterruptedException e) {}
play();
finish();
}
@Override
public boolean onCreateOptionsMenu(Menu menu) {
// Inflate the menu; this adds items to the action bar if it is present.
getMenuInflater().inflate(R.menu.activity_main, menu);
return true;
}
// From http://eurodev.blogspot.com/2009/09/raw-audio-manipulation-in-android.html
public void record() {
int frequency = 16000; // changed this to avoid a -2 output from AudioRecord.getMinBufferSize
int channelConfiguration = AudioFormat.CHANNEL_IN_MONO;
int audioEncoding = AudioFormat.ENCODING_PCM_16BIT;
// Got rid of the use of the SD card for storage and instead using local file storage
Log.d("MainActivity", "Got to 1");
String filePath = this.getFilesDir().getPath().toString() + filename;
File file = new File(filePath);
Log.d("MainActivity", "Got to 2");
// Delete any previous recording.
if (file.exists())
file.delete();
try{
file.createNewFile();
} catch(IOException e){
Log.d("MainActivity", "Error creating file.");
e.printStackTrace();
}
Log.d("MainActivity", "Got to 3");
try {
// Create a DataOuputStream to write the audio data into the saved file.
OutputStream os = new FileOutputStream(file);
Log.d("MainActivity", "Got to 4");
BufferedOutputStream bos = new BufferedOutputStream(os);
DataOutputStream dos = new DataOutputStream(bos);
Log.d("MainActivity", "Got to 5");
// Create a new AudioRecord object to record the audio.
int bufferSize = AudioRecord.getMinBufferSize(frequency, channelConfiguration, audioEncoding);
Log.d("MainActivity", "Audio buffer size = " + bufferSize);
AudioRecord audioRecord = new AudioRecord(MediaRecorder.AudioSource.MIC,
frequency, channelConfiguration,
audioEncoding, bufferSize);
Log.d("MainActivity", "Got to 6");
short[] buffer = new short[bufferSize];
audioRecord.startRecording();
while (isRecording) {
int bufferReadResult = audioRecord.read(buffer, 0, bufferSize);
for (int i = 0; i < bufferReadResult; i++)
dos.writeShort(buffer[i]);
}
audioRecord.stop();
dos.close();
} catch (Throwable t) {
Log.e("AudioRecord","Recording Failed");
t.printStackTrace();
}
}
// From http://eurodev.blogspot.com/2009/09/raw-audio-manipulation-in-android.html
public void play() {
// Get the file we want to playback.
// Changed this to local storage from SD card storage.
String filePath = this.getFilesDir().getPath().toString() + filename;
File file = new File(filePath);
// Get the length of the audio stored in the file (16 bit so 2 bytes per short)
// and create a short array to store the recorded audio.
int musicLength = (int)(file.length()/2);
Log.d("MainActivity", "music length " + musicLength);
short[] music = new short[musicLength];
try {
// Create a DataInputStream to read the audio data back from the saved file.
InputStream is = new FileInputStream(file);
BufferedInputStream bis = new BufferedInputStream(is);
DataInputStream dis = new DataInputStream(bis);
// Read the file into the music array.
int i = 0;
while (dis.available() > 0) {
music[musicLength-1-i] = dis.readShort();
i++;
}
// Close the input streams.
dis.close();
Log.d("MainActivity", "Got to 7");
// Create a new AudioTrack object using the same parameters as the AudioRecord
// object used to create the file.
AudioTrack audioTrack = new AudioTrack(AudioManager.STREAM_MUSIC,
16000, // changed this
AudioFormat.CHANNEL_OUT_MONO, // changed this
AudioFormat.ENCODING_PCM_16BIT,
musicLength,
AudioTrack.MODE_STREAM);
Log.d("MainActivity", "Got to 8");
// Start playback
audioTrack.play();
Log.d("MainActivity", "Got to 9");
// Write the music buffer to the AudioTrack object
audioTrack.write(music, 0, musicLength);
} catch (Throwable t) {
Log.e("AudioTrack","Playback Failed");
t.printStackTrace();
}
}
}
-------------------
I think I can use GraphView to plot graphs in Android:
http://stackoverflow.com/questions/2271248/how-to-draw-charts-in-android
Adam-Marblestones-MacBook-Pro:~ adammarblestone$ cd desktop
Adam-Marblestones-MacBook-Pro:desktop adammarblestone$ git clone git://github.com/jjoe64/GraphView.git
Cloning into 'GraphView'...
remote: Counting objects: 376, done.
remote: Compressing objects: 100% (159/159), done.
remote: Total 376 (delta 139), reused 335 (delta 103)
Receiving objects: 100% (376/376), 180.38 KiB, done.
Resolving deltas: 100% (139/139), done.
Adding the com/.. source tree for this library to src and bringing in code from SimpleGraph.java in GraphViewDemos
Running into a problem where it can't find java.utils.Arrays.CopyOf() which is a known issue due to changes between java API versions…
so tried changing it to use System.arraycopy():
@TargetApi(9)
public void appendData(GraphViewData value, boolean scrollToEnd) {
GraphViewData[] newValues = new GraphViewData[values.length + 1];
System.arraycopy(values, 0, newValues, 0, values.length);
newValues[values.length] = value;
values = newValues;
for (GraphView g : graphViews) {
if (scrollToEnd) {
g.scrollToEnd();
}
}
}
Now using this code in MainActivity.java
// From SimpleGraph.java
// init example series data
GraphViewSeries data = new GraphViewSeries(new GraphViewData[] {
new GraphViewData(1, 2.0d)
, new GraphViewData(2, 1.5d)
, new GraphViewData(2.5, 3.0d) // another frequency
, new GraphViewData(3, 2.5d)
, new GraphViewData(4, 1.0d)
, new GraphViewData(5, 3.0d)
});
// graph with dynamically generated horizontal and vertical labels
GraphView graphView = new LineGraphView(this, "Audio input");
graphView.addSeries(data); // data
LinearLayout layout = (LinearLayout) findViewById(R.id.mainlayout);
Log.d("MainActivity", "Layout: " + layout.toString());
layout.addView(graphView);
// End the part from SimpleGraph.java
and putting this in res/layout/activity_main.xml
android:layout_width="match_parent"
android:layout_height="match_parent"
tools:context=".MainActivity" >
android:layout_height="wrap_content"
android:layout_centerHorizontal="true"
android:layout_centerVertical="true"
android:text="@string/hello_world" />
android:layout_width="fill_parent"
android:layout_height="fill_parent"
android:id="@+id/mainlayout">
was able to see the graph plotted!
--------------------
Next thing we need to do is convert the Tiny44 code to write one character at a time like (based on the SoftModem terminal code):
char c = blah blah
modem.write (c); / / iPhone send
we can do this by converting the 16-bit ADC samples into two bytes representing the 8 most-signifcant and 8 least-significant bits
--------------------
allowed SoftModem frequencies
Baud rate 126bps 315bps 630bps 1225bps
Low-frequency 882Hz 1575Hz 3150Hz 4900Hz
High Frequency 1764Hz 3150Hz 6300Hz 7350Hz
--------------------
To implement FSK demodulation, we can follow a strategy based on edge detection (edge in a square wave vs plateau in a square wave) and counting, similar to that in AudioSignalAnalyzer.m in the SoftModemTerminal app.
We can do this once we've recorded some audio to a file: instead of doing playback on the data in the file, we do demodulation and then display the demodulated signal.
Having demodulated, we can recognize serial communication, like this
"On top of the FSK-modulated signal, Tin Can uses a standard serial protocol, with a start bit, a series of data bits and finally a stop bit. One LOW bit indicates the start of a byte, then follow eight bits of data, an optional parity bit and then a HIGH bit to indicate the end of the byte. It uses a HIGH carrier signal in between bytes to indicate that no transmission is taking place." http://labs.perceptdev.com/
--------------------
That said, the simplest way to demodulate is just to take the FFT of a window.
--------------------
Easiest is to take from the existing Android code for AndroinoTerm, particularly FSKModule.decodeSound(sound)
If I use versions of this code I'll include the Apache license and the original copyright notice for the Androino authors
If I use those routines on the Android side, I'll also want to write on the Arduino side using stripped down versions of sendMessage instead of just modem.write(c)
void sendMessage(int number, boolean persistent){
// encodes and sends the message to the modem
// number must [0,16]
int msg = encodeMessage(number);
modem.write(msg);
if (persistent) {
lastMessageSent = number;
lastMessageTime = millis();
lastMessageAckReceived = false;
}
}
int encodeMessage(int number){
// adds the checksum
// Example: 3 (000.00011) => (101.00011)
int cSum = checkSum(number);
int msg = number + cSum;
Serial.print(" encodeMessage:number="); Serial.print(number, DEC); Serial.print(":"); Serial.println(number, BIN);
Serial.print(" encodeMessage:chk="); Serial.print(cSum, DEC); Serial.print(":"); Serial.println(cSum, BIN);
Serial.print(" encodeMessage:message="); Serial.print(msg, DEC); Serial.print(":"); Serial.println(msg, BIN);
return msg;
}
int checkSum(int number){
// calculates the checkSum for error correction
// simple implementation even => 010, odd =>001
int sign = 1;
for (int i=0; i < 5; i++){
int b = bitRead(number, i);
if (b==1){
sign = sign * (-1);
}
}
if (sign>0)
return PARITY_EVEN;
else
return PARITY_ODD;
}
-----------------------
This records audio, displays it as a graph and plays it back:
package org.adammarblestone.fsksamplerv0;
import android.os.Bundle;
import android.app.Activity;
import android.view.Menu;
import android.media.*;
import java.io.*;
import android.os.Environment;
import android.util.Log;
import android.content.Context;
import android.widget.LinearLayout;
import com.jjoe64.graphview.BarGraphView;
import com.jjoe64.graphview.GraphView;
import com.jjoe64.graphview.GraphView.GraphViewData;
import com.jjoe64.graphview.GraphViewSeries;
import com.jjoe64.graphview.LineGraphView;
public class MainActivity extends Activity {
public boolean isRecording;
public String filename = "localAudioStorage";
@Override
protected void onCreate(Bundle savedInstanceState) {
super.onCreate(savedInstanceState);
setContentView(R.layout.activity_main);
// From http://eurodev.blogspot.com/2009/09/raw-audio-manipulation-in-android.html
Thread thread = new Thread(new Runnable() {
public void run() {
record();
}
});
isRecording = true; // added this
thread.start();
try {
// got an error here: object not locked by thread before wait()
// so switched to using synchronization
synchronized(this){
this.wait(10000);
}
} catch (InterruptedException e) {}
isRecording = false;
try {
thread.join();
} catch (InterruptedException e) {}
play();
//finish();
}
@Override
public boolean onCreateOptionsMenu(Menu menu) {
// Inflate the menu; this adds items to the action bar if it is present.
getMenuInflater().inflate(R.menu.activity_main, menu);
return true;
}
// From http://eurodev.blogspot.com/2009/09/raw-audio-manipulation-in-android.html
public void record() {
int frequency = 44100; // changed this to avoid a -2 output from AudioRecord.getMinBufferSize
int channelConfiguration = AudioFormat.CHANNEL_IN_MONO;
int audioEncoding = AudioFormat.ENCODING_PCM_16BIT;
// Got rid of the use of the SD card for storage and instead using local file storage
Log.d("MainActivity", "Got to 1");
String filePath = this.getFilesDir().getPath().toString() + filename;
File file = new File(filePath);
Log.d("MainActivity", "Got to 2");
// Delete any previous recording.
if (file.exists())
file.delete();
try{
file.createNewFile();
} catch(IOException e){
Log.d("MainActivity", "Error creating file.");
e.printStackTrace();
}
Log.d("MainActivity", "Got to 3");
try {
// Create a DataOuputStream to write the audio data into the saved file.
OutputStream os = new FileOutputStream(file);
Log.d("MainActivity", "Got to 4");
BufferedOutputStream bos = new BufferedOutputStream(os);
DataOutputStream dos = new DataOutputStream(bos);
Log.d("MainActivity", "Got to 5");
// Create a new AudioRecord object to record the audio.
int bufferSize = AudioRecord.getMinBufferSize(frequency, channelConfiguration, audioEncoding);
Log.d("MainActivity", "Audio buffer size = " + bufferSize);
AudioRecord audioRecord = new AudioRecord(MediaRecorder.AudioSource.MIC,
frequency, channelConfiguration,
audioEncoding, bufferSize);
Log.d("MainActivity", "Got to 6");
short[] buffer = new short[bufferSize];
audioRecord.startRecording();
while (isRecording) {
int bufferReadResult = audioRecord.read(buffer, 0, bufferSize);
for (int i = 0; i < bufferReadResult; i++)
dos.writeShort(buffer[i]);
}
audioRecord.stop();
audioRecord.release();
dos.close();
} catch (Throwable t) {
Log.e("AudioRecord","Recording Failed");
t.printStackTrace();
}
}
// From http://eurodev.blogspot.com/2009/09/raw-audio-manipulation-in-android.html
public void play() {
// Get the file we want to playback.
// Changed this to local storage from SD card storage.
String filePath = this.getFilesDir().getPath().toString() + filename;
File file = new File(filePath);
// Get the length of the audio stored in the file (16 bit so 2 bytes per short)
// and create a short array to store the recorded audio.
int musicLength = (int)(file.length()/2);
Log.d("MainActivity", "music length " + musicLength);
short[] music = new short[musicLength];
try {
// Create a DataInputStream to read the audio data back from the saved file.
InputStream is = new FileInputStream(file);
BufferedInputStream bis = new BufferedInputStream(is);
DataInputStream dis = new DataInputStream(bis);
// Read the file into the music array.
int i = 0;
while (dis.available() > 0) {
music[musicLength-1-i] = dis.readShort();
i++;
}
// Close the input streams.
dis.close();
Log.d("MainActivity", "Got to 7");
// Modified from SimpleGraph.java
GraphViewData[] g = new GraphViewData[musicLength/1000];
for(i=0; i < musicLength/1000; i++){
g[i] = new GraphViewData(i, (double) music[i]);
}
GraphView graphView = new LineGraphView(this, "Audio input");
GraphViewSeries data = new GraphViewSeries(g);
graphView.addSeries(data);
LinearLayout layout = (LinearLayout) findViewById(R.id.mainlayout);
Log.d("MainActivity", "Layout: " + layout.toString());
layout.addView(graphView);
// Create a new AudioTrack object using the same parameters as the AudioRecord
// object used to create the file.
AudioTrack audioTrack = new AudioTrack(AudioManager.STREAM_MUSIC,
44100, // changed this
AudioFormat.CHANNEL_OUT_MONO, // changed this
AudioFormat.ENCODING_PCM_16BIT,
musicLength,
AudioTrack.MODE_STREAM);
Log.d("MainActivity", "Got to 8");
// Start playback
audioTrack.play();
Log.d("MainActivity", "Got to 9");
// Write the music buffer to the AudioTrack object
audioTrack.write(music, 0, musicLength);
} catch (Throwable t) {
Log.e("AudioTrack","Playback Failed");
t.printStackTrace();
}
}
}
Also has in AndroidManifest.xml:
android:versionCode="1"
android:versionName="1.0" >
android:targetSdkVersion="16" />
android:allowBackup="true"
android:icon="@drawable/ic_launcher"
android:label="@string/app_name"
android:theme="@style/AppTheme" >
android:label="@string/app_name" >
and in activity_main.xml:
android:layout_width="match_parent"
android:layout_height="match_parent"
tools:context=".MainActivity" >
android:layout_height="wrap_content"
android:layout_centerHorizontal="true"
android:layout_centerVertical="true"
android:text="@string/hello_world" />
android:layout_width="fill_parent"
android:layout_height="fill_parent"
android:id="@+id/mainlayout">
---------------------
Then got rid of the "hello world" text through the layout xml file.
Verified that pure tone gives a sinusoidal trace and more complex tones give more complex patterns.
----------------------
Could see a clear difference between a pure tone at 2000 Hz and a non-pure sound from my attempting to hum/whistle a consistent sound.
----------------------