WEEK
8: EMBEDDED PROGRAMMING
This was probably the most challenging week so
far, as programming has always been a black box I´ve been scared of. The week
started with Neil´s “1 hour knowledge capsule” about embedded programming, and
I have to admit that my brain was about to explode with so many a-priori
unconnected new terms and jargon. After a week of fighting “the monster”
(embedded programming) I´m happy to say that I feel like I have a much better
idea of what is going on when dealing with those “black chips that lets us do
fancy stuff”.
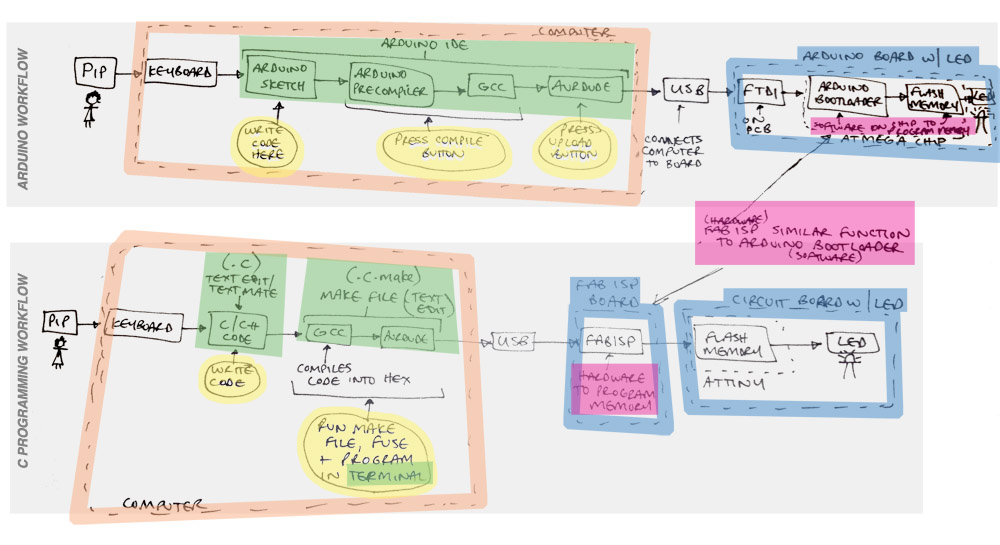
This week I navigated more class pages than
ever. I especially found Pip´s
tutorial very useful http://fab.cba.mit.edu/classes/863.12/people/pip/WK7/wk7.html. The
schematic below is just wonderful.
Neil said in class that how we manage
Mercurial (Tortoise or terminal) would tell how we will
manage embedded programming. I´m honestly terrified by the
terminal, that´s why I started with Arduino IDE
first.
Hasier´s
option 1: using Arduino´s IDE to program the board
It was extremely gratifying to program the
board so quickly using this tutorial from high low tech. http://hlt.media.mit.edu/?p=1695. The basic
idea is to burn Arduino´s bootloader
into the chip, so that we can upload programs using Arduino´s
simple IDE.
I know this is probably the easy-cheap way,
and not the most code-efficient way of doing it, but I was just so happy when
the led started working.

I changed the code a bit in order to
activate the led with the button. I had to be careful of selecting the pins for
the switch and led.
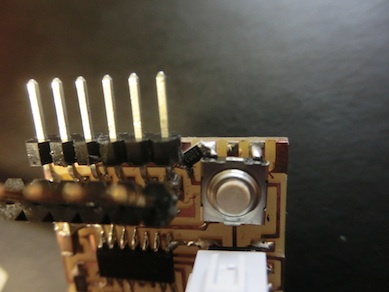
My FabIsp worked
perfectly. There was only one small mistake with the host board. I had not added
the pullup resistor (this is when I understood why
there were so many back and forth emails about this in the past weeks). I knew
the chip had an internal pull up resistor, but I did not know this was not
activated by default. I did not know how to do that, but luckily enough I found
out I could solder a resistor
“neatly” on the board.
At this point I already had decided that the
arduino IDE workflow was gonna be the chosen one for the rest of the semester,
but I decided to give it a try to the pure c path in order to get a better
grasp of it (which may be very useful for the future).
Hasier´s
option 2: programming directly the .c and .c.make files
This is where Pip´s tutorial was extremely
useful.
By the way, find evidence below of my
willingness to go over the microcontroller datasheet. I printed the whole
thing, but I have to admit that I had a very hard time.

Luckily enough, I´m taking Paul Horowitz´s
class at Harvard (Physics 123), so hopefully I will be able to go over the
datasheet and understand something sooner than later. We are starting to build
a computer from scratch there.
Back to the assignment, I took Pip´s .c and .c.make files and make some
changes in order to get a simple button controlled led. The process of
compiling and uploading was not bad at all. You just need to download crosspack (for mac) and ftdi chip
drivers, and then go to the terminal , find your
folder (using command cd and ls) and type:
make -f blinking.led.c.make
sudo make -f blinking.led.c.make
program-usbtiny-fuses
sudo make -f blinking.led.c.make
program-usbtiny
Done. The uploading process is as easy as
the Arduino IDE. The problem is on the code, that is pretty hard to decipher for a beginner like
me.
DECISION: being
realistic about the time left for the end of the semester and understanding the
learning curve of each method, I´m gonna use the arduino IDE workflow for now.
Also, I realized that I will be short of
pins for my final project, so I started fabricating a fab version of the arduino