A STUDY

This a study of interactive fabrication where a type of data input is used to fabricate 'something' tangible.
Processes vary and can involve a great range of data, real time and types of feedback on users' behaviors.

In this particular case, I decided to explore sound as a data input.
Sound is commonly used for that type of experiments, but I like the intimacy and familiarity, the ease and comfort we get from using sound as our interactive material.
The outcome would be a lamp shade.
The idea would be to use a metaphor from sound to light.
It's fairly basic, but I thought it could make a first case study into a larger research scope (my doctorate thesis at GSD).

I wanted to create machine in the process, that would integrate the whole experience (from input to output), but it soon proved that it wouldn't be feasible within the time frame and structure of the class.
As I was diving into each week's assignment, my time was mostly used learning how to make the most basic aspects of it. So, I found it hard to reach a higher level of complexity and therefore I scaled
back my general project.

The final experience implements the following process: 1. speak in a computer mic, 2. visualise it on Processing, 3. save a PDF of one sound moment, 4. save the file as an EPS for laser cutting, 5. laser cut on paper, 6. mount on a lamp frame
The lamp was supposed to integrate another interactive component, with a circuit board and LEDs, but I failed to get the circuit to work (it was a handcut vinyl copper circuit on paper).


 RELATED WORK

- Sound materialisation

In the past couple of years, with the growing popularity of 3D printing and other CNC fabrication techniques, some projects emerged using data to transform into objects, usually sculptures of sorts.
See this work and library created for Processing for instance:
http://workshop.evolutionzone.com/2012/08/30/workshops-sept-89-sound-responsive-visuals-3d-printing-and-parametric-modeling/"

- Craft, technology and lamps

A class has explored ways to make lamps as basic exercises:
http://makingfurnitureinteractive.wordpress.com/category/assignments/exercise-0-make-a-lamp/

- Other resources for 'Computational craft'

http://lizastark.com/compcraftfall13/36-2/

- Paper and technology

When I set myself to make a lamp with paper, I was really inspired by the tutorials and case studies of Jie Qi, a researcher at MIT Media Lab,
initially in the High-Low-Tech group, who also took the HTMAA class.
She particularly worked on using vinyl copper for making circuits on paper by hand.
http://highlowtech.org/?p=1653
http://simonetti.media.mit.edu/~jieqi/2012/01/


RESEARCH/STEPS

Because I initially wanted to make a machine, I lost of lot of time during the semester trying to get a mic board to work and to capture sound data.
By the time, I started to work on the final project, I had about 2 weeks to properly devote to it.
At the suggestion of our professor, Neil, I settled to use the computer mic, and for the fabrication part, I sort of decided arbitrarily that I would use the laser cutter.
It was the combination between sound - 2D shape - 3D assembly that I was interested in the most.

- Sound visualisation

At this point, my first step was to find ways to visualise the sound.
I first had to understand what I wanted to capture from the sound.
This is again one of those moments when it becomes clear that without prior knowledge, I've to settle for the most common aspect (the FFT - the Fast Fourier Transform). I wish I could have explored
further the implications of that question, mainly to add more quality to the experience than quantity.
For programming environment, I decided to use Processing because it was created in a way to visualise information and also because I'm slightly familiar with it.
The book 'Generative Design' shows great case studies and art works in that regard (not with sound input though).
http://generative-gestaltung.de/
The main sound library for Processing is Minim.
http://code.compartmental.net/minim/audiorecorder_class_audiorecorder.html
This script in particular was useful to understand what was recorded:
http://www.ecole-art-aix.fr/article4111.html
But I ended up using the Ess library to analyse the sound with the FFT algorithm.
http://www.tree-axis.com/Ess/classes_FFT.html
I followed this tutorial
http://archive.anthonymattox.com/2007-2011-blog/index.html%3Fp=393.html
And worked with ellipses representations rather than lines
I added lines to save a frame in PDF (which is a tool that Processing offers, but there are different ways to do that
http://processing.org/reference/libraries/pdf/
http://forum.processing.org/one/topic/pdf-export-on-mousepressed.html

Here's the code I ended up using:
import krister.Ess.*;
import processing.pdf.*;
FFT myfft;
AudioInput myinput;
int bufferSize=512;
boolean record;
void setup() {
size(800,600);
frameRate(30);
background(255);
noStroke();
fill(0);
Ess.start(this);
myinput=new AudioInput(bufferSize);
myfft=new FFT(bufferSize*2);
myinput.start();
myfft.damp(.3);
myfft.equalizer(true);
myfft.limits(.005,.05);
}
void draw() {
if (record) {
// Note that #### will be replaced with the frame number. Fancy!
beginRecord(PDF, "frame-####.pdf");
}
background(255);
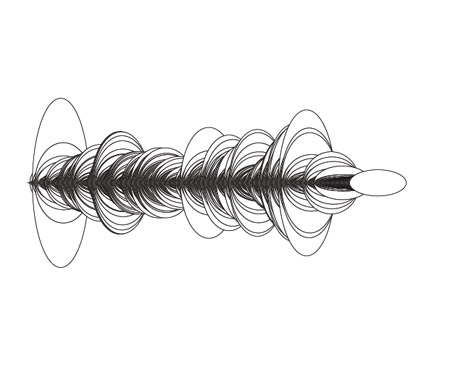
for (int i=0; i<bufferSize;i++) {
ellipse(i+60,300,90,myfft.spectrum[i]*-700);
}
if (record) {
endRecord();
record = false;
}
}
void mousePressed() {
record = true;
}
public void audioInputData(AudioInput theInput) {
myfft.getSpectrum(myinput);
}
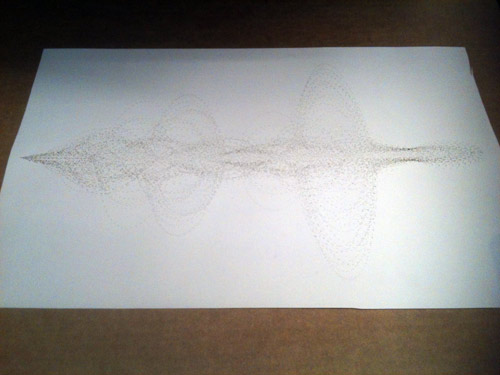
This is the result:
- Laser cut file prep
Interestingly, you get something completly different than the type of shape seen above when saved in a PDF: each ellipse shows it contour. This was a nifty surprise because I was able to envisage how it could be laser cut.
This is the shape I chose from a dozen of files as my final outcomeOther examples of files I could have used:
- Lamp Design From there, I had to set how I would use the shape and assemble it through a laser cut process (I was open to other fab processes but was still mostly interested by going from 2D to 3D). This was the hardest and the most time consuming part of this study. I wanted to avoid being literal as well as being unintelligble. I knew I wanted to transform this drawing into a volume for a lamp. I first started to browse countless lamp designs on the web for inspiration, knowing that I had to take into account constraints of time, techniques, material and skill. I found many incredible designs such as this one: http://mocoloco.com/archives/005034.php
Quickly, the most compelling designs were origami-based shapes, like this one from Issey Miyake:
Here again, I wanted to generate a shape numerically and found that there was some research being done with computing origamis, but
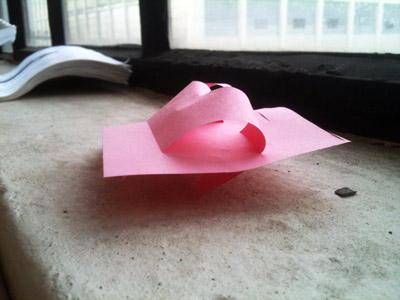
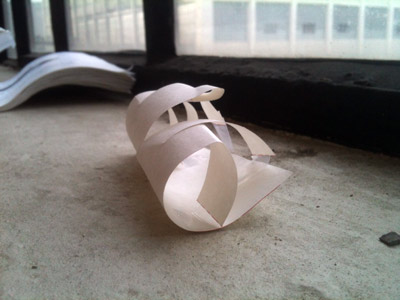
I wouldn't be able in that time frame to explore that further. I opted instead for laser cutting the shape on paper and searched ways of assembling it to generate a volume. Like these quick studies: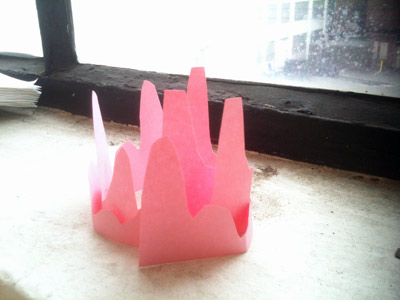
I also looked at possibly using shape memory alloy wire (Nitinol) to insert 'movement' into the paper. There has been many explorations of that use, and again Jie Qi has proposed a tutorial - in correlation with origami too, http://makingfurnitureinteractive.wordpress.com/2007/10/11/muscle-wire/ http://makezine.com/2012/01/31/skill-builder-working-with-shape-memory-alloy/ Nitinol properties: http://jmmedical.com/resources/221/Nitinol-Technical-Properties.html - Laser cut process This part took me about 3 days of experimentation with different types of paper, sizes, settings, etc. I used mainly a transparent type of paper that was thick enough to hold on its own if folded. The Blick art store (in Central square) was where I picked the different types. A good tip from our workshop manager, Charles, for laser cutting paper is to give it support for the laser to find the right position. So put it on top of acrylic or wood.
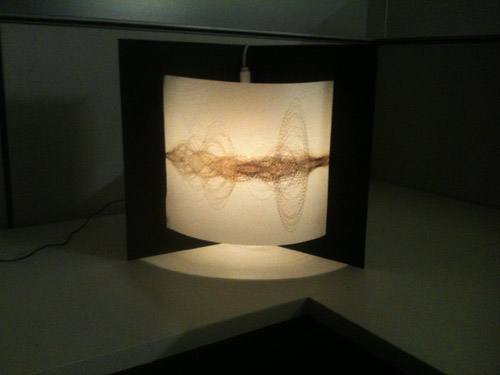
This wonderful tip provided another happy accident: the resin of the wood would be 'printed' on the paper as it was laser cut. It provided a great range of color. But I also like the one on top of acrylic completely transparent.The Epilog laser website has settings for paper: http://www.epiloglaser.com/tl_paper.htm http://www.epiloglaser.com/sc_christmascard.htm My settings for the project: Speed: 85% Force: 4% Frequency: 10% - Final design After much attempts, failures and disappointments for finding a 'volume' for the lamp, I opted for a simple shape where a background black board in an angle would support the entire frame in an circular motion.
- Circuit board In order to implement a circuit on my lamp, I designed a circuit board with Eagle I used guidelines: hello.RGB.board + Jie Qi's work with circuits on paper mentioned above http://academy.cba.mit.edu/classes/output_devices/RGB/hello.RGB.45.png
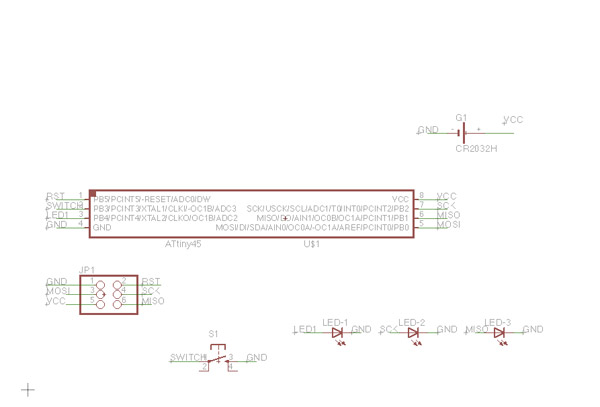
I tried to cut it in the vinyl cutter but even with trying (about a dozen times) with a wide range of settings, it kept failing:
I ended up cutting and making it by hand
Alas after soldering the components onto it, it didn't work. I had little hopes because I had made some tests and I knew if would be quite unstable, but I wanted to try it anyway. So I resorted to use for the time being a candlelight lamp that I bought from a hardware store (I cut some of the original design and just kept the core part). The final result is this one
MATERIALS For pattern: paper and laser cutter the coloring of the paper was made because I used plywood under the paper, so the resin shows. - Paper From Blick art store, Transparent watercolor or Opalux brand transparent paper each sheet costs 3-4$ (20x30 typical size) - Board The board for the lamp frame is also from Blick, 2.69$ for 15x20 - Plywood from scraps Circuit board: - Unit price 0.39 3 LEDs White 1206 http://www.digikey.com/product-detail/en/LTST-C150CKT/160-1167-1-ND/269239 Microcontroller Attiny45 http://www.digikey.com/product-detail/en/ATTINY45V-10XU/ATTINY45V-10XU-ND/1245909 ISP Header http://www.mouser.com/ProductDetail/FCI/95278-101A06LF/?qs=sGAEpiMZZMtsLRyDR9nM14Vjyw4ze%252bjt4BkljYq5qeM%3d Copper tape 3M sourced from Budnick (246$ for 6x36 yards) 3.3V battery (each approx. 3$) from drugstore - Candle light lamp reused from hardware store TruValue, 6$ PROBLEMS - when do you decide within a short time frame to move on from an idea when it's not the right one and is not worth pursueing? - the feeling of loneliness when you work on your own proved to be a major impediment, even with the help of TAs and classmates