The assignment for this week is to make something big using the 3 axis milling machine. We were also given a demo of the waterjet cutter but I sadly could not attend. So exciting! Have never used a milling machine before. Should be fantabulous.
I have been thinking about what to make since hearing about this class. The hard part is picking just one thing to make. Some ideas:
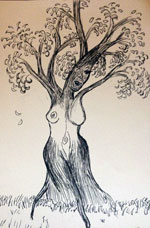
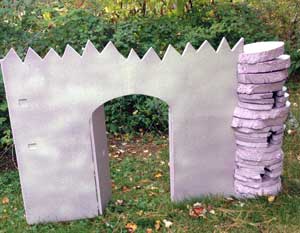
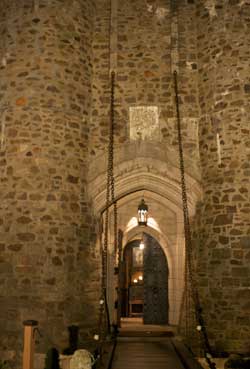
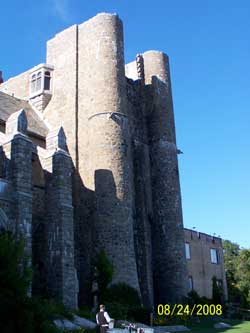
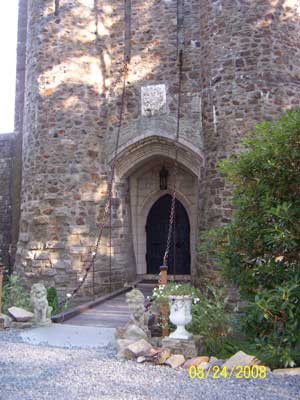
Just need to decide! Finally decided on a playcastle. Here is some inspiration.
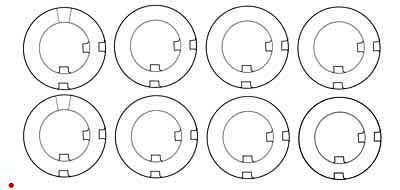
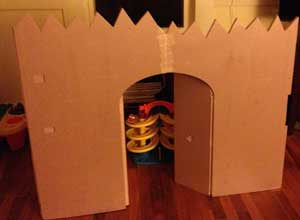
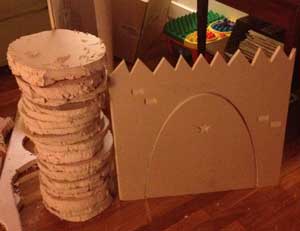
I first designed everything on pencil and paper and tried a number of different designs, then cut them out in cardboard. The first cardboard cutout prototype was a big hit. My son played in the castle for hours, climbing in and out of the door, pulling the drawbridge up and down, napping in it, and dragging it around the house. I next created the design in Inkscape. Every good castle needs turrets. For the turrets I decided to use stacking hollow circles so things could be stored inside. I also wanted to have windows in the turrets. The interior circles would later be used for the back turrets to hold everything together so no material would be wasted. I originally thought I would glue and nail everything together. After more consideration I thought a press fit castle is a much better way to hold the pieces on place.
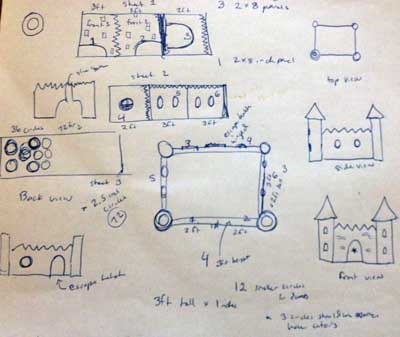
The initial design on paper
On Friday I took a shopping trip to home depot with my toddler and picked out materials to cut, glue and paint. Originally I thought I'd get a bunch of sheets
of foam and OSB and my husband smartly pointed out my inability to carry all of that back from lab by myself. So I decided to forgo making anything in OSB or plywood and stick with the foam.
Purchased foam in varying thicknesses, two different types of glue (wood glue and spray adhesive designed for foam), and spray paint that has a faux stone finish.
Saturday was spent designing the castle in Inkscape. Decided to create the turrets to the castle by stacking hollow circles on top of each other. In a future iteration of the
design it might be fun to create undulating turrets or turrets shaped like animals. I saved the Inkscape files as dxf, eps, svg and pdf fiels and emailed them to myself as well.
When designing your parts keep the size of the design sheet the same as the size of the board. I maximimized the space of the foam and used all available areas. But there is variance in the actual measurements of the material you are using. This was something I noted after I'd cut out my pieces- Measure twice, maybe 3 times- for good measure, cut once.
All castles need turrets
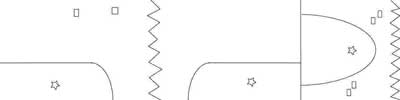
The front
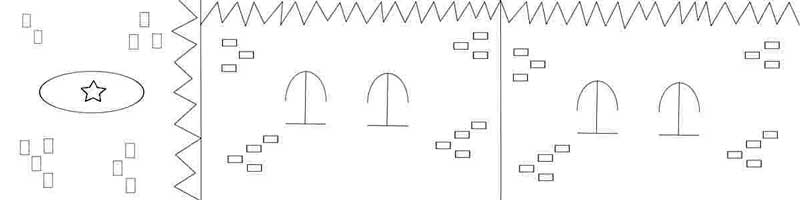
The sides and back
On Sunday I emailed my files to myself and loaded them on a flash drive (the machine in the lab does not have access to the internet) and drove down to campus to cut out parts. When I arrived the machine would not read my drive (mac!) Luckily there was a spare drive on hand and the trusty internet on another computer. Imported files into partworks to create the tool paths for cutting. Our TA, Jared, told us to keep the order of operations in mind when designing tool paths. First engrave, then cut interior parts, then cut exterior parts. Thus, toolpaths were designed accordingly. When first loading your files you need to measure the thickness of your material and note that you are measuring you cut from the top of the material.
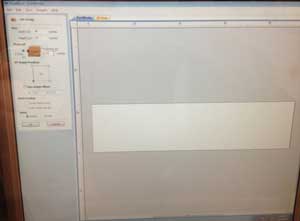
Adjust your settings to account for the thickness of the material and to start cuts from the top of the material
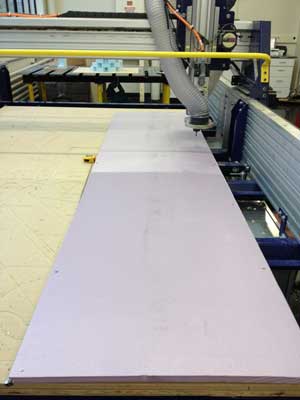
Fixture your material to the sacrificial layer with screws
This can be done one of two ways. One way is to create a drilling toolpath in your file and place your drill holes where they will not interfere with any of your other toolpaths. Another way is to drill your screws into your material and cut air before cutting you job to see if any of the screws will interfere with your toolpaths. I choose the latter method. If you decide to choose the former method you may need to create a new tool in the settings to import a 3mm drill bit and you'll need to change your tools mid job. This was a Huge pain. We tried this when I helped someone else cut later in the week. The shopbot froze and took forever to recover. So we ended up saving all of the tool paths as separate jobs and loaded them up separately.
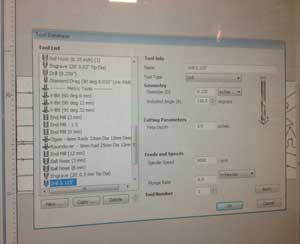
Create a new tool to drill fixturing holes
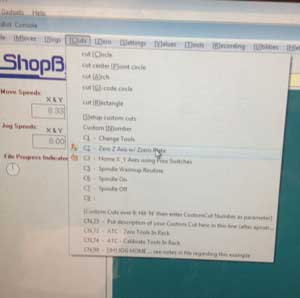
For an engraving path, set the cut depth to be less than the thickness of the material. Keep your pass depth no larger than the diameter of the tool. Check to make sure your units for plunge rate, feeds and speeds are all in inches/min. I used a feed of 100 and a speed of 50, with a spindle rate of 6000 for the foam and it worked well. You also need to override the setting on the side of the machine for the spindle speed if you change it. Because it will not actually listen to the values in your toolpaths. For my interior cuts I interactiovely added tabs so my pieces would not fall out as the job progressed. For the exterior cuts I elected to cut on the line. I also was not using any slots for my first piece so I did not need to dogbone any of the corners to get a 90 degree angle. When all of the tool paths were saved I exported the file as a shopbot file in inches as loaded up the shopbot program. First zeroed the xy by moving the tool to the bottom right corner.
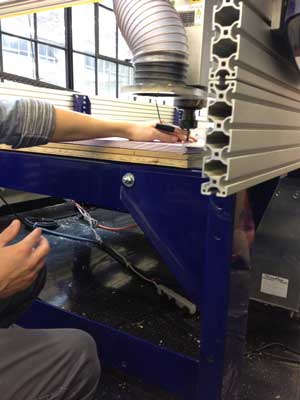
Zero x and y axes
Then zeroed the z axis using the z plate.
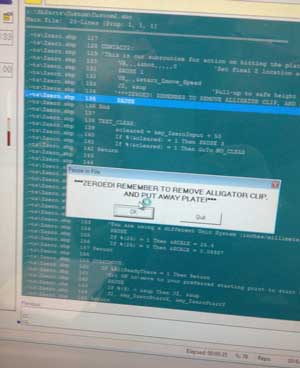
Zero z axis using z plate
Next, increased the z height and cut air to see if any of the fixturing screws would interfere with the toolpaths. I few did so they were removed. Then the cutting commenced! The front panel of the castle was successfully cut out and my time for cutting was up. I came home happy with my cut pieces and eager to return the next night to cut the rest. I had 2 more pieces to cut out to complete the castle- but plenty of time right?? Not really. The front panel was cut out successfully. Forgot to take pictures!
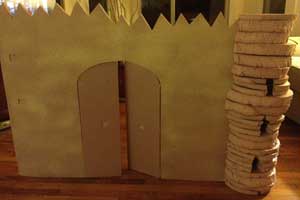
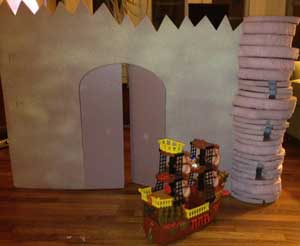
Arrived home to the smell of seasonal roasted vegetables, sizzling porkchops and a happy kid. Thanks to my husband! After bedtime, I started assembly of the castle. When designing the castle I should have put 2 pieces side by side and cut them out to line up perfectly to take advantage of the natural tongue and groove construction of the foam. I figured I would use the tongue and groove to hold the front pieces togetehr but when I actually cut I had 2 grooved pieces for the front. Oops! Also one half of the side is slightly higher than the other because my measurements wereoff slightly. This could be fixed if I cut the pieces side by side. I also would have gotten more cutting time bang for my buck! So I hand whittled foam and created a tongue and tongue piece to slide in between the two front pieces and used wood glue to glue the three pieces together. I used fibrous packing tape to hold the two pieces together while they dried. I also created hinges for the front castle doors so they would open in by using packing tape on the front and inside of the door in 3 separate places. When the front panel was assembled I put it in my porch and gave it a pass of faux stone spray paint.
The drawbridge hinge was created (Thanks to Charles' suggestion) by poking holes in the inside wall of the panel and also poking holes on the outer edge of the door. I then used a chopstick broken in half to connect the holes together. Still need to create a string or pull rope to help raise and lower the bridge.
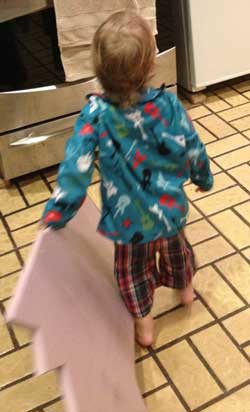
I modified the design slightly after my initial experience cutting and when I returned to cut my remaining parts there was a long line for cutting because the shop had been closed earlier. So I spent a lot of time cleaning and waiting and waiting and waiting and helping my fellow classmate cut her foam. We learned a lot but I never did get to cut my part. I could not return to the shop to cut my parts so the next day after bedtime I decided I needed to finish cutting some more pieces so I cut the pieces of the turret by hand. I cut a few pieces while my son napped. And he and the girl next store enjoyed going in and out and in and out of the castle front door as we held it up for them. They repositioned the castle in the yard and my son carried it around while the girl next door pointed to where she wanted it to be. It was incredibly cute and fun to watch them play with it in ways I would not have imagined. The foam is pretty durable because the castle (not being fully constructed) kept falling down and the kids walked on it and easily put it back up. I tried to cut some of the circles during the day on my day off but this was close to impossible while running after my toddler. The kids did enjoy stacking the circles and placing them in a pile.
My husband brought home thicker foam and after bed I got to work cutting out circles. I used a dogbowl as a rough template and hand cut two 2x8 panels worth of turret circles. The original thought of hollowing out all of the circles was too time consuming when cutting by hand. The circles had a rough hand hewn look and this process was painstaking, long, messy and made me really appreciate the beauty of the machine.It also helped me realize the importance of pass depth in the thicker material. I could only cut through the thicker material a bit at a time. I hollowed out 3 onsets of three circles to create the windows to the castle. I also hand cut each notch to fit the front panel. The side notches for the side panel still need to cut. I plan on redesigning the remaining turret pieces to be larger than my original design and plan on cutting out the rest of the pieces on the shopboat soon! I was up all night cutting the pieces for this turret and then adding pictures to the webpage. I was rushing down the stairs to get to class on time and I slipped and fell down my flight of stairs. Do not rush. Even if you think you are late. I am still sore 5 days later.

So far my son loves his simple castle made out of cut up cardboard box. Here it is on the left side by side with pieces of the new and improved?? version of the castle
.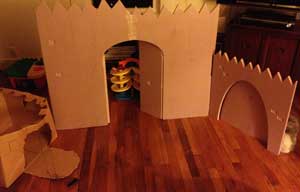
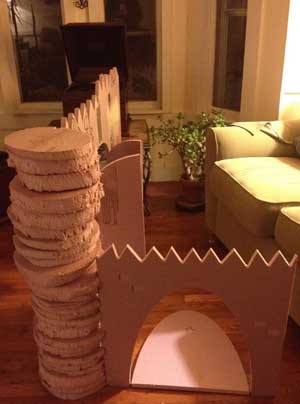
This version is still too unstable and blows down too easily in the wind... Taking this on the subway was interesting. Need to add the second turret and the side and back pieces to complete the castle. Also the roofs of each turret need to be added. Once assembled the castle needs to be primed and painted and glued where necessary but glue should not be needed for the majority for the castle pieces. I also think it'd be great to paint the inside with chalkboard paint so kids can add their own designs to the inside.

Copyright 2013 Kathy Sinclair