005: Computer-controlled Machining
This week's goal was to make something big wit the aid of the Shopbot.
Materials
OSB (Plywood) - 4' x 8', ~0.5"-thick
Shopbot
Partworks
Vector-drawing software (I used Adobe Illustrator)
Using Adobe Illustrator
Unlike with CorelDraw, it is not necessary to turn your vector lines to hairlines. Lines draw with any thickness will be
read and understood by Partworks.
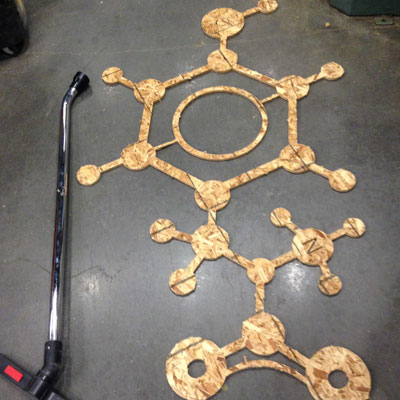
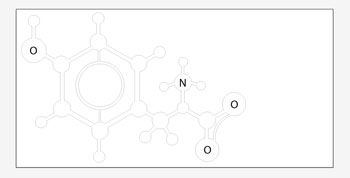
Here, I chose to cut a very large zwitterion, a tyrosine molecule.
- I started with a canvas that was the size of one sheet of plywood: 4 feet by 8 feet. I hoped that this would eliminate
the need to change the size of my drawing later on Partworks.
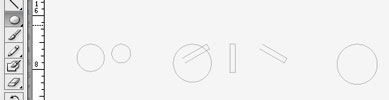
- I used the shape tool to draw hollow circles and lines of various sizes.
Intersection of these components,

Selecting all,

And using the Unit button in Pathfinder
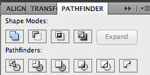
Creates a seamless intersection of the two components.
- Final result after various shape combinations.
Shopbot
Random notes and tidbits about the bot
Tool path should be offset to take into account the cutting tool diameter. This will leave you with the expected size of your design.
Do not use the drill bit in place of the endmill for the Shopbot.
Long, thin ribs are unadvisable.
It is also inadvisable to make tiny cuts because the dust collector might accidentally suck up your stuff.
Avoid gouging the sacrificial layer.
It is recommended that the 1/8" or 1/4", two-flute, down-spiral endmill
The XY origin starts from the northwest-most corner of the bot.
Never exceed the diameter of the tool with pass depth.
Random notes and tidbits about Partworks
Add 0.05-inch thickness to the cut depth. The extra bit is necessary for the mill to cut through your material.
Vectors are the best files to import.
Uncheck Origin Offset, which causes alignment issues. Establish the origin yourself.
T-bone fillet creation allows for perfect corners.
Sometimes, vectors will be open, in which case, go to the Edit menu and click Join Vectors.
Parts can be nested, but make sure that there is enough space between the parts so nothing is accidentally cut off.
Circles should be drawn about the diameter of your cutting tool directly on your vector file. This will let you know
where you can put screws. A short cut depth of 0.125" is sufficient just to let you know where to put the screws. When cutting out your desired
object, change the cut depth to 0.05" + thickness of your material.
On that note, make sure to take a sample of your material's thickness from all four corners.
Stepover adjusts the amount of overlap between passes. Low stepover is desirable for detailed machining, but for our purposes, 80% is OK.
Feeds and Speeds
Spindle speed: 10,000 rpm
Feed rate: 120 - 150 is OK.
Plunge rate: 75.0
Conventional cuts have better precision and tolerance.
Climb milling puts stress on tool -- use minimally and with caution.
Profile path will cut out the shape on your vector.
Adding tabs to toolpath is recommended in case you have particularly fragile parts of your material: Length - 0.25", thickness - 0.25". Click Edit Tabs button and apply 2 tabs per point. Then click the add tabs button.
When exporting your toolpath, the file extension is .crv.
Click the floppy disk icon to save toolpath, and export. A sbp (shopbot) file will be saved.
Shopbot3 and prepping for your cut
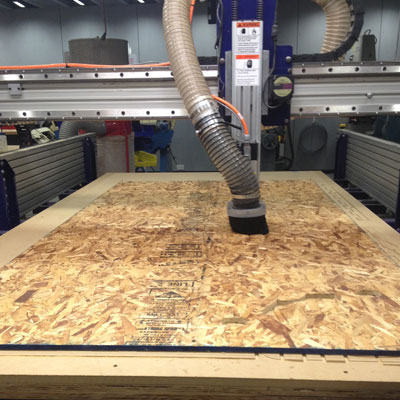
- Change the endmill. Using the two wrenches, take out the spring collet, which will click into place.
- Lock the endmill so that the shaft is snug, but the flutes are not covered.
- Attach the dust dress.
- The machine control box is on the east of the machine. Make sure the box has the number 10 for 10,000rpm. This needs to be adjusted manually if
you change your spindle speed.
- Hit the blue button to connect the machine to the computer.
- Open the command console. The keypad here allows for manual control of the x, y, and z of the shopbot head.
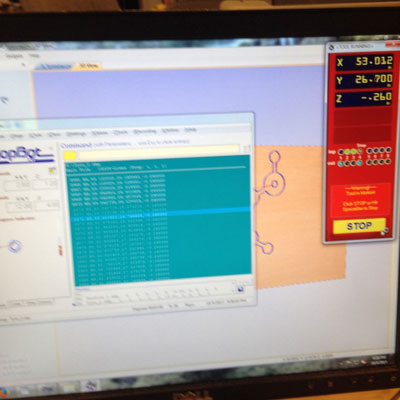
- Set the x and y coordinates. Bring the machine to the origin before setting the x and y coordinates. Click the Zero menu and [Zero two axe x and y]. To set the z, move the head to the middle of your material, take out your zero plate and set it on your material.
Select the Cuts menu and click option C2. The shopbot head will touch down twice. Do not move plate in haste.
- Turn on the dust collector.
- Hit the physical green start button when prompted. Then hit start on the command console.
- When your job is done, turn off the dust collector, clean up the stage, and unscrew your board.
The spacebar pauses your job and the shopbot will remember its last location. The physical red stop button will reset completely.
Do not lean on the machine.
Take time to clean up your mess.
And here's the finished product!