ss="row">
Skillsets used:
Well the moment of truth came and went....the semester blew by unbelievably quick. I managed to apply many of the weeks of classes that we had and with some effort I believe that I could have incorporated each week. It was rewarding to have a culminating project that, although it has its glitches still, is a reflection of how much further along I am in December than I was in August.
Time to actually introduce my project just once more: for my final project I was attempting to construct a wireless audio spectrum analyzer. The initial idea was to digitally sample an audio signal playing through my speakers, output the FFT to a bluetooth module, which would then enable the Arduino to run its code to serially update the LED Matrix. The project morphed slightly, so now it's close to wireless and takes an analog input from a microphone instead, relying fully on the Arduino to do all the work. It was a fun project that taught me a lot and allowed me to practice applying almost everything I learned in the class.
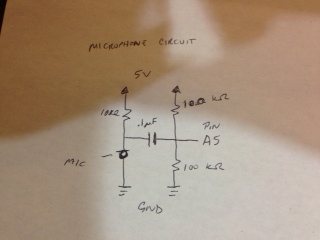
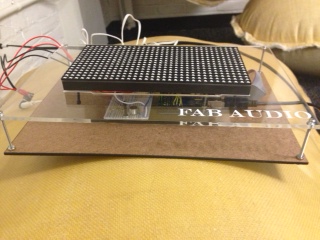
The electronics for this project weren't overly complicated. The components list is above. The link to the Adafruit website has an explanation on wiring the Matrix which I followed exactly and is much better documentation than what I would be able to do for it here. Below is a picture of the circuit I laid out for the microphone. It was a last minute addition...an attempt at a solution for the code problems I'm about to talk about. So basically on the electronics side of the house, switching over to using just Arduino meant that I had a couple of options. I could either take an analog input from some sort of device and run that through the FFT and matrix code, or I could probably work out a mono input but then depending on my computer I may or may not be able to generate that sound simultaneously if I plug in another set of speakers to the laptop. I didn't really have what I felt I needed on hand or time wise to attempt this so I went for the input device. I was concerned about having a lot of uncontrolled variables with an electronics heavy project, which is not my strong suit, so I chose to use an Arduino Uno that I already had on hand, rather than run a risk with the Fabduino. Although it would be nice to make one in the near future, I already had a mini circuitboard I was going to be stuffing anyway, and just like the Arduino the Fabduino isn't something I designed, so it didn't seem to matter to me which I used aside from saving some time soldering and praying that it wouldn't act up on me. The LED matrix I ordered was a little bit annoying...this is obviously a project that other people have undertaken before. There's plenty of articles I skimmed on instructables and youtube videos I filtered through to see it up and running. A key difference though was that my board from Adafruit doesn't use the HT1632C driver chip that a lot of other people had in their boards, so I wasn't able to apply a few things code wise and was working off of different libraries as well obviously. I originally had thought about building the matrix myself, but Charles said that hand soldering 512 LEDs to a scrap of copper wasn't really worth the time in the overall scope of the assignment. The other problem I'd have encountered with that is if I wanted the HT1632C driver chip (which I really did want) then it's not manufactured in the US. We looked everywhere--it would have gotten here from China some time in February.
Coding for the final project was a rather involved process. I started out with the intention of using both Processing and Arduino.Processing uses Java in an interface similar to Arduino. It's an open source programming environment that has a lot of great use for graphics and general media applications. I chose to use it because I wanted to be able to play back the Audio input I was receiving while it was sending a serial output to the microcontroller. Unfortunately, I was having some issues debugging a component of the code, and when I tried the example code for the functions I was using it threw the same error. I'm not sure if it's a problem with their library for that or what, but I decided not to waste time further with it. This completely changed my project because I had to rethink how I was obtaining Audio on very short notice. So what I decided to do, which I talked about more in the Electronics section, is to switch over to receiving analog input from a microphone. I then used the FHT Arduino library, which was written by an MIT alum and current affiliate in the research lab, and chose to perform everything on the microcontroller. The code verified and uploaded to the Arduino and shouldn't have any issues. Here is the link (which hopefully works) to my code. It uses the Arduino FHT, forked RGB Matrix panel, and Adafruit_GFX libraries. There are some commented out areas in the code that are leftover from code when I had intended to take in serial input from Processing, and possibly some leftovers from the Bluetooth module idea that I'm saving for further iterations of this project. Although I have 32 bins I chose to double the width and sort the frequencies into 16 bins. The fht_log_out values are divided by 16 to scale it to the height of the board (hint: 32x16...).
Below are some pictures of the actual build process. I drew up a rough sketch of the exact dimensions I used on the laser cutter. One correction is that for the hole sizes those are through holes for 4-40 screws, which the internet put at about .1285, so I actually sized them at .13 to account for the kerf of the laser. I did the formal mock up of the two parts in Rhino, which was a very interesting experience since I've never used it before. I actually found that for simple things, especially 2D I like it quite a lot better than Solidworks, and I'm sure that I will use it more often now. I also did a few odds and ends work in Correldraw. The print jobs were combined jobs: I used color mapping to cut the vector paths and through holes on black at 12 speed and 100 power, and for the rastering I used red at 50 speed and 100 power. Nothing burned down so I would call it a success. I did not place the holes for the electronics components on the laser cutter because I hadn't figured out the orientation, so those were hand drilled afterwards.
There are a few things that I would like to do in the future. Right now the panel isn't currently functional. I haven't as of yet been able to identify the problem but I would be willing to bet it's an electronics issue. I need to recheck everything I soldered to ensure nothing is touching that shouldn't be, but more importantly I want to go back and recheck my circuit values because I wasn't overly certain of them when I started. I couldn't find any information on the microphone I used so I'm not sure that I have the values Iwant. The second issue that may be causing the problem is the power to the LED matrix. I believe that I soldered the GND and VCC pins to the correct sides of the 2.1 mm power jack component but again something is obviously wrong and that's one area that's yet to be tested.
Aside from getting the final bits of this project debugged (because I know that I'm really close!) I have two other things that I would like to do. Originally I had wanted to make the board more wireless so that I could wall mount it. The HC-05 Bluetooth module was having some issues with the ports on my computer, or at least Processing wasn't liking it much, so I threw it out for this round. I do think that I have enough pins to incorporate it though, or I could get a different microcontroller if not and include the bluetooth device. The point would be to run the audio playback and FFT in Processing, then send out packets of the FFT bins to the Arduino to push through to the LED matrix. Another way to make this wireless would be to make sure that my proto-board is accurate and then hook it and the LED matrix up to a LiPo battery or something that could be easily mounted in the electronics housing.
The second thing I want to do about as soon as possible is figure out why Processing won't work, or get a mono input running to Arduino. As it is right now, if I'm sampling any sound from the microphone that means that my device is vulnerable to all the environmental disturbances trashing my audio input, and it also has a pretty limited range to get a good output, so rather than wall mount it's more like something that would be mounted low or stay on the desk next to the speakers. I really would prefer to be sampling sound digitally and it's what I am going to work on fixing over the next couple of weeks. I'll post a second page with the updated project as things get refined to functionality and hopefully a bit of optimization as well.
Well I tried to list my resources throughout this page as I used them so it was clear what part of the process they were involved in, but I'll go through again a bit. Adafruit was great for the libraries specific to the LED matrix. Definitely want to give Charles a shoutout for keeping the IDC well stocked with all the extra components I needed. Arduino has an abundance of useful libraries and wikis about how to do some amazing thing--I also got a bit of advice from the guy who wrote the FFT and FHT libraries, so he deserves credit while I also respect that I think he'd prefer to be unnamed. A variety of instructables tutorials were helpful as a sanity check although there was no single one that I used over others. Once I get processing sorted out, I would count it as a good resource as well. They aren't as well documented in libraries as Arduino but there's a ton of potential lying in that programming environment and I really encourage anyone who is reading this to check it out. One final thanks as well to the How to Make staff and the West section...we all bonded this weekend slaving over our projects in the middle of the night in N52. Peer resources are the best option when possible and I think one thing that is great about this class is that it introduces students not just to FAB, but to the community that comes with it and the extensive resources available through each individual's unique expertise.