
Assignment 2: Make A FabISP
The assignment for this week was to fabricate the FabISP in circuit programmer. I have very little experience with electronics, so this was a bit of a scary assignment for me. Even though we don't need to actually understand yet what it is we've made, it's still pretty intimidating making something without entirely understanding what it is!
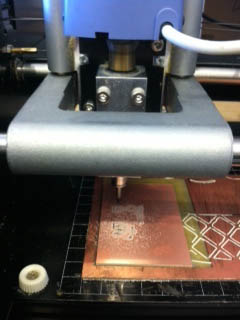
Milling the Board
The first step was to mill the board on the Modela. I followed Jean-Francios's Tutorial, which I found to be very helpful. However, when I was milling the board out, I managed to break the 1/32 bit. Jean-Francios guessed that the problem was that I didn't put tape all the way up to the edges of the board, so the part probably vibrated. I wound up finishing the board by cutting it on the bandsaw, rather than remaking the whole thing, since I knew that this was my first board and I'd probably make further mistakes anyway.
Well, I decided to start a second board a few days after (for reasons described later). This time I was careful to cover every bit of the board with double stick tape. And then part of the way through I broke another drill bit (sorry Prof. Gershenfeld). At this point Charles came to the rescue. The problem turned out to be that I hadn't tightened the set screws enough, and the bit slowly came out of the collet, going deeper and deeper into the part. There were two reasons that I didn't tighten the set screws enough: The first was simply that we'd be warned not to overtighten them, so I was overly cautious. The second was that I didn't realize that I was using the ball end of the hex wrench to tighten the set screws, and so it simply didn't tighten as much as I'd thought it had. The difficulty was that by zeroing the bit and then tightening it, there was no way for me to realize the bit was loose until too late.
Keeping in mind all of these hard-learned lessons, I managed to successfully cut a new board that at some point in the future I plan on stuffing.
Stuffing the Board
Soldering was the part I was most nervous about since I found out during the tutorial session. I'd had a little bit of soldering experience before, but I'd always had a lot of difficulty with it - and then I found out at the tutorial that the way I'd been taught to solder was wrong!
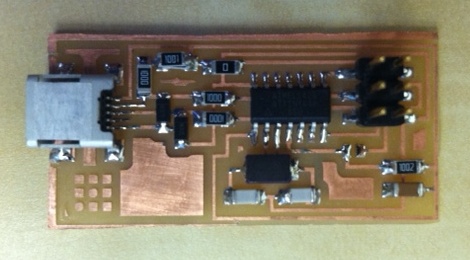
It turned out in the end that I didn't need to worry about the soldering at all. Armed with the correct technique (and a lot of flux), the soldering didn't take long at all. Perhaps the most difficult part was interpreting what parts I was supposed to use. There also weren't any 499 ohm resistors left, so I soldered two 1000 ohm resisters in parallel, one on top of the other.
The Mistake I Made With Flux
I hadn't tested the board yet, but I was pretty satisfied that I was done. I used soap and water to clean the board, and then had to leave for the weekend before it was properly dry. When I came back, I found that my board was still sticky with flux, and had gotten somewhat dirty. It turned out the soap and water (and scrubbing with a sponge) hadn't been enough - I needed to use an actual flux remover. Unfortunately, by the time I realized this on Monday, the flux had set in pretty well.
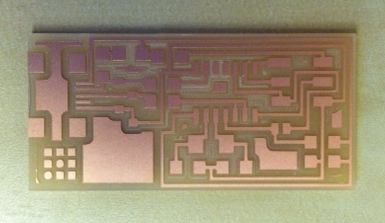
I managed to clean off quite a lot of it with the flux remover and a vigorous scrubbing with Q-tips and a tooth brush. However, that doesn't help with flux under the parts, which could eventually corrode the board. For that reason, I decided to start another board. The second board (shown below) hasn't been stuffed yet, so I decided to use the initial board for the time being, since I don't have to worry about the negative consequences of the flux any time soon.
Programming the Board
The last step was programming the board, which I did with the help of Jean-Francios and this tutorial. I guess my soldering must have been pretty good because I had no difficulties.