First, I spent a while following the programming steps listed here: http://academy.cba.mit.edu/classes/embedded_programming/hello.ftdi.44.program.png. I was stumped for a while over the following issue: my board appeared to program successfully, except that when running the sample hello.ftdi.44.echo.c program using the term.py python script, the app would crash as soon as I typed in any letter (rather than display the letter as it was supposed to).
Therefore, I assumed at the time that my board had not in fact programmed correctly and that there must be a problem with the 6-pin connector circuitry.
I realized in the debugging process that I had connected two ports of the ATTiny to one of my two LEDs. This in theory should not cause a problem (I simply can use either port's output to control the LED) but for kicks, I removed one connection using an x-acto knife. No luck, as expected.
Later on in the day, Tomer gave me a hand and rather than use the Term.py application provided to us, we instead attempted to run the echo program using screen:
screen /dev/tty.usbserial-[your serial number] 115200
Now the board worked just fine!
(Note: I was also able to run the python script and it would only freeze when I hit exit. So something clearly changed in my setup from the previous attempt, though I do not know what exactly).
Next, I followed the instructions located here: http://highlowtech.org/?p=1695
in order to use the Arduino programming environment to program my board. Once installed, just select the following options from within the Arduino programming environment:
Tools->Board->ATtiny 44 (external 20Mz clock)
Tools->Burn Bootloader
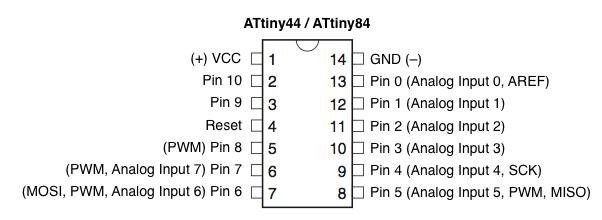
from there, in order to run any sample code, you need to make sure you're referencing the appropriate pins, as there is a particular mapping from the ATTiny44 processor to Arduino pins in this environment. The pin diagram is below.
I got the light blinking and button press examples working on my board. IMPORTANT NOTE: remember to include a software pullup on the button or else your button will behave strangely (unless you included a hardware pullup resistor).
To do this, include
pinMode(buttonPin, INPUT_PULLUP); which will give your button an initial state rather than have it float.
I currently cannot progress further since I'm hitting a power drawing error when pressing my button....about 3/4 of the time, when I tap the button my computer will complain that the device is drawing too much power and shut off the USB drive. This probably means that I am causing a short circuit somewhere, though I do not know where.
In any case, I included videos below of my LED blinking and a trial where my button pressing did indeed work.
Maybe I'll have a chance to do some more with this!