Week 2: The One Where We Make Electronics
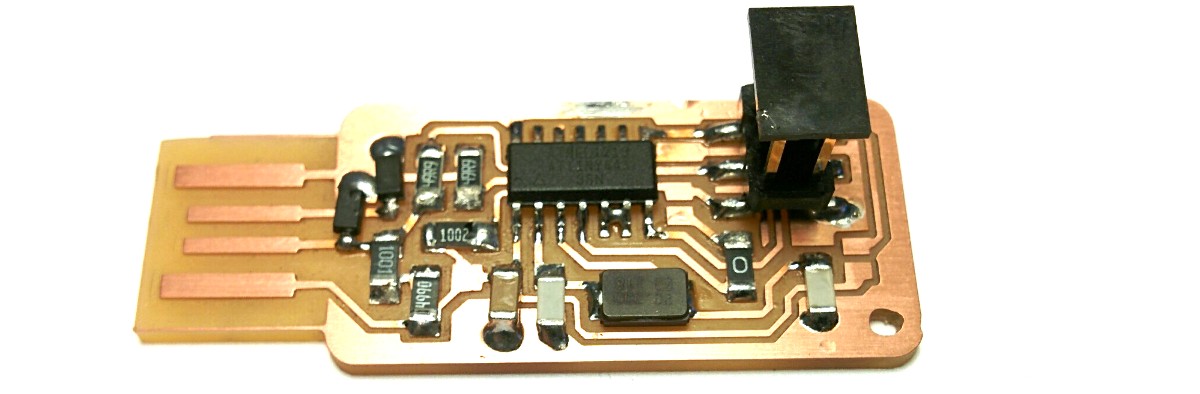
We are making AVR programmers based off existing circuit designs. The task is to understand how to mill out traces on copper clad boards, and solder surface mount components. I went for Andy's design which turned out to be bit of a mistake. The appeal of Andy's design was the built-in usb connector as opposed to using a mini-usb jack and a cable on the standard design.
Step 1: Milling the board
Instead of doing messy etching of traces, we are going to mill the traces out from copper clad FR1 boards using a Roland MDX-20 desktop mill. To mill the board, one first puts down a "sacrificial board" on the bed of of the machine and then the actual board on top of that taped down with double sided sticky tape. This way, if the tool head cuts too deep it doesn't hit the bed of the mill.
To compute the tool path, I took the traces file, and open it up using Neil's mod tools, set output to "roland mdx-20" and process to "pcb traces 1/64". I had my board taped down and there was a 1/64" end mill in place.
Zeroing the tool wasn't obvious. Unlike the laser cutters, it turns out that whereever you place the cutting head manually is considered to be (0,0,0).
Here is what I did:
- I took it out of view mode (press view). View mode just moves the part forward and the head up.
- I moved the head to 20,20 with the mod.cba.mit.edu tool
- I lowered the head about halfway down using the up-down buttons until the end was an inch above.
- Then with some trial and error I got it over the starting spot. Helped that the head was low enough.
- Then loosened screw, lowered the end mill by hand until it touched the board, held it down and tightened the screw again.
Hit send path and it goes milling crazy.
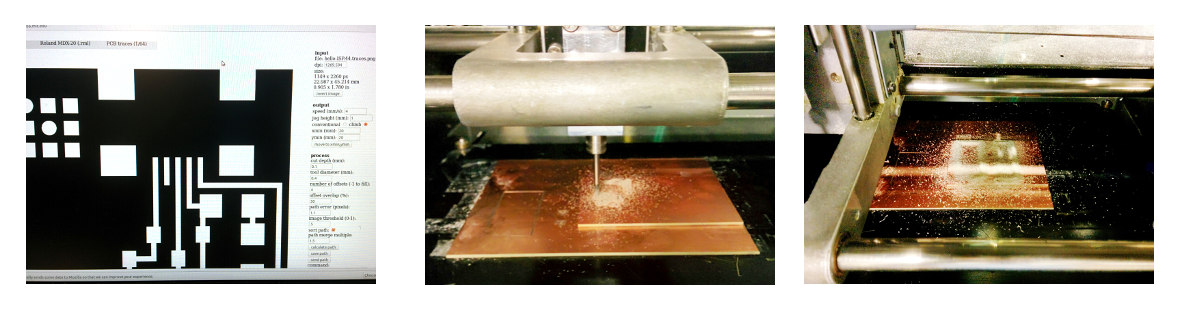
The triptych shows path calculation (for the class standard board), pcb tracing and the final outline cutting. I had cut both the Andy board and the class board for backup which you can see the outline cuts. The outline cutting is set to 0.6mm which cut into the sacrificial layer below. It also did it in 3 passes.
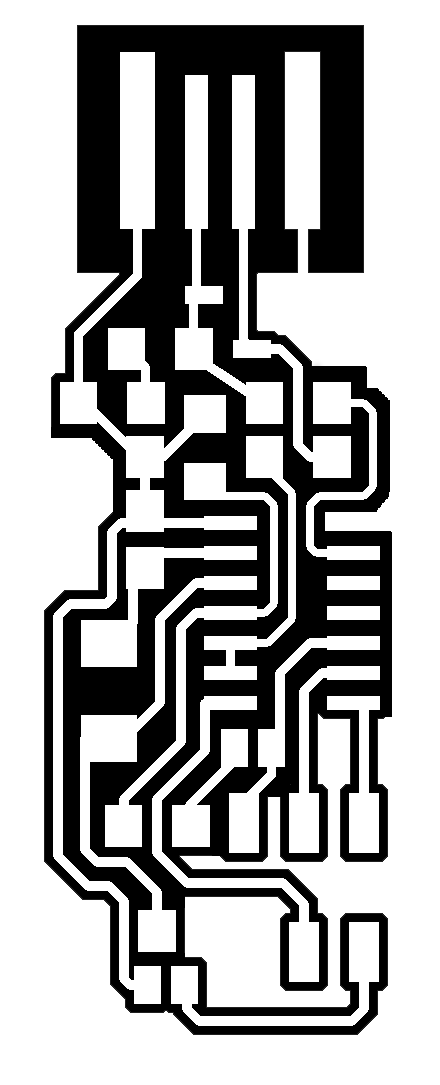
So here we have the finished product. There is a problem. Some of the traces are shorted to the ground plane.
The problem was in path calculation. Narrow gaps is causing the calculation tool to skip over those gaps. Some advice I got from Mike, Jean-Francois and Neil.
- Redraw the traces to be wider
- Set the tool width to be 0.3mm even though it is 0.4mm
- Use high DPI images if the gaps are set to be exactly 1/64"
- Don't use ground plane in your design unless you are doing RF. Easier to solder too.
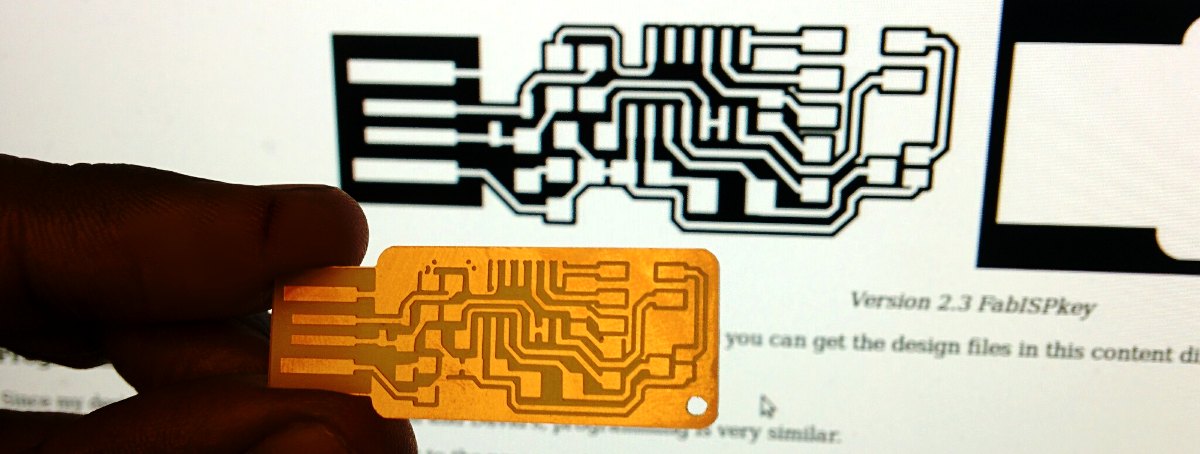
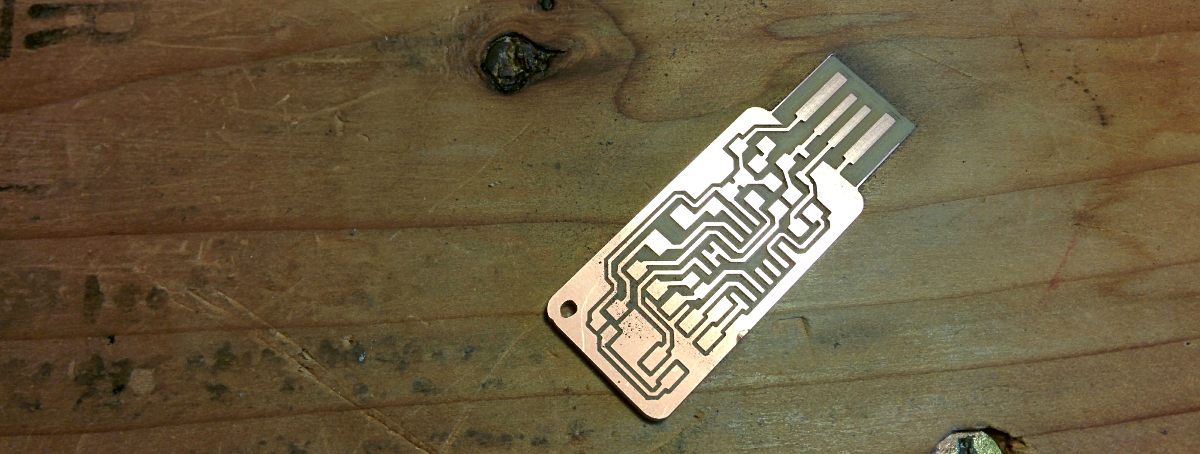
I ended up using gimp to widen the gaps. Here are the traces and interior images for download. A couple of tries later, I got a usable board. Here it is halfway polished.
Stuffing the board
Surface mount soldering is not my favorite. I learned a couple of neat tricks though. Taping the board down with double sided tape is a cheap way to get it clamped. Makes it hard to rotate though. The other trick was using solder to hold the component: place a bead of solder on the copper, warm it up and tweezer in a component, solder the other side properly, solder the beaded side again.
Andy's board called for a couple of components that I couldn't find. There was a 0.1uF capacitor which I left out since there was already a 1u across the power line. The XTAL needed 8pF caps which we didn't have so I subbed in 10pF instead. I soldered in the two jumpers for programming.
Building firmware
Per instruction, I downloaded firmware.zip. It unzips into a directory caleld fabISP_mac.0.8.2_firmware. Which is a bit confusing since I am on linux. Anyway, Neil's instructions are brief:
         USB power
         make clean
         make hex
         (sudo) make fuse (check programmer in Makefile, may need to repeat)
         (sudo) make program
         desolder SJ1 and SJ2
         make IDC ISP cable, connecting header pin 1 to pin 1, check wires
make hex first failed because of absence of avr-gcc. fair enough. apt-get install gcc-avr.
and now this:
ubuntu:fabISP_mac.0.8.2_firmware$ make hex
avr-gcc -Wall -Os -DF_CPU=20000000   -Iusbdrv -I. -DDEBUG_LEVEL=0 -mmcu=attiny44 -c usbdrv/usbdrv.c -o usbdrv/usbdrv.o
In file included from usbdrv/usbdrv.c:11:0:
usbdrv/usbportability.h:121:20: fatal error: avr/io.h: No such file or directory
compilation terminated.
make: *** [usbdrv/usbdrv.o] Error 1
hmm... missing avr-libc? yes. that was the problem. apt-get install avr-libc
ubuntu:fabISP_mac.0.8.2_firmware$ make hex
avr-gcc -Wall -Os -DF_CPU=20000000       -Iusbdrv -I. -DDEBUG_LEVEL=0 -mmcu=attiny44 -c usbdrv/usbdrv.c -o usbdrv/usbdrv.o
avr-gcc -Wall -Os -DF_CPU=20000000       -Iusbdrv -I. -DDEBUG_LEVEL=0 -mmcu=attiny44 -x assembler-with-cpp -c usbdrv/usbdrvasm.S -o usbdrv/usbdrvasm.o
avr-gcc -Wall -Os -DF_CPU=20000000       -Iusbdrv -I. -DDEBUG_LEVEL=0 -mmcu=attiny44 -c usbdrv/oddebug.c -o usbdrv/oddebug.o
avr-gcc -Wall -Os -DF_CPU=20000000       -Iusbdrv -I. -DDEBUG_LEVEL=0 -mmcu=attiny44 -c main.c -o main.o
avr-gcc -Wall -Os -DF_CPU=20000000       -Iusbdrv -I. -DDEBUG_LEVEL=0 -mmcu=attiny44 -o main.elf usbdrv/usbdrv.o usbdrv/usbdrvasm.o usbdrv/oddebug.o main.o
rm -f main.hex main.eep.hex
avr-objcopy -j .text -j .data -O ihex main.elf main.hex
avr-size main.hex
   text    data     bss     dec     hex filename
      0    2020       0    2020     7e4 main.hex
ubuntu:fabISP_mac.0.8.2_firmware$
Now I got hold of a AVR ISP mkII. Hooked it up so the red line (not ground) is on the right withe board pointing up. New problem:
ubuntu:fabISP_mac.0.8.2_firmware$ make fuse
avrdude -c avrisp2 -P usb -p attiny44  -U hfuse:w:0xDF:m -U lfuse:w:0xFF:m
avrdude: usb_open(): cannot read serial number "error sending control message: Operation not permitted"
avrdude: usb_open(): cannot read product name "error sending control message: Operation not permitted"
avrdude: usbdev_open(): error setting configuration 1: could not set config 1: Operation not permitted
avrdude: usbdev_open(): did not find any USB device "usb"
make: *** [fuse] Error 1
ubuntu:fabISP_mac.0.8.2_firmware$ lsusb
Bus 001 Device 005: ID 203a:fff9
Bus 001 Device 006: ID 203a:fff9
Bus 002 Device 002: ID 03eb:2104 Atmel Corp. AVR ISP mkII
Bus 001 Device 001: ID 1d6b:0002 Linux Foundation 2.0 root hub
Bus 002 Device 001: ID 1d6b:0001 Linux Foundation 1.1 root hub
Bus 003 Device 001: ID 1d6b:0002 Linux Foundation 2.0 root hub
Bus 004 Device 001: ID 1d6b:0003 Linux Foundation 3.0 root hub
ubuntu:fabISP_mac.0.8.2_firmware$
From the man page for avrdude:
For the JTAG ICE mkII, if avrdude has been configured with libusb support, port can alternatively be specified as usb[:serialno]. This will cause avrdude to search a JTAG ICE mkII on USB. If serialno is also specified, it will be matched against the serial number read from any JTAG ICE mkII found on USB. The match is done after stripping any existing colons from the given serial number, and right-to-left, so only the least significant bytes from the serial number need to be given.
As the AVRISP mkII device can only be talked to over USB, the very same method of specifying the port is required there.
rookie mistake of not doing sudo as per instruction. Thanks to Amir L who walked me through a flashing.
ubuntu:fabISP_mac.0.8.2_firmware$ sudo make program
avr-gcc -Wall -Os -DF_CPU=20000000       -Iusbdrv -I. -DDEBUG_LEVEL=0 -mmcu=attiny44 -o main.elf usbdrv/usbdrv.o usbdrv/usbdrvasm.o usbdrv/oddebug.o main.o
rm -f main.hex main.eep.hex
avr-objcopy -j .text -j .data -O ihex main.elf main.hex
avr-size main.hex
   text    data     bss     dec     hex filename
      0    2020       0    2020     7e4 main.hex
avrdude -c avrisp2 -P usb -p attiny44  -U flash:w:main.hex:i

avrdude: AVR device initialized and ready to accept instructions

Reading | ################################################## | 100% 0.01s

avrdude: Device signature = 0x1e9207
avrdude: NOTE: FLASH memory has been specified, an erase cycle will be performed
         To disable this feature, specify the -D option.
avrdude: erasing chip
avrdude: reading input file "main.hex"
avrdude: writing flash (2020 bytes):

Writing | ################################################## | 100% 2.60s

avrdude: 2020 bytes of flash written
avrdude: verifying flash memory against main.hex:
avrdude: load data flash data from input file main.hex:
avrdude: input file main.hex contains 2020 bytes
avrdude: reading on-chip flash data:

Reading | ################################################## | 100% 2.44s

avrdude: verifying ...
avrdude: 2020 bytes of flash verified

avrdude: safemode: Fuses OK

avrdude done.  Thank you.

avrdude -c avrisp2 -P usb -p attiny44  -U hfuse:w:0xDF:m -U lfuse:w:0xFF:m

avrdude: AVR device initialized and ready to accept instructions

Reading | ################################################## | 100% 0.01s

avrdude: Device signature = 0x1e9207
avrdude: reading input file "0xDF"
avrdude: writing hfuse (1 bytes):

Writing | ################################################## | 100% 0.00s

avrdude: 1 bytes of hfuse written
avrdude: verifying hfuse memory against 0xDF:
avrdude: load data hfuse data from input file 0xDF:
avrdude: input file 0xDF contains 1 bytes
avrdude: reading on-chip hfuse data:

Reading | ################################################## | 100% 0.00s

avrdude: verifying ...
avrdude: 1 bytes of hfuse verified
avrdude: reading input file "0xFF"
avrdude: writing lfuse (1 bytes):

Writing | ################################################## | 100% 0.00s

avrdude: 1 bytes of lfuse written
avrdude: verifying lfuse memory against 0xFF:
avrdude: load data lfuse data from input file 0xFF:
avrdude: input file 0xFF contains 1 bytes
avrdude: reading on-chip lfuse data:

Reading | ################################################## | 100% 0.00s

avrdude: verifying ...
avrdude: 1 bytes of lfuse verified

avrdude: safemode: Fuses OK

avrdude done.  Thank you.
Here is a good page for decoding fuse bits.
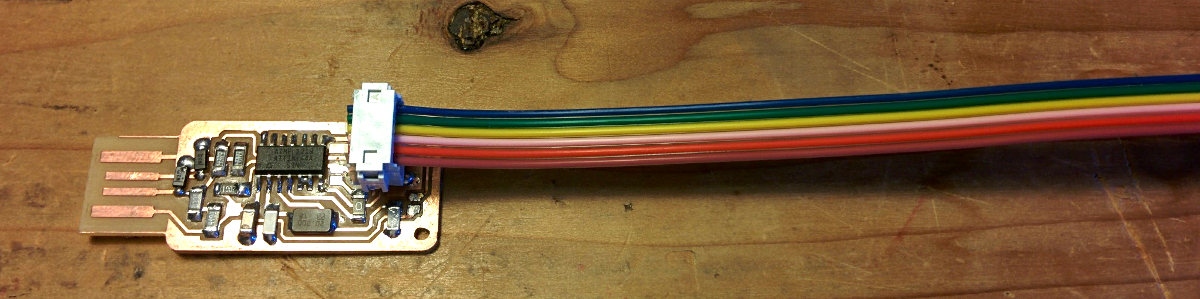
Now I got a programmed programmer. SJ1 and SJ2 desoldered and here we are:
ubuntu:site$ lsusb
Bus 001 Device 008: ID 203a:fff9
Bus 001 Device 006: ID 203a:fff9
Bus 002 Device 079: ID 1781:0c9f Multiple Vendors USBtiny
Bus 001 Device 001: ID 1d6b:0002 Linux Foundation 2.0 root hub
...
ubuntu:site$ dmesg | tail
[56988.705510] usb 2-1: new full-speed USB device number 79 using uhci_hcd
[56988.854220] usb 2-1: New USB device found, idVendor=1781, idProduct=0c9f
[56988.854223] usb 2-1: New USB device strings: Mfr=0, Product=2, SerialNumber=0
[56988.854225] usb 2-1: Product: FabISP
Potting
While completely unnecessary for this project, I wanted to experiment with potting.
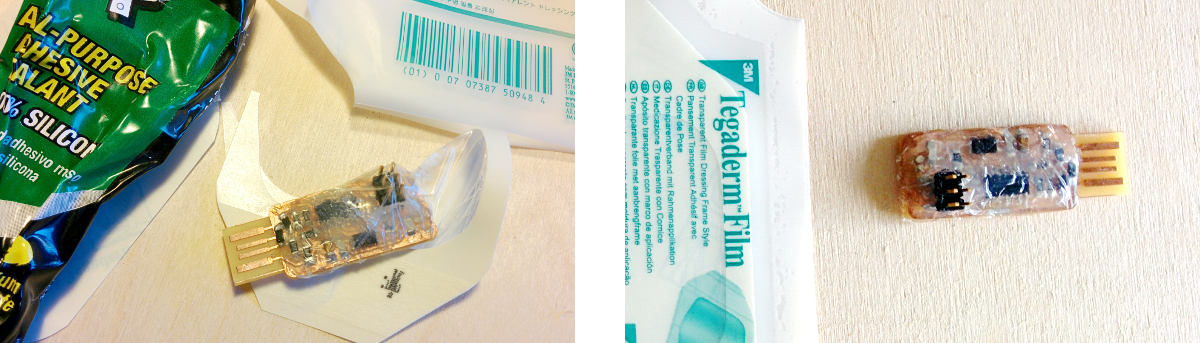
ps. something to try: https://www.youtube.com/watch?v=8UAlHatuFXE
Debugging
I helped a few people debug their boards and by the end of it we had a testing protocol that worked well:
- Use multimeter to make sure ground and VCC are not connected
sudo make fuse- If make fuse fails, using a multimeter go through each connector on the ISP header and check to make sure it is connected to the correct pin(s) on the IC and those pins only.
sudo make program- If make program fails (and sudo make fuse succeeded), then there is a problem with the external clock (crystal / resonator). check caps if using crystal. check connection for shorts.
- If make program succeeds, then you are almost through. Connect your board to a linux machine and check output of
lsusb. You should see a device listed as USBtiny. - If there is USBtiny listed, there is a probably a connection problem from IC to the data pins of the USB
- if this succeeds, desolder jumpers, use board to program another board