|
|
MAS.863 How To Make (Almost) Anything
– Fall 2014 Richard Li Final Project Ideas Week 0 Many ideas are floating around in my head and I haven’t quite decided
on one yet, especially given the time constraints of the semester (or rather the
last week in prototyping the idea). I like to build things that are tools
that can be put to immediate use. Ideally, if I can build things for this
class that can also help my everyday labwork or
safety, then that’s a big win! So here is one idea: Idea 1: Vacuum Controller/Pulsator For my graduate research on nano-engineered
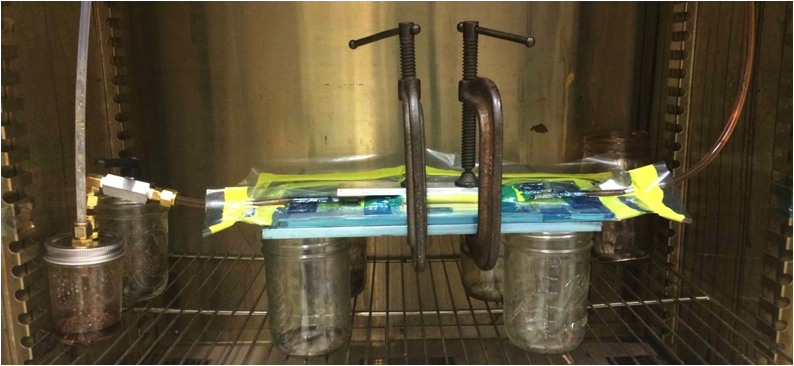
composite materials, I fabricate high performance composite specimens for
mechanical and multifunctional testing. One of the composite fabrication
techniques we employ quite commonly is Vacuum Assisted Resin Infusion (VARI)
which entails first laying up your dry fabric (e.g., carbon fiber, fiber
glass etc.), vacuum bagging it inside a mold, and flowing epoxy resin through
it until it full wets before stopping the flow and curing the resin in place.
Once the piece is cured, the part can be peeled out of the vacuum bag, and
machined down to the section you want – thus your desired composite is
formed. A diagram is shown below:
However, this is a process that is very much manual and
intensive, and requires constant monitoring. Depending on the mold geometry,
the infusion process can last from 45 minutes to over 8 hours. Additionally,
vacuum conditions are absolutely critical to ensure low void content in the
specimen – a high content of which results in large stress
concentrations and drastically impacts the mechanical properties of the
specimen. To really help remove entrapped air bubbles inside the resin, it’s
helpful to pulsate the the vacuum level so that the bubble sizes change, and
likely loosen from any fabric surface they temporarily linger onto. This
would help these voids to advect down towards the vacuum and off of the
sample. In the past, this was done very manually, by either kinking the
downstream tubing (so the vacuum decreases as the flow progresses) and then
unkinking it to bring it back to max vacuum levels. This was usually done in
intervals of 5 to 10 minutes for the full duration of the infusion. One can
imagine how crazy this gets if we do it for 8 hours. Thus, it is of interest
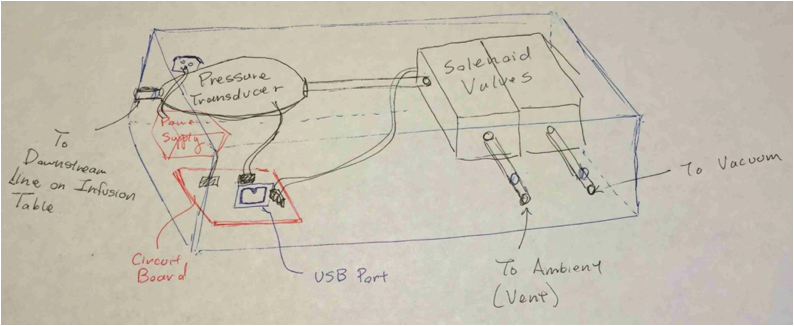
to automate this system! Here’s the vision: A device with 3 tubing ports – one to the
vacuum pump, one to the air (venting), and the last one connected to the
downstream line of our sample for which we’re trying to infuse. This device will
have a pressure sensor (analog vacuum gauge?), and a valve that opens and
closes to the vacuum pump or air. When connected to the computer, this device
will allow a user to specify a vacuum waveform to track. For instance, if we
want to pulse between 29 and 15 inHg in periods of 16 minutes, then the
device will switch open the the valve to the vacuum pump until 29 inHg is
reached within the first 8 minutes, and then open the ambient valve slowly so
it vents to 15 inHg by the 16 minute mark and etc. On the interface side,
this would be great to control remotely as well – say using wifi.
While on one extreme, I might thinking of building
the valves from scratch, these are a highly specialized parts that must
reliably cycle through long durations of labwork. I think what makes the most
sense to implement this would be to integrate commercial off the shelf valves
and sensors into one glorified vacuum control box/panel that can communicate
to a computer. Before I CAD anything up more sensibly, I’ll have to really
dig around the internet to find the size of these valves, and then design my
control box around these devices. Perhaps the closes item to this concept is
shown here: http://www.vacuubrand.com/us/page800.html.
My idea is to have something more DIY, integrated,
and made of cheap commercial off the shelf solenoid valves:
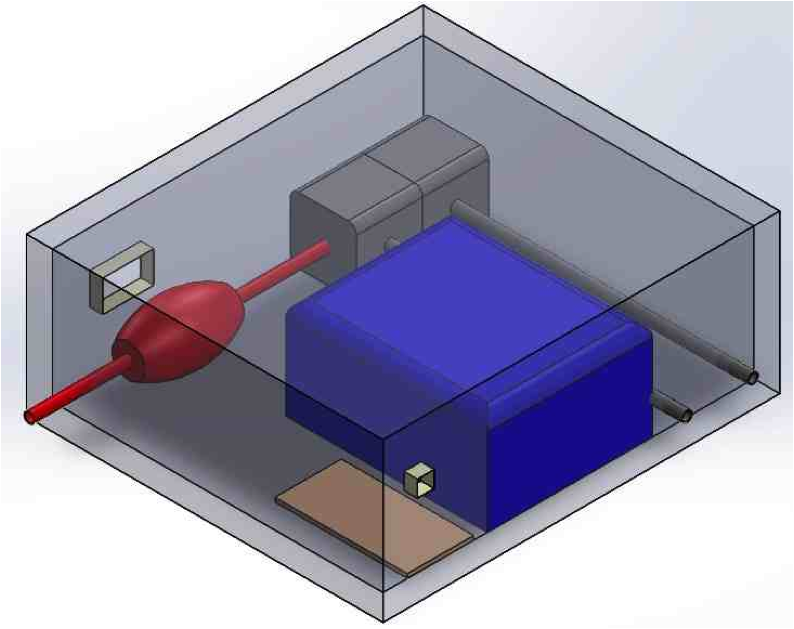
To visualize this better, here is
CAD in solidworks of the parts minus the wiring. The red is the pressure
transducer, the dark grey are the solenoid valves, the blue is the power
supply, and the copper are the circuit boards to be designed which may need a
DAQ mount. The front of the box has a cutout for USB mount, and the rear has
a cutout for the IEC power connector.
|
|
|
|
|
|
|
|
|
|
|
|
|
|
|
|
|
|