Objective
This week we are fabricating our own in-system programmer.
Printed circuit board
We are milling our PDBs from FR1 (phenolic paper) using a Rolang milling machine. I loaded the .png file of the traces into fabmodules (Roland mill- PCB traces 1/64, make sure to load settings).
Settings:
- speed: 3mm/s
- cut depth: 0.1mm If the copper is not completely removed, set cut depth to 0.11mm.
- number of offsets: 4
Milling
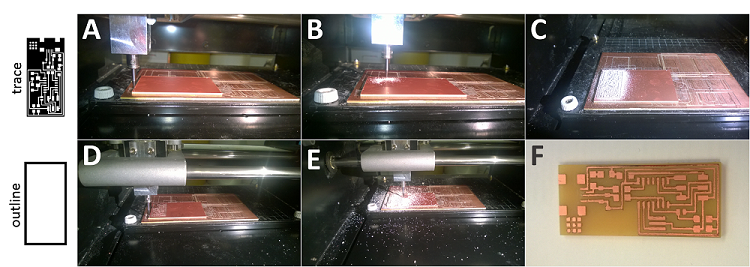
A (positioning board and endmill): After checking the settings I positioned the PCB board ontop of the sacrificial layer and secured it with severeal pieces of double sided tape (make sure, that they don't overlap and that the board is parallel to the border of the milling machine). Secure the 1/64in endmill with the two set screws (with the shank almost all the way in the machine) and lower it using the -down- button of the machine (not all the way, the endmill needs to be able to travel down). Then, loosen the set screws and gently lower the endmill until it touches the board, press it down and tighten the set screws again. You are set to go!
B (milling the traces): Now, send the job from fabmodules, the endmill will start to cut the design (the fab ISP takes about 8min).
C (finished traces): After the traces are cut, vacuum the excess material off.
D+E (milling the outline): Change the endmill from 1/64in to 1/32in to cut the outline. Load the outline .png(Roland mill- PCB outline 1/32) and make sure to use the same 0/0 position that you used for milling the traces. After the outline is milled, lift the board off of the sacrificial layer.
F (clean up): Run a ruler over the board to clean up the lines, use tweezers to remove all burrs. Then wash the board with water and soap and let it dry.
Stuffing
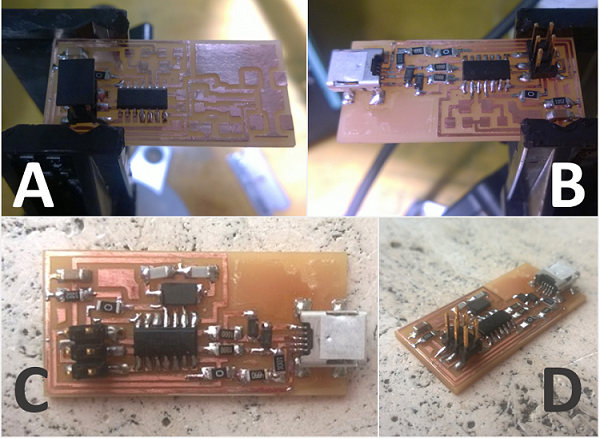
A+B (soldering/stuffing):
Set the soldering iron to 750F and make sure that the tip is clean. Find the components here. I used solder wire with flux. For fixing parts on the board, heat the copper pad and add a bit of solder then add the component (hold is with tweezers) and remove the iron then remove the tweezers. After this solder the other joints of the compontent.
Heat the copper pad and the component with the iron and then add solder (the solder will flow towards heat) then remove solder wire and iron at the same time (pull them away from the joint almost parallel to the board). Then reflow (heat it up again) the first joint, maybe add more solder. All joints should be smooth and shiny.
Start in one corner of the board and work from there (or start in the middle and work outwards) some joints might not be easily accesible after adding all the components. If you need to remove solder, put copper braid over the solder that is to be removed and heat the braid and solder with the iron. The braid will suck up some of the solder. Repeat if necessary.
Components:
- D: diodes (have orientation)
- R: resistors
- C: capacitors
- ISP: 2x3pin header
- USB: USB mni connector
- IC1 t44: ATTINY44A microcontroller (has orientation, little hole over VCC)
- SJ: 0ohm resistor
C (soldering/stuffing continued): The tricky components are the mmicrocontroller and the USB connector. It is possible to solder the connectors of the microcotroller one by one. If there is bridging sometimes just reflowing the solder will take care of it, sometimes you need to remove some of the solder with braid. I soldered the USB connector by putting on a fairly large amount of solder and removing the excess, only the solder on the copper pads will be left behind.
<C+D (finished board): Shiny joints, some components are crooked, that has not been a problem so far.
Programming
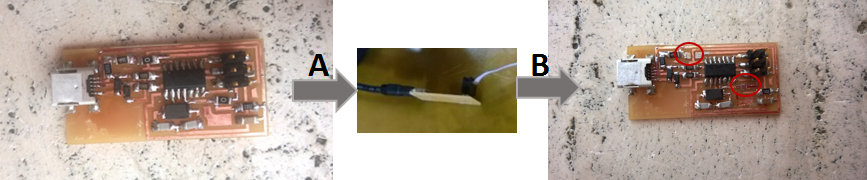
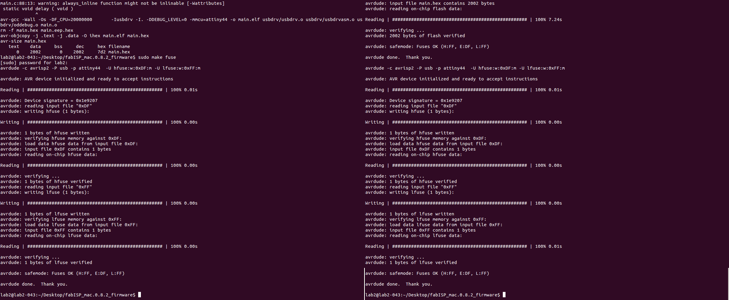
A (programming):
After stuffing the board, connect it to a PC with the USB connector and to a programmer (that is connected to the PC) via the 2x3pin header.
Download the firmware, in the firmware folder open terminal and type:
make clone
make hex
sudo make fuse
sudo make program
If everything is working correctly, you should see progress bars in the terminal (fuse and program):
B (turning it into a programmer): We just programmed our programmer, to turn this programmable board into a programmer we need to remove SJ1 and SJ2. Just desolder the two little resistors. I removed most of the solder on the joints with braid and then heated up the solder on one end, gently lifted the resistor and then heated the solder on the other end. DONE.