 For this week's assignment for 3-D printing, the concept of 'Spiral Design' really saved me.
My original idea was to make a prototype of a 'stir-bar' array device for agitating cultures of yeast (or other microbes) when grown in 96-well microtitre plates. When yeast are grown in liquid culture, they grow more efficiently when the culture is agitated, allow for mixing of the yeast and broth throughout the growth period. This is normally achieved by growing cultures in wide-bottom conical flasks placed on laboratory rotating platforms. The wide-bottom of the flask allows for greater angular velocity of the liquid, resulting in effective mixing of the cultures. However, when yeast cultures are arrayed into microtitre plates (96 or 384 wells), it is difficult to agitate the cultures using standard techniques. This is because the small volumes (~100µL in a 96-well plate), the small diameter of the well itself (~6.5mm for a 96-well plate), and the straight sides of the well 'chimney', do not allow for the generation of sufficient rotation of the liquid to stir the culture.
 In the past, I have solved this problem by placing 1/16" ball-bearing in the wells of the
microtitre plates. I have built a jig to array the ball-bearings so they are spaced:
1 ball-bearing per well, and the plate is inverted over the jig and then the plate and jig
are flipped dropping the ball-bearings into the wells. This solution has worked well, but
since little ball-bearings have the magical ability to fly all over the place, I
was curious to see if I could come up with an alternate solution.
In the past, I have solved this problem by placing 1/16" ball-bearing in the wells of the
microtitre plates. I have built a jig to array the ball-bearings so they are spaced:
1 ball-bearing per well, and the plate is inverted over the jig and then the plate and jig
are flipped dropping the ball-bearings into the wells. This solution has worked well, but
since little ball-bearings have the magical ability to fly all over the place, I
was curious to see if I could come up with an alternate solution.
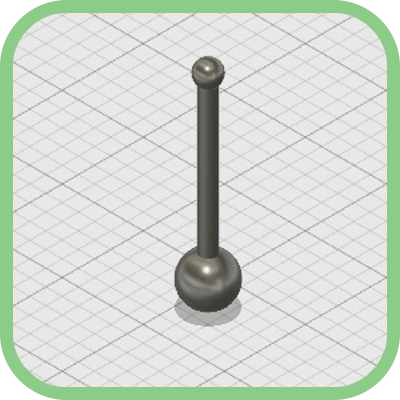
The idea for the device was to have a 'cocktail-stirrer' style stir-bar nested within a block, which would effectively serve as the plate-lid. The stir-bars would be arrayed in a 8 x 12 grid, 9mm on center, matching the geometry of a 96-well microtitre plate.
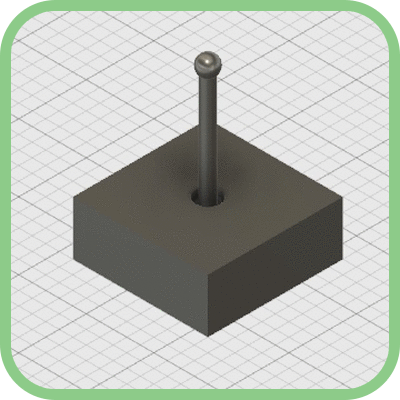
I designed the stirrer using AutoDesk Fusion 360. The stirrer itself is a bar-bell shape with a 3mm diameter sphere on one end, intended to extend down into the plate, and a 1.5mm diameter sphere on the other end, connected by a 10mm long, 1mm diameter rod. The stirrer extends through a block (plate lid) that is 3mm thick, with 3.5mm and 1.8mm diameter concave surfaces on the bottom and top respectively, where the stir-bar passed through. The purpose of this concave surfaces where to serve two separate purposes. On the bottom it allowed the lower sphere to nest within the block, allowing both features to begin on the same plane facilitating fabrication by 3D-printing. On the top, the concave surface would form the socket of a ball-socket joint with the upper sphere, intended to make a more effective fulcrum for stirring.
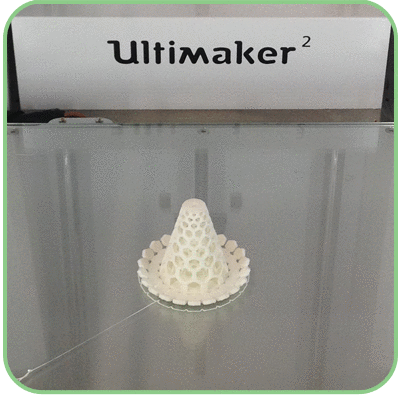
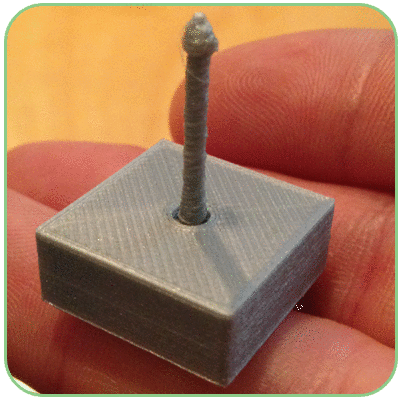 Here is where the spiral design saved me. Instead of trying to make a complete prototype with
all 96 stirrers in place, I decided to try and start with just 1. When I printed this single
iteration of the design, a couple of things became immediately apparent to me. First, the
dimensions that I was designing at were at the lower practical limit of 3D printing. The
upper portion of the stir-bar came out looking more like a soft-serve ice cream cone
then a shaft and sphere, definitely not something the would rotate in a socket joint. Second,
it was obvious the mass of the stirrer was going to be too low to provide it with enough
inertia to agitate the liquid. While this was only intended to be a prototype, I wanted it
to be functional in order to test the viability of the design. Well, it's a good thing that
I started with 1, before I made nearly 100! Whew!!!
Here is where the spiral design saved me. Instead of trying to make a complete prototype with
all 96 stirrers in place, I decided to try and start with just 1. When I printed this single
iteration of the design, a couple of things became immediately apparent to me. First, the
dimensions that I was designing at were at the lower practical limit of 3D printing. The
upper portion of the stir-bar came out looking more like a soft-serve ice cream cone
then a shaft and sphere, definitely not something the would rotate in a socket joint. Second,
it was obvious the mass of the stirrer was going to be too low to provide it with enough
inertia to agitate the liquid. While this was only intended to be a prototype, I wanted it
to be functional in order to test the viability of the design. Well, it's a good thing that
I started with 1, before I made nearly 100! Whew!!!
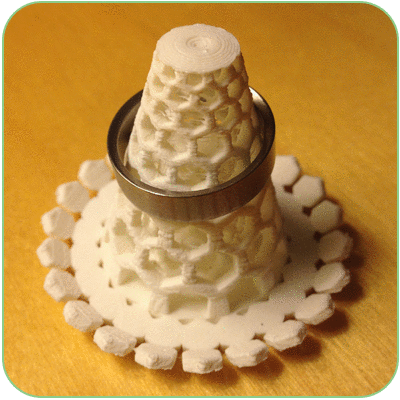
On to design #2! My second design was a night-stand ring holder. My wife wanted to buy one on Etsy, and I figured forget that, I can spend 6 hours designing something and another 2 hours making it on a 3D printer! Well, after she saw my stirrer-prototype, she thought the plastic was ugly, so I decided to make it for myself.
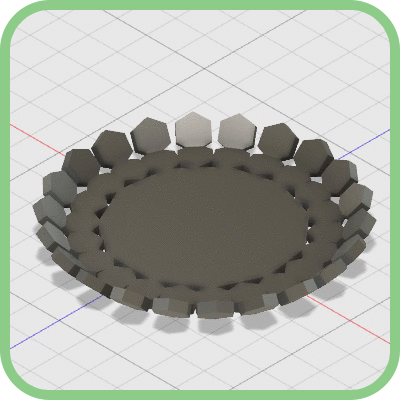
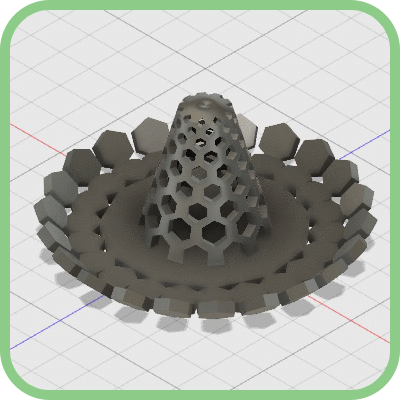
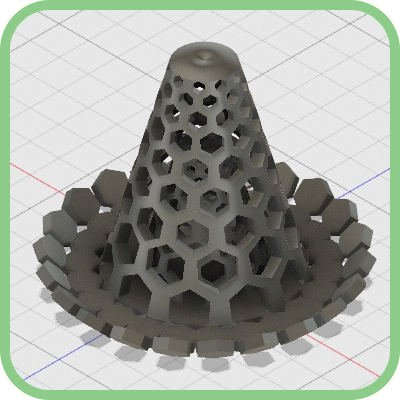
Back to Fusion 360! From the get-go, I knew I would be making something with a conical shape to hold the ring, and I wanted to try and make something that would have a 'honeycomb' appearance. I started by making hexagons to represent the negative space. By using the Create -> Pattern tool, I was able to place a set of hexagons in a circle around a central axis. From there I was on my way, I make a 'cone' of hexagons that I used to remove the negative space from an actual cone using the Modify -> Combine -> Cut tool. I then duplicated the 'hex-cone' shape and scaled it down, to nest a smaller 'hex-cone' within a larger one. I then made a base with an 11-sided polygon, and a rim of hexagons, and I was left with something that looks like a futuristic traffic-cone! Off to the 3D-printer
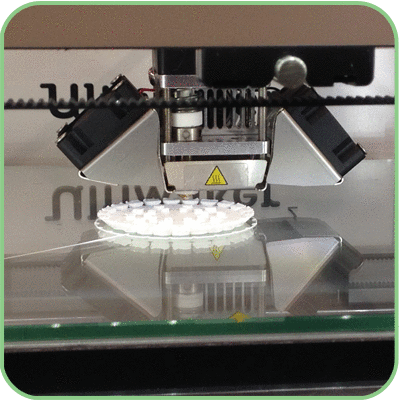
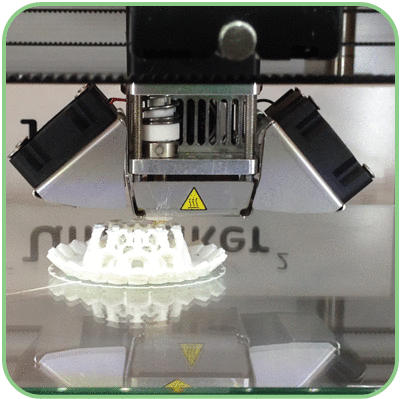
The printing of my ring-holder using the Ultimaker went smoothly. The object coming in at 50mm diameter at the base, and 40mm high, took a little over 2 hours to print.
For the 3D scanning portion of this week's assignment, I played around with the Cubify Sense Handheld 3D scanner.
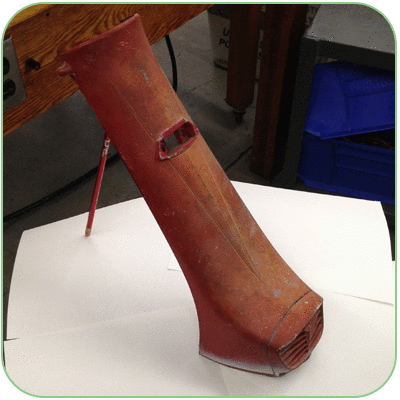 For an object to scan, I decided to bring in something from one of my other passions,
vintage Italian motorscooters. I tried to scan a horncast from a 1963 Lambretta. Based
on the preliminary experience our group had with the Sense scanner, the horncast (about
the length of my arm), seemed to be within the size range that the scanner could handle.
I was also curious to see how well a device like this could accurately replicate objects
thing of an instance where it may be necessary to reproduce a scooter part that is made of
Unobtainium.
For an object to scan, I decided to bring in something from one of my other passions,
vintage Italian motorscooters. I tried to scan a horncast from a 1963 Lambretta. Based
on the preliminary experience our group had with the Sense scanner, the horncast (about
the length of my arm), seemed to be within the size range that the scanner could handle.
I was also curious to see how well a device like this could accurately replicate objects
thing of an instance where it may be necessary to reproduce a scooter part that is made of
Unobtainium.
The answer: Not well
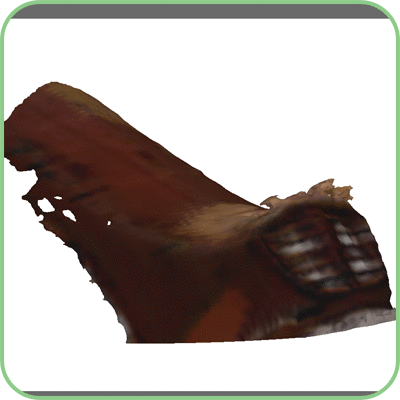 However after a frustrating hour of the scanner lossing 'tracking' and becoming tangled
in the USB cord, I ended up with a piss-poor, partial scan of a Lambretta horncast. Needless
to say, I think that 3D scanning is a technology that is still in its infancy.
However after a frustrating hour of the scanner lossing 'tracking' and becoming tangled
in the USB cord, I ended up with a piss-poor, partial scan of a Lambretta horncast. Needless
to say, I think that 3D scanning is a technology that is still in its infancy.
That said, seeing some of the results that others, like Gabe, achieved using the Capture 123 app, I would be curious to give that a try.