What is git?
Git is a widely used version control system for software development. It is a distributed revision control system with an emphasis on speed, data integrity, and support for distributed, non-linear workflows. Git was initially designed and developed by Linus Torvalds for Linux kernel development in 2005 [1].
For those of you who don't know the basis of version control, refer to this video to learn about the basis:
For those of you who know the basis of version control but want a quick introduction to git:
Installing Git
Linux
If you want to install Git on Linux via a binary installer, you can generally do so through the basic package-management tool that comes with your distribution. If you’re on a Debian-based distribution like Ubuntu, try apt-get:
sudo apt-get install git
For more options, there are instructions for installing on several different Unix flavors on the Git website.
If you’re on Fedora for example, you can use yum:
sudo yum install git
Mac
There are several ways to install Git on a Mac. The easiest is probably to install the Xcode Command Line Tools. On Mavericks (10.9) or above you can do this simply by trying to run git from the Terminal the very first time. If you don’t have it installed already, it will prompt you to install it.
If you want to install manually without XCode, you can use a binary installer. An OSX Git installer is maintained and available for download at the Git website.
Windows
There are also a few ways to install Git on Windows. The most official build is available for download on the Git website. Unless you know better, keep the defaults during the installation process. When this is finished, launch Git Bash and proceed through this tutorial.
Setting computer up to use the archive
Configuring SSH
The first thing we need to do is to obtain the keys for the archive you want to use, which in this case are distributed by Neil via email to the accepted students. This will contain two files: classes and classes.pub. The former being the private key and the latter being the public one. We now need to place them in a directory located in ~/.ssh. Let's first check that the path exists:
ls ~/.ssh
If the directory doesn't exist (e.g., if you are using Windows), you can create it by using the following command:
mkdir ~/.ssh
To keep things clean, let's make a subdirectory for the keys. Again, check if it already exists:
ls ~/.ssh/keys
If the directory doesn't exist, you can create it by using the following command:
mkdir ~/.ssh/keys
Now that we have the folder created, move the archive keys you're going to use into the folder. You can do this in many different ways. The simplest is probably to use the move command to move the correct files:
mv path-to-keys/classes ~/.ssh/keys
mv path-to-keys/classes.pub ~/.ssh/keys
For instance, if the keys are in your Downloads folder, use:
mv ~/Downloads/classes ~/.ssh/keys
mv ~/Downloads/classes.pub ~/.ssh/keys
Key file permissions
We need to make sure the keys have the correct permissions set, otherwise SSH won't let you connect to the archive. Let's check the permissions of the files in the keys folder:
ls -la ~/.ssh/keys
Permissions for the private key file(s) should be:
-rw-------
This is unlikely to be the case right out of the box. So type the following command:
chmod go-rwx ~/.ssh/keys/classes
Cloning the class archive
Now that we have the SSH keys configured correctly, we need to clone the archive to our local computer. First let's create a config file to create an alias for a host 'fabclasses' so that it is easier to refer to when we want to clone our repo. Because the location .ssh is hidden (that's what the leading dot means), this can be tricky for beginners. Probably the easiest is to create an empty file on the Desktop. On Mac or Linux, you can use the command:
touch ~/Desktop/config
or if you are using Windows, you can try
> ~/Desktop/config
Then we need to open this file in a text editor on our system. Good, often-preinstalled choices of text editors for beginners are TextEdit (on Mac), NotePad (on Windows), or gedit (on Linux). Other great, more fully-featured choices are Atom, Sublime Text, emacs, or vi.
In your editor, open this new file from the Desktop and copy the following code (make sure the code is correctly indented, otherwise it won't work).
host fabclasses
hostname fab.cba.mit.edu
user git
port 846
identityfile ~/.ssh/keys/classes
Save this file and close your text editor. Now we need to move this file to the .ssh folder. If you created it on the Desktop, you can use this command:
mv ~/Desktop/config ~/.ssh/
If everything went well, you should be able to see this file in .ssh with the following command:
ls ~/.ssh
In this file, the 'host fabclasses' is an alias that refers to hostname 'fab.cba.mit.edu' with port '846', etc.
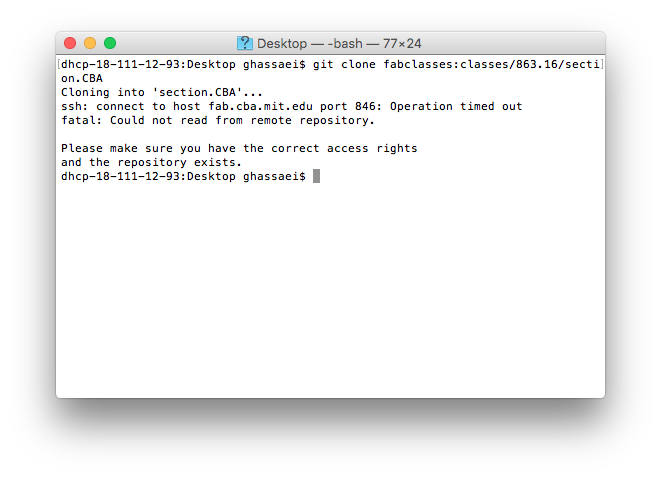
Let's clone our repo now. First make sure you are not on a guest wifi network, this will throw up an error when you try to clone (see screenshot below). In the terminal (git bash on Windows) navigate to the folder where you want to clone your repo. For example, to put the repo on the Desktop:
cd ~/Desktop/
Now type one of the following commands based on your section:
git clone fabclasses:classes/863.16/section.Architecture
git clone fabclasses:classes/863.16/section.CBA
git clone fabclasses:classes/863.16/section.Harvard
git clone fabclasses:classes/863.16/section.EECS
Note that this is an example for How to make (almost) anything class, year 2016. If you are from the future, you would need it to change it for your corresponding year.
If things went well, the ls command should show you a new folder for your section. If you got a message with a timeout error, you are probably connected to a guest network right now. Switch to a non-guest network and try again:
While we're at it, we can clone the documentation repo for tutorials.
git clone fabclasses:classes/863.16/doc
Configuring git
For our class' repo, a couple configuration options are helpful:
git config --global push.default simple
git config --global pull.rebase true
The first adopts the new standard push behavior, while the second avoids unnecessary merges (a source of confusion for beginners).
Identify yourself
Before we commit anything, we should tell git (and our classmates) who we are.
git config --global user.name "First Last"
git config --global user.email "me@site.thing"
At this point you've finished setting up the repo. :)
The rest of this tutorial will cover what you need to do whenever you add content to your webpage.
Editing your webpage
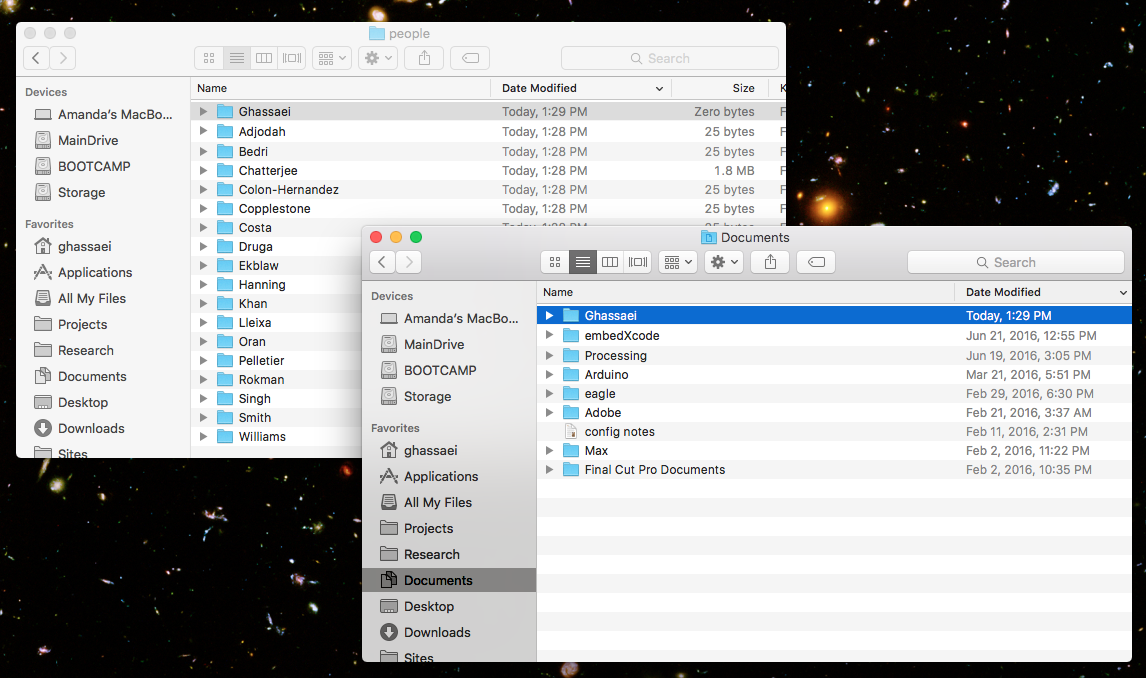
Using the Finder/File Explorer, navigate to the class archive. Inside it, you will see a folder called "people". Inside "people" is a folder for each person in the class. Open your folder. This is where you will add all your documentation for this class.
When you first clone the repo, this folder contains a single file called "index.html". This is the page linked to from the people directory.
Open your index.html file with an html editor (Atom, Sublime), it should look like this:
<html>
<body>
empty page
Now open index.html with a web browser (Chrome, Firefox, etc), you should see:

Edit this file by chaning the text "empty page" to something else. (Also close the html and body tags, they should have been closed from the start) Now you have:
<html>
<body>
hello, welcome to my website!
</html>
</body>
Refresh index.html in your web browser, you should see:

You can learn more about editing HTML at Khan Academy, Mozilla, and w3schools.
You will need to create a new webpage for each week of this class. A good file structure for this would be something like:
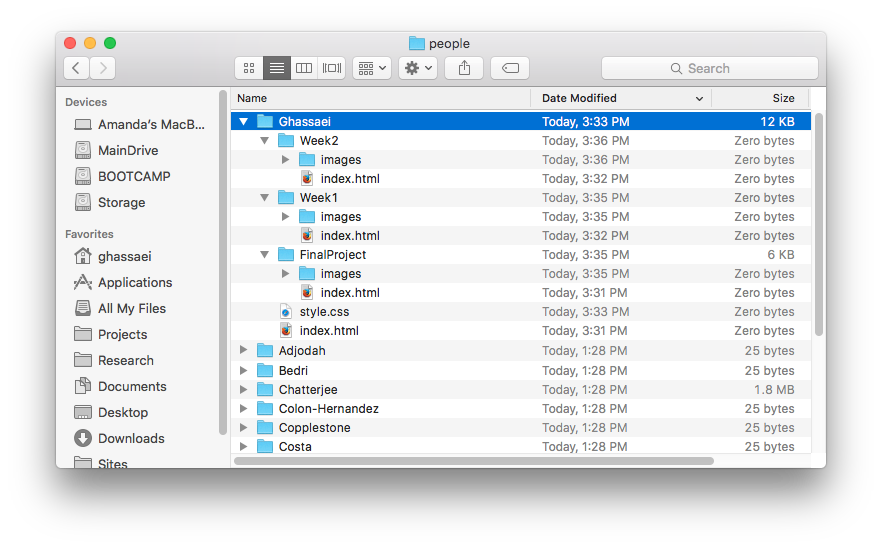
Where each week has its own folder with an index.html and a folder for images for that week. Then people/Ghassaei/index.html is a table of contents page that links to the pages FinalProject/index.html, Week1/index.html and so on... You can do whatever you want, there is no official format for these pages, this is just a suggestion.
Adding and committing changes
Once you have made changes to your local copy of the repo, you need to use git to save it to the remote copy so it shows up at fab.cba.mit.edu.
Open the terminal/Git Bash and navigate to your folder in the people directory with cd. I ran:
cd ~/Desktop/section.CBA/people/Ghassaei
Show the current status of your local archive
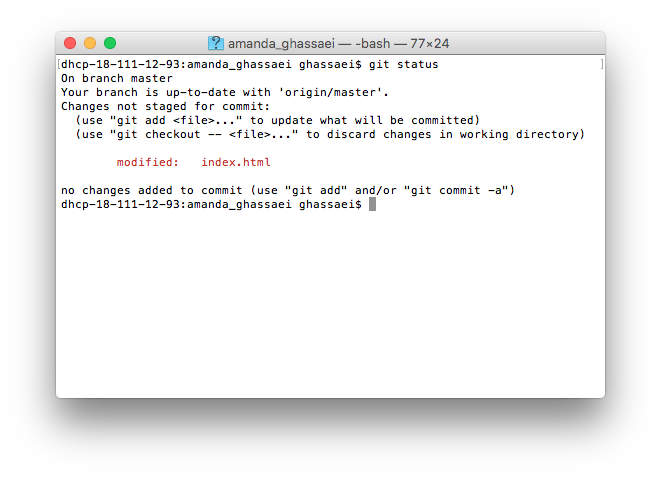
The first thing you should do when adding changes to the class repo is to check the status with the following command:
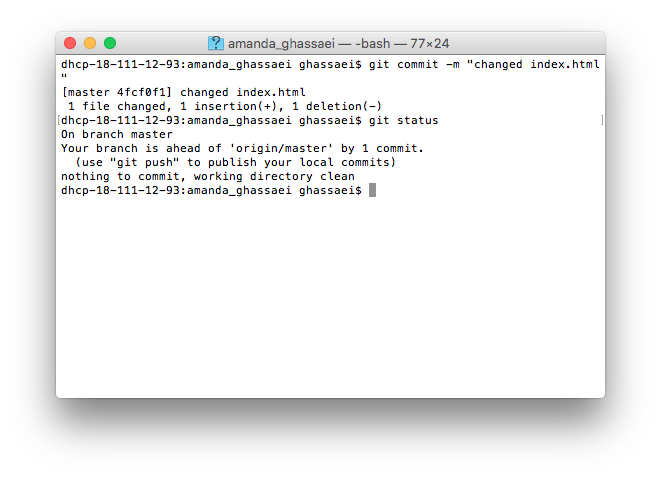
git status
This gives you the brief summary which files have changed. I changed my index.html file so I see the following output:
Adding files
Before you add any files, make sure they're not huge. If everyone commits large images to the repo it will become bloated very quickly and make neil grumpy. To see the sizes of your top ten biggest files run:
du -h . | sort -nr | head -n10
The files sizes are listed in bytes on the left.
If any of these files are bigger than 2MB, please make them smaller or compress them (e.g. jpg is smaller than png). You should not be committing more than a few MB a week.
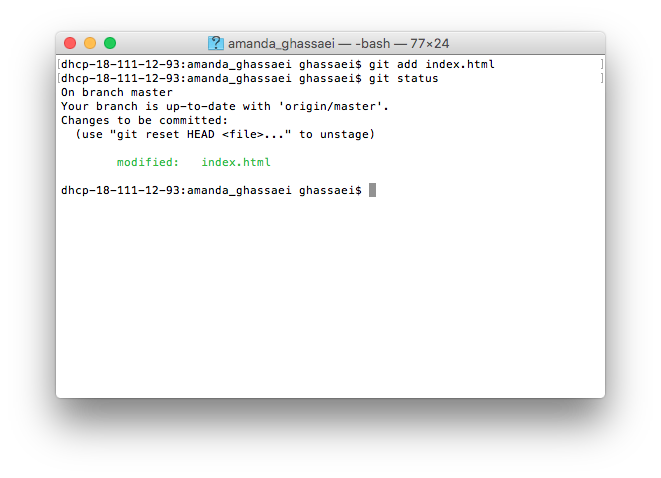
I want to include my changes to index.html to the next commit, so I add the file to the commit using the following command:
git add index.html
Re-running "git status" should now shows that the file will be added to the next commit:
If I wanted to add all the files that I've changed in one go, I can use the command:
git add -A
In case you accidentally add a file that you don't want to commit (maybe a large image), you can unstage (un-add) it with the following command:
git reset HEAD myHugeImage.png
Or unstage all files with:
git reset HEAD
Committing
Run "git status" to be sure everything you've added is what you want to put in your commit. Everything in green will be committed.
Next, create a commit with the following command:
git commit -m "Your commit message"
The commit message is a note to yourself and your classmates about what has changed in your commit, one short sentence is good.
Re-running "git status" now shows:
Pulling
If it's been a while since you first cloned the archive or since you last pulled, one of the other students in the class has probably made a change to the remote repo of the fab server. Pulling grabs the latest copy of the repo from the server and merges it with your local copy. To do this run:
git pull
Then:
git status
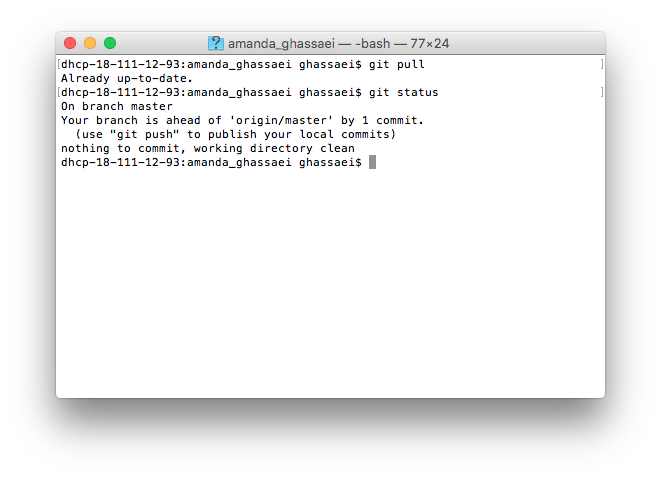
In my case, there were no remote changes to pull, so git tells me I'm already up to date. If there were changes git would download the changes, print them to the terminal window, and tell you if they were merged into your local copy successfully.
Pushing to the archive
Running git status tells me that my local copy of the repo is ahead of the remote copy "origin/master" by one commit. Pushing to the archive uploads your latest commits to the server. Run:
git push
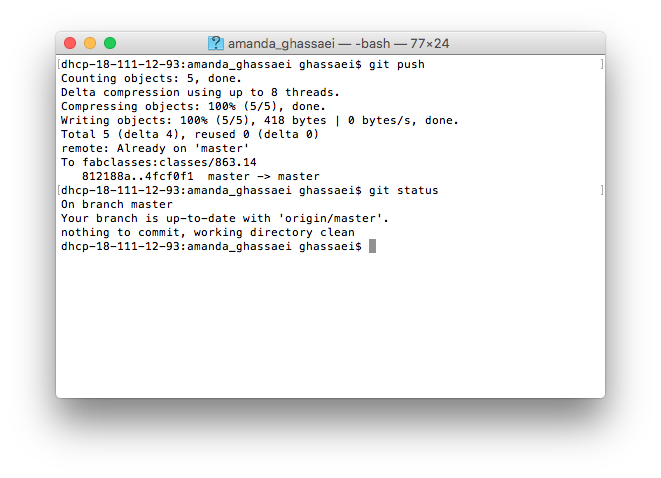
"git status" tells me that my local copy of the repo is up to date with the server. If I go to my fab class webpage I should see the new changes.
You might see a message saying that your local copy is behind the remote copy and the push failed. In this case, pull again and then try to push. Someone might have just pushed a change in the last few seconds since your last pull.
Overview
The commands to commit and push a change to the repo are:
git status
git add -A
git status
git commit -m "Your commit message"
git status
git pull
git status
git push
git status
Yes, that's a lot of "git status", but it's good to make sure you don't run into any errors along the way.
Help! It's not working!!
In most cases, each person only edits files in their folder and there will be no conflicts between commits. Unfortunately, you may still run into a weird git situation at some point this semester, due to mistakes you've made or possibly mistakes by other students. If you're very familiar with git, you may be able to debug problems yourself. If you are not comfortable debugging, here's a set of steps to take that should fix 99.9% of git problems:
BEFORE YOU ATTMEPT THIS, READ THROUGH ALL 4 STEPS SO YOU UNDERSTAND WHAT YOU'RE DOING
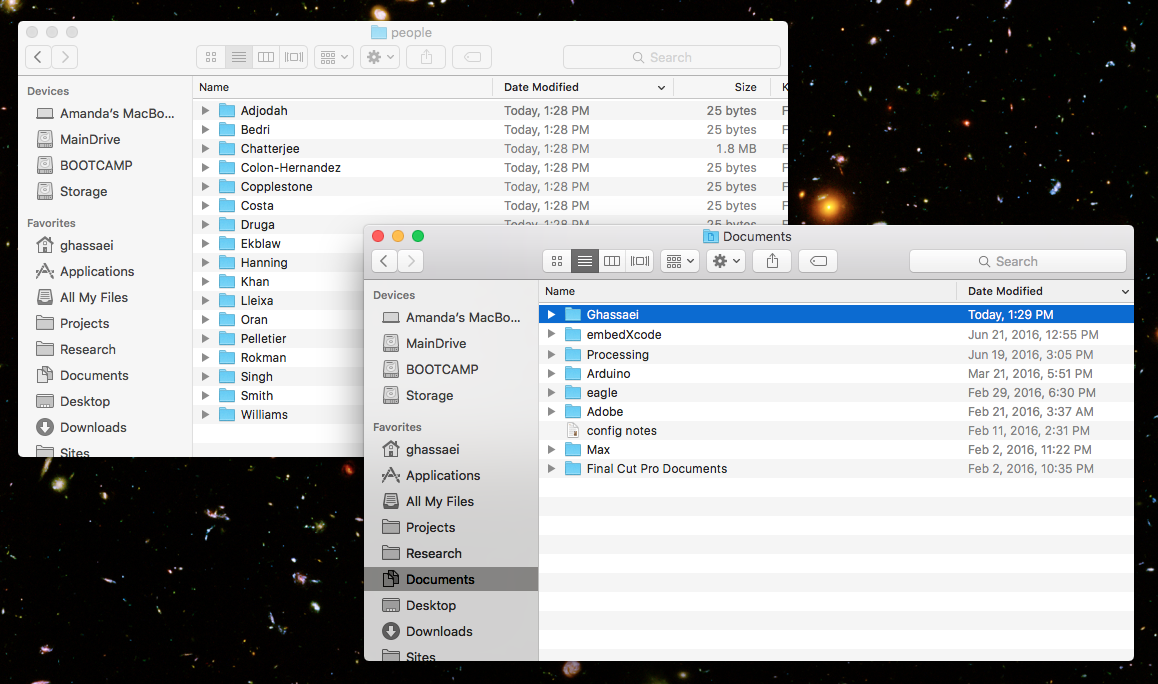
Step 1: Copy your folder in the people directory to a COMPLETELY DIFFERENT PLACE ON YOUR COMPUTER - somewhere outside the section folder. I like to do this using the Finder/File Explorer so that I can see exactly what I'm doing. Here I am copying my folder in the people directory, called "Ghassaei", to my Documents folder:
Step 2: DANGER DANGER!!! This next step will DELETE YOUR MOST RECENT CHANGES in your local copy of the repo. So be sure you've COMPLETED STEP 1 and made a copy of your folder from the people directory somewhere else on your computer.
Open the terminal/git bash and navigate to your section repo. Run the following commands to grab the latest version of the repo from the server and make your local copy identical to it:
git fetch origin
git reset --hard origin/master
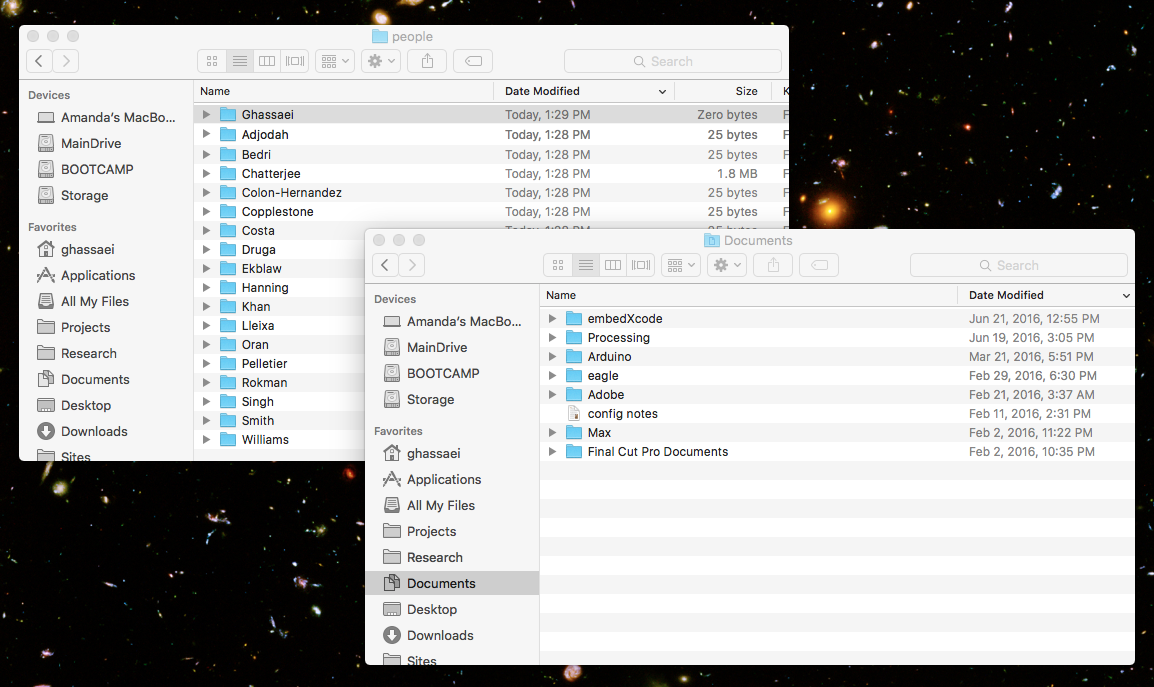
Step 3: Now that you are all synced up with the most recent version of the repo on the class server, update your folder in the people directory. Again I'm going to do this through the Finder/File Explorer. I deleted my "Ghassaei" folder from the "people" directory, and replaced it with the copy I made in my Documents folder:
Step 4: Now running "git status" shows me that only files in my personal directory have changed. Go ahead and make a commit and push it to the repo using the steps from the last section.