
WEEK 6: _ read microcontroller datasheet, program your board, and use a plethora of different programming languages and environments.
Embedded Programming Basics
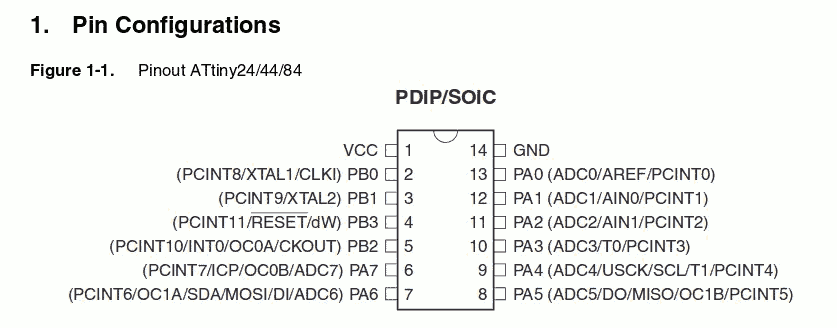
The very first task this week was to read the ATTiny microcontroller data sheet . There is alot to this. I hope that at least if I do not understand all of it now, I will in the future at least be aware of some of the terms and where to find info on them in this ATTiny bible.
For now, I will glean the basics. These two diagrams are useful. This board runs off a Harvard Architecture.

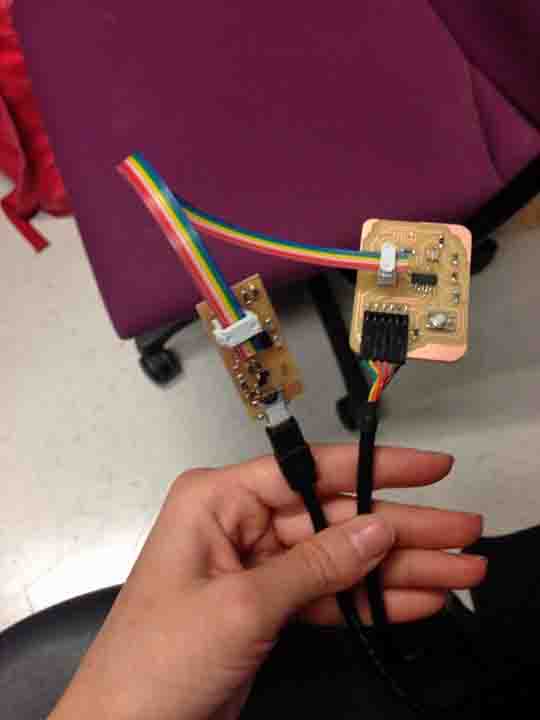
Since I already fabbed the Hello-World board in Week4, I can dive straight into programming. The very first step is to burn the bootloader for the configuration of the board you are about to program. To do this I:
(1) plugged my Hello-World board into my USBtiny programmer from Week2, on one end; this programmer receives the compiled sketch off your computer via the USB cable, and programs it onto your board.
(2) connected the Hello-World board to a FTDI cable, also running to one of the computer's USB ports. This cable says plugged in after programming is done. It will power the board and relay Rx/Tx signals.
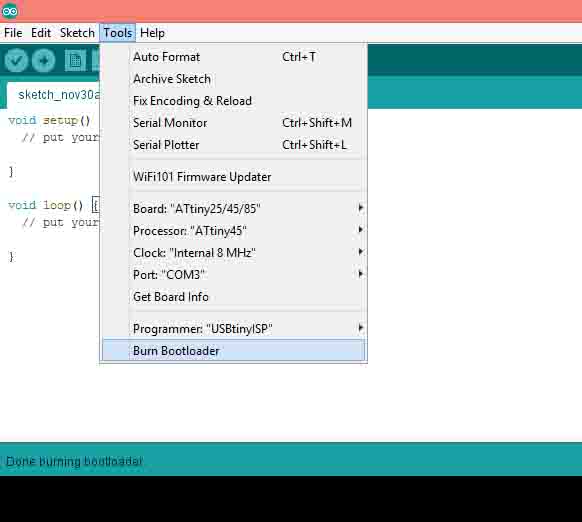
My board is a ATTiny44, using an external clock at 20Hz, off the COM3 port. In arduino, you simply pull down the menu 'Tools' and "Burn Bootloader"
Arduino Environment: Blinky Light
Arduino environment comes with example code, including 'Blink' to loop an LED on and off every second.
// put your setup code here, to run once:
pinMode(3, OUTPUT);
}
void loop() {
// the loop function runs over and over again forever:
digitalWrite(3, HIGH); // turn the LED on (HIGH is the voltage level)
delay(1000); // wait for a second
digitalWrite(3, LOW); // turn the LED off by making the voltage LOW
delay(1000); // wait for a second
}
Arduino Environment: ON Switch
Next, I integrate the board's switch into the code. . I slightly alter existing Button example code to have the light turn on when ever the button is being pressed.
const int buttonPin = 2; // the pushbutton pin
const int ledPin = 7; // the LED pin
// variables will change:
int buttonState = 0; // for reading pushbutton status
void setup() {
// initialize the LED pin as an output:
pinMode(ledPin, OUTPUT);
// initialize the pushbutton pin as an input:
pinMode(buttonPin, INPUT);
}
void loop() {
// read the state of the pushbutton value:
buttonState = digitalRead(buttonPin);
// check if the pushbutton is pressed.
// if it is, the buttonState is HIGH:
if (buttonState == HIGH) {
// turn LED on:
digitalWrite(ledPin, HIGH);
} else {
// turn LED off:
digitalWrite(ledPin, LOW);
}
}
Arduino Environment: ON-OFF Switch
Finally, one last layer of logic is to make the button into a switch, in which the light's pin will be opposite of what it was the last time the button was pressed (i.e. If it is pressed while off, it turns on, and vice versa).
I learned about adding a debounce time here. This is a buffer to stop any signal reading 20 ms directly after the button is pressed, which may be an artifact of an un-perfect step function.
const int buttonPin = 2; // the pushbutton pin
const int ledPin = 7; // the LED pin
// variables will change:
boolean buttonState = true; // for reading pushbutton status
boolean lastState = true;
boolean toggleState = true;
int debouncetime = 20;
void setup() {
// initialize the LED pin as an output:
pinMode(ledPin, OUTPUT);
// initialize the pushbutton pin as an input:
pinMode(buttonPin, INPUT);
}
void loop() {
// read the state of the pushbutton value:
buttonState = digitalRead(buttonPin);
if (debouncetime >= 0) {
debouncetime--;
}
if (buttonState == LOW && lastState == HIGH && debouncetime <= 0) { //button has been pressed
toggleState = !toggleState;
debouncetime = 20;
}
// check if the pushbutton is pressed.
// if it is, the buttonState is HIGH:
if (toggleState == HIGH) {
// turn LED on:
digitalWrite(ledPin, HIGH);
} else {
// turn LED off:
digitalWrite(ledPin, LOW);
}
lastState = buttonState;
}
}
Programming in C
I also explore the use of the C enviroment to program the boards. Using the following cues from Neil in bash, we programmed.
The python window was unresponsive for me, and I could not get the Echo function to work! I will keep working on this and farmilliarize myself with C.