(final project)Kevin Kwok's (almost) Adventures in
How To Make (almost) Anything

Tuesday, Dec 6, 2016, 5:16 PM EST

Massachusetts Institute of Technology, Cambridge, MA, United States
39°F Mostly Cloudy

A Room-Scale Crane

For the final project, I'm making a room-scale crane.

I'm putting networked nodes in 3 corners of the room driving DC motors which control spools of fishing line which will position an end-effector.

If I have additional time, I might add another wireless actuator for controlling Z independent of the other axes.

Saturday, Dec 10, 2016, 5:20 PM EST

Massachusetts Institute of Technology, Cambridge, MA, United States
27°F Mostly Clear

Electronics Design

These nodes use the Nordic Semiconductor nRF24L01+ modules to communicate with each other. Modules for the nRF24L01+ half-duplex transciever chip are sold for less than $1, which means it's ridiculously cheap.

It operates on 3.3V, so both it and the ATTiny44 are made to be run on regulated 3.3V power.

Sunday, Dec 11, 2016, 12:00 PM EST

Massachusetts Institute of Technology, Cambridge, MA, United States
32°F Partly Cloudy

Routing Boards

Initially there was some problem with the pads being too big which was fixed by changing the settings in the design review configuration

I tried experimenting with routing on two layers, but eventually gave up because it’ll probably be obnoxious to flip the board and align it properly. Certainly more complicated than just adding a few zero ohm resistors.

Here is the single layer board layout which I ended up settling on, there are a few changes compared to the “real” first working boards, but almost all the components are in their same places.

The motor is driven by an H-Bridge, the Allegro MicroSystems, LLC A4953ELJTR-T.

Sunday, Dec 11, 2016, 6:23 PM EST

Massachusetts Institute of Technology, Cambridge, MA, United States
21°F Mostly Sunny

Driving Motor with DC Power Supply

It’s apparently a 12V motor, but it works with 9V and draws a certain amount of current that I forgot to write down.

Sunday, Dec 11, 2016, 8:40 PM EST

Massachusetts Institute of Technology, Cambridge, MA, United States
30°F Partly Cloudy

nRF24 H-Bridge Driver

This will form the backbone my final project, so I made 3 of these boards for each of the 3 axes.

Unfortunately they don’t seem to work.

Sunday, Dec 11, 2016, 11:09 PM EST

Massachusetts Institute of Technology, Cambridge, MA, United States
30°F Light Snow

Thermal Ground

I had designed the board with the assumption that the H-bridge was like any other IC and I could route wires underneath it. Apparently it’s actually got a giant metal contact on the bottom.

To get around this, I cut tiny bits of kapton tape and covered the thermal sink on the bottom to insulate it from the signals passing underneath.

Epilogue:

Turns out that none of the boards worked anyway, so it’s not clear whether or not this helped.

Sunday, Dec 11, 2016, 11:23 PM EST

Massachusetts Institute of Technology, Cambridge, MA, United States
30°F Light Snow

Land of the misfit boards

You can see a lot of these boards are broken. I held some of them for too long under the hot air gun and the FR1 material started to bubble up. Other ones were inadvertent shorts.

I probably shouldn’t have made so many before realizing that they’re almost all broken.

Monday, Dec 12, 2016, 3:10 AM EST

Massachusetts Institute of Technology, Cambridge, MA, United States
32°F Cloudy

H-Bridge Debugging

In an effort to figure out how to drive the H-bridge, I desoldered it from my board, soldered it onto a SSOP breakout adapter that I had lying around and poked around with it on a breadboard.

Nothing came of a any of these experiments, and I’m not entirely sure why.

It was however about this time that I learned that LSS needed to be shorted to GND.

Monday, Dec 12, 2016, 9:49 AM EST

Massachusetts Institute of Technology, Cambridge, MA, United States
39°F Light Rain

Battery Test

I wanted a minimum testing environment which I could do from home. Of the four or so boards that I had stuffed, only one of them could be programmed successfully. Still unable to drive H-bridge.

Tuesday, Dec 13, 2016, 1:36 AM EST

Massachusetts Institute of Technology, Cambridge, MA, United States
36°F Clear

Voodoo Pigeon Magic

Adding a random sheet of aluminum foil in between the boards somehow makes the signal go from nonexistent to quite strong even across the room

Tuesday, Dec 13, 2016, 2:05 AM EST

Massachusetts Institute of Technology, Cambridge, MA, United States
36°F Clear

Enclosure Prototyping in Antimony

I’m imagining something which fits into the corners of my room, so naturally I want some kind of shape which is flat on 3 sides.

I think it’d be cool if it had a hemispherical interface, because circles are pretty neat.

Note that this screenshot is upside down, it’ll be mounted on a corner of the ceiling.

Here’s what the program/dataflow procedure in Antimony looked like

Saturday, Dec 17, 2016, 12:00 PM EST

Massachusetts Institute of Technology, Cambridge, MA, United States
32°F Light Snow

Modeling Motor & Spool in Fusion360

Saturday, Dec 17, 2016, 12:03 PM EST

Massachusetts Institute of Technology, Cambridge, MA, United States
32°F Light Snow

Manually running motor for Neil’s H-bridge board

  // FORWARD FAST
  clear(bridge_port, IN1);
  set(bridge_port, IN2);
  _delay_ms(1000);
  clear(bridge_port, IN2);

Saturday, Dec 17, 2016, 12:07 PM EST

Massachusetts Institute of Technology, Cambridge, MA, United States
32°F Light Snow

David A. Mellis has a arduino ide plugin which adds support for programming ATTinys: https://github.com/damellis/attiny

It has a rigid pin mapping which is incompatible with some libraries.

I’m using SpenceKonde’s ATTinyCore (https://github.com/SpenceKonde/ATTinyCore) which has configurable pinouts

The “Alternative Pinout” corresponds to the ATTinyCore pinout, whereas the normal one is the damellis one.

Saturday, Dec 17, 2016, 12:10 PM EST

Massachusetts Institute of Technology, Cambridge, MA, United States
32°F Light Snow

Neil’s unabridged H-bridge:

Grace Copplestone suggested increasing the default on_delay duration from 3us to 30us, which seemed to make it work.

Saturday, Dec 17, 2016, 12:13 PM EST

71 Vassar St, Cambridge, MA, United States
32°F Light Snow

David Mellis has a good tutorial for setting up the Arduino IDE for use with the ATTiny: http://highlowtech.org/?p=1695

But I think ATTinyCore has better features, so I used http://drazzy.com/package_drazzy.com_index.json as the board manager URL instead

Saturday, Dec 17, 2016, 12:15 PM EST

Massachusetts Institute of Technology, Cambridge, MA, United States
32°F Light Snow

Neil’s H-bridge

IN1 = PA3 = Pin 7 (attc)
IN2 = PA2 = Pin 8 (attc)

Saturday, Dec 17, 2016, 12:20 PM EST

Massachusetts Institute of Technology, Cambridge, MA, United States
32°F Light Rainsnow

Digital H-Bridge Driver

I had a lot of trouble getting the H-bridge to work earlier and I was unable to even manually jump Vcc to IN1/IN2 to get the motor to turn, so this was pretty monumental to see this work.

I later tested the direct jumper trick again and it seems to work this time. It may have been due to a problem in the old board design.

// attinycore
const int in1 = 7;
const int in2 = 8;

void setup() {
  pinMode(in1, OUTPUT);
  pinMode(in2, OUTPUT);
}

void loop() {

  // fast forward
  digitalWrite(in1, LOW);
  digitalWrite(in2, HIGH);
  delay(1000);
  digitalWrite(in2, LOW);
  
  delay(2000);
  
  // fast reverse
  digitalWrite(in2, LOW);
  digitalWrite(in1, HIGH);
  delay(1000);
  digitalWrite(in1, LOW);

  delay(2000);
}

Saturday, Dec 17, 2016, 12:33 PM EST

Massachusetts Institute of Technology, Cambridge, MA, United States
32°F Light Snow

For my board:

IN1 = PB2 = Pin 2 (attc)
IN2 = PA7 = Pin 3 (attc)

Saturday, Dec 17, 2016, 12:38 PM EST

Massachusetts Institute of Technology, Cambridge, MA, United States
32°F Light Snow

Driving my board’d outputs: an H-bridge and an LED:

// attinycore pin ordering
const int in1 = 2;
const int in2 = 3;
const int led = 10; 

void setup() {
  pinMode(in1, OUTPUT);
  pinMode(in2, OUTPUT);
  pinMode(led, OUTPUT);
}

void loop() {
  
  // fast forward
  digitalWrite(in1, LOW);
  digitalWrite(in2, HIGH);
  delay(1000);
  digitalWrite(in2, LOW);

  digitalWrite(led, HIGH);
  delay(2000);
  digitalWrite(led, LOW);
  
  // fast reverse
  digitalWrite(in2, LOW);
  digitalWrite(in1, HIGH);
  delay(1000);
  digitalWrite(in1, LOW);

  digitalWrite(led, HIGH);
  delay(2000);
  digitalWrite(led, LOW);
}

I was getting this error when trying to “upload the bootload” from the Arduino (which for an attiny mostly just flashes the fuse bits)

avrdude: Expected signature for ATtiny44 is 1E 92 07 Double check chip, or use -F to override this check.

Things worked again after I ran

avrdude -p t44 -P usb -c usbtiny -U lfuse:w:0xe2:m

Saturday, Dec 17, 2016, 2:22 PM EST

Massachusetts Institute of Technology, Cambridge, MA, United States
32°F Mist and Fog

Tragedy seems to have struck, and somehow one of my boards has shuffled off its mortal coil in a puff of magic smoke.

Saturday, Dec 17, 2016, 5:56 PM EST

43–45 Vassar St, Cambridge, MA, United States
30°F Mist and Fog

motor offset from center

0.9-(1.475/2)+(0.235/2) = 0.28 inches

The first attempt at printing failed as one of the legs got separated from the build plate

The print was done with PLA on a 3DWox Sindoh

New design has a bigger area touching the baseplate

Lots of area to adhere to the build plate, hopefully won’t have problems with the stuff anymore. Also, the extra material on the side should make it easier to attach it to walls.

One problem that I only noticed after the print job had been sent and started is there’s actually a part of the design which results in an unsupported cantilever, which leads to much sadness.

That said, the result is still usable.

Sunday, Dec 18, 2016, 1:16 AM EST

43–45 Vassar St, Cambridge, MA, United States
36°F Cloudy

It seems like the 3dWOX Sindoh doesn’t accurately project the time remaining for the first few support layers. It took about an hour for “15 minutes” worth of work.

Sunday, Dec 18, 2016, 1:17 AM EST

71 Vassar St, Cambridge, MA, United States
36°F Cloudy

I realized there’s a part of the new design which is less than totally printable, but its not going to happen for a few hours, and there’s a chance that it’ll still be usable anyway

Sunday, Dec 18, 2016, 2:11 AM EST

Massachusetts Institute of Technology, Cambridge, MA, United States
37°F Cloudy

Code for receiving messages on ATTiny

// CE and CSN are configurable, specified values for ATtiny85 as connected above
#define CE_PIN 8
#define CSN_PIN 7


#include "RF24.h"

RF24 radio(CE_PIN, CSN_PIN);

//byte addresses[][6] = {
//  "1Node","2Node"};
byte address[] = "4Node";
//unsigned long payload = 0;

const int led = 10;


typedef struct {
  int motor;
  int target; 
  int mode;
} CommandPacket;

CommandPacket message;


void setup() {
  pinMode(led, OUTPUT);
  
  // Setup and configure rf radio
  radio.begin(); // Start up the radio
  
  radio.setPALevel(RF24_PA_LOW);
  radio.setRetries(15, 0); // Max delay between retries & number of retries
//  radio.openWritingPipe(addresses[1]); // Write to device address '2Node'
//  radio.openReadingPipe(1, addresses[0]); // Read on pipe 1 for device address '1Node'
  radio.openReadingPipe(1, address);
  radio.setAutoAck(false); // Ensure autoACK is enabled
  radio.startListening(); // Start listening
}

unsigned long got_time;


void loop(void){

    if( radio.available()){
      digitalWrite(led, HIGH);
      
                                                                    // Variable for the received timestamp
      while (radio.available()) {                                   // While there is data ready
        radio.read( &got_time, sizeof(unsigned long) );             // Get the payload

        radio.read( &message, sizeof(message) );             // Get the payload
      }
//     
//      radio.stopListening();                                        // First, stop listening so we can talk   
//      radio.write( &got_time, sizeof(unsigned long) );              // Send the final one back.      
//      radio.startListening();                                       // Now, resume listening so we catch the next packets.     

      
      delay(50);
      digitalWrite(led, LOW);
      delay(50);
   }


}
include define

Sunday, Dec 18, 2016, 3:03 AM EST

43–45 Vassar St, Cambridge, MA, United States
39°F Cloudy

nRF24 LED controller

// CE and CSN are configurable, specified values for ATtiny85 as connected above
#define CE_PIN 8
#define CSN_PIN 7


#include "RF24.h"

RF24 radio(CE_PIN, CSN_PIN);

byte address[] = "4Node";

// attinycore pin ordering
const int in1 = 2;
const int in2 = 3;
const int led = 10;

const int deviceId = 1;


typedef struct {
  int motor;
  int target;
  int mode;
} CommandPacket;

CommandPacket message;
CommandPacket messageStaging;
unsigned long lastMessage;

void setup() {
  pinMode(in1, OUTPUT);
  pinMode(in2, OUTPUT);
  pinMode(led, OUTPUT);


  // Setup and configure rf radio
  radio.begin(); // Start up the radio

  radio.setPALevel(RF24_PA_LOW);
  radio.setRetries(15, 0); // Max delay between retries & number of retries

  radio.openReadingPipe(1, address);
  radio.setAutoAck(false); // Ensure autoACK is enabled
  radio.startListening(); // Start listening

  message.mode = 15;
  message.motor = 0;
}


void loop(void) {

  if (radio.available()) {                                                           // Variable for the received timestamp
    while (radio.available()) {                                   // While there is data ready
      radio.read( &messageStaging, sizeof(messageStaging) );             // Get the payload
      if (messageStaging.target == deviceId) {
        message = messageStaging;
      }
    }
  }

  if (message.mode == 0) {
    digitalWrite(led, LOW);
  } else if (message.mode == 1) {
    digitalWrite(led, HIGH);
  } else {
    if ((millis() / message.mode) % 2 == 0) {
      digitalWrite(led, LOW);
    } else {
      digitalWrite(led, HIGH);
    }
  }

  if (message.motor == 0) {
    digitalWrite(in1, LOW);
    digitalWrite(in2, LOW);
  } else if (message.motor > 0) {
    digitalWrite(in1, LOW);
    analogWrite(in2, message.motor);
  } else if (message.motor < 0) {
    digitalWrite(in2, LOW);
    analogWrite(in1, -message.motor);
  }

}
include define

Sunday, Dec 18, 2016, 3:50 AM EST

71 Vassar St, Cambridge, MA, United States
37°F Mist and Fog

It’s using about 100mA idling, which seems pretty bad. Looking into using watchdog and sleep.

Sunday, Dec 18, 2016, 3:59 AM EST

Massachusetts Institute of Technology, Cambridge, MA, United States
37°F Mist and Fog

'WDTCR' was not declared in this scope

I was getting this error trying out the watchdog code from https://github.com/sparkfun/H2OhNo/blob/master/firmware/H2OhNo/H2OhNo.ino

It turns out that according to the datasheets, WDTCR has been renamed to WDTCSR

http://www.atmel.com/Images/8006S.pdf

Sunday, Dec 18, 2016, 4:28 AM EST

Massachusetts Institute of Technology, Cambridge, MA, United States
39°F Fog

Disabling ADC gets it down to 1.9mA @ 9V current draw while idling, peaking at ~4mA when it activates the radio to poll

It should be using much less than that, but it seems the LM3480 3.3V regulator isn’t specced to use any less than 2mA even without a load.

This is upsetting because the ATTiny should be able to run with 0.005mA (5uA) while sleeping, and the nRF24 can be powered down to .9uA.

That said it does have to wake up for something like 50ms every 2s, using ~20mA for 50ms.

Sunday, Dec 18, 2016, 4:30 AM EST

Massachusetts Institute of Technology, Cambridge, MA, United States
41°F Fog

Tweaking 3DWox Settings

The default settings said that the print would take like 15 hours, but by tweaking the advanced settings and giving up a lot of assurances about structural integrity and aesthetics, it’s possible to decrease the amount of time of a print by a factor of 3.

That said, this might not be worth it.

Sunday, Dec 18, 2016, 7:21 AM EST

Massachusetts Institute of Technology, Cambridge, MA, United States
46°F Cloudy

The front seems to have printed out okay. It didn’t collapse at the keystone as I had feared, but the material did get kinda stringy.

Sunday, Dec 18, 2016, 12:16 PM EST

Massachusetts Institute of Technology, Cambridge, MA, United States
46°F Cloudy

avr/dt.h: watchdog timer handling

http://www.nongnu.org/avr-libc/user-manual/group__avr__watchdog.html

wdt_reset()
WDTO_15MS, WDTO_30MS, WDTO_60MS, WDTO_120MS, WDTO_250MS, WDTO_500MS, WDTO_1S, WDTO_2S, WDTO_4S, WDTO_8S

avr/sleep.h: Power Management and Sleep Modes

http://www.nongnu.org/avr-libc/user-manual/group__avr__sleep.html#ga3775b21f297187752bcfc434a541209a

Sunday, Dec 18, 2016, 12:27 PM EST

Massachusetts Institute of Technology, Cambridge, MA, United States
55°F Light Rain

Servos apparently use ~100mA idling with no load, and about 1A in operation according to http://www.rcuniverse.com/forum/rc-radios-transmitters-receivers-servos-gyros-157/2357551-how-much-power-does-servo-use.html

We definitely want to be using /much/ less power than that when idling, so we need some way of switching off the whole servo apparatus.

Apparently the Sevo.detach() method doesn’t actually do anything as most servos are not designed with the case that PWM stops in mind http://www.modsbyus.com/how-to-properly-detachturn-off-a-servo-with-arduino/.

So I think the right thing to do is to have some sort of MOSFET to switch on/off the servo part of the board.

Sunday, Dec 18, 2016, 12:29 PM EST

Massachusetts Institute of Technology, Cambridge, MA, United States
55°F Light Rain

Fab Inventory N-Channel MOSFET: https://www.fairchildsemi.com/datasheets/ND/NDS355AN.pdf

P-Channel MOSFET: https://www.fairchildsemi.com/datasheets/ND/NDS356AP.pdf

When using a MOSFET, you can switch at either the high side (toggling connectivity to power) or low side (toggling connectivity to ground). You would use P-Channel for switching the high side, and N-Channel for switching the low side.

I think if I want to switch 5V with a P-Channel MOSFET, the transition happens around 5V - Vgs, which seems to be about 1.6V

But we’re running the microcontroller at 3.3V, so there’s a good chance we can’t actually switch between the modes.

It looks like we’ll have to use a low-side configuration.

Sunday, Dec 18, 2016, 5:38 PM EST

43 Vassar St, Cambridge, MA, United States
45°F Cloudy

Expected signature for ATtiny84 is 1E 93 0C

Sketch uses 3,846 bytes (46%) of program storage space. Maximum is 8,192 bytes.
Global variables use 57 bytes (11%) of dynamic memory, leaving 455 bytes for local variables. Maximum is 512 bytes.
avrdude: Expected signature for ATtiny84 is 1E 93 0C
         Double check chip, or use -F to override this check.
Wrong microcontroller found.  Did you select the right board from the Tools > Board menu?

Problem: ATTiny84 was selected instead of ATTiny44

Sunday, Dec 18, 2016, 5:38 PM EST

36 Albany St, Cambridge, MA, United States
45°F Cloudy

I had an error message trying to flash bootloader, but it worked after I had uploaded a program.

Sunday, Dec 18, 2016, 5:55 PM EST

Kresge Auditorium, Cambridge, MA, United States
43°F Cloudy

All the boards

Sunday, Dec 18, 2016, 6:51 PM EST

71 Vassar St, Cambridge, MA, United States
43°F Cloudy

Odd Heisenbugs

In computer programming jargon, a heisenbug is a software bug that seems to disappear or alter its behavior when one attempts to study it.

From https://en.wikipedia.org/wiki/Heisenbug

avrdude: Expected signature for ATtiny44 is 1E 92 07
         Double check chip, or use -F to override this check.
Error while burning bootloader.
avrdude: error: usbtiny_receive: Operation timed out (expected 128, got 0)

avrdude: error: usbtiny_receive: Operation timed out (expected 4, got 0)
avr_read(): error reading address 0x0000
    read operation not supported for memory "flash"
avrdude: failed to read all of flash memory, rc=-2
the selected serial port avrdude: failed to read all of flash memory, rc=-2
 does not exist or your board is not connected

Then it worked when I tried again.

Sunday, Dec 18, 2016, 8:11 PM EST

Kresge Auditorium, Cambridge, MA, United States
37°F Cloudy

Fake action shot

#spiraldevelopment

I found a piece of circular plastic that was part of the support material from someone else’s 3d printer job and I decided to pretend that it was a spindle and I taped it up against a corner to see what it’d look like.

One neat thing is you see the reflection of the object in the mirror and it looks like a hemisphere.

spiraldevelopment

Sunday, Dec 18, 2016, 8:14 PM EST

Massachusetts Institute of Technology, Cambridge, MA, United States
37°F Cloudy

Assembling an anchor

Walking

Sunday, Dec 18, 2016, 8:14 PM EST

Massachusetts Institute of Technology, Cambridge, MA, United States
37°F Cloudy

The opening of the housing is about 2.354in by 0.70in.

It fits a 3in diameter object pretty well.

3.5in is probably the biggest thing that could likely fit.

Sunday, Dec 18, 2016, 8:15 PM EST

43–45 Vassar St, Cambridge, MA, United States
37°F Cloudy

The motor spindle has a diameter of 0.227in

There’s a hole through the middle with about an 1/8” diameter

Monday, Dec 19, 2016, 12:56 AM EST

Kresge Auditorium, Cambridge, MA, United States
32°F Clear

Starting the third 3D-printed anchor housing

Walking

Monday, Dec 19, 2016, 1:09 AM EST

Kresge Auditorium, Cambridge, MA, United States
32°F Clear

Motor and spool

Here you see the final gear assembly with the orthogonal channel for the locking pin and the hole filled with hot glue attached to the motor.

The motor is a Jameco 253471: DC Motor with Gearhead 12VDC 74mA (MOTOR,DC,GEAR,12V,50/1,120RPM, 1100G-CM,74MA)

The individual modules consist of a brushed DC motor from Jameco found in the Fab inventory. DC Motor with Gearhead 12VDC 74mA

The motor drives a spool for monofillament illusion thread Beadalon Supplemax 0.40mm Nylon Bead Stringing Material, 50m, Clear.

Walking

Monday, Dec 19, 2016, 2:05 AM EST

Massachusetts Institute of Technology, Cambridge, MA, United States
32°F Clear

Designed spool

Each “anchor” has a DC motor driving a spool of fishing line, the spool consists of 3 sandwiched sheets of black acrylic

The outer pieces have a 3.4in diameter, and the inner one has a 3in diameter.

There’s a square hole in the side so all the spools can be aligned to each other. Some kind of pin could be inserted there, but instead I just squished them together and filled the hole with hot glue.

BTW, the hot glue guns at the EDS are really hot

Monday, Dec 19, 2016, 2:17 AM EST

Massachusetts Institute of Technology, Cambridge, MA, United States
32°F Clear

Redesigned Spool

The problem with the old design was that there wasn’t other than press fitting which actually kept the spool spinning with the motor. This was problematic as this means effectively the crane can’t pick anything up.

The motors actually have a little hole going through their shaft where you can stick a pin to attach it to something.

So I changed the design so there’s a channel where a pin or something can fit.

Monday, Dec 19, 2016, 2:29 AM EST

Massachusetts Institute of Technology, Cambridge, MA, United States
32°F Clear

Servo Board

Here’s a board using the nRF24, it’s basically the same as the one with the h-bridge but designed to drive servos instead.

To do this we have a beefier 5V regulator, and an N-channel MOSFET so we can disable the servo whenever we want to.

Monday, Dec 19, 2016, 2:46 AM EST

Massachusetts Institute of Technology, Cambridge, MA, United States
32°F Clear

Importing Regulation

For designing the servo board, I needed the 5V 1A regulator which wasn’t in the fab eagle library. Luckily I found the same thing, LM1117 on the Sparkfun Eagle Library.

I imported the LM1117 5V 1A regulator and added it to the htmaa tutorials/electronics repo.

Monday, Dec 19, 2016, 2:57 AM EST

Massachusetts Institute of Technology, Cambridge, MA, United States
32°F Clear

End Effector

The original plan was to have some sort of crane thing, but I haven’t actallly designed the crane thing yet and that seems like it’d be difficult, and I didn’t end up buidling/testing the circuit for the servo (I’m not sure the circuit design works yet).

So another idea is essentially to build a big electromagnet and glue neodymium magnets to things in order to pick them up.

The advantage to this is we don’t actually need any new boards— the H-Bridge boards (of which I’ve made a few extras) can just as well be used drive an electromagnet.

It might however interfere with communications?

Monday, Dec 19, 2016, 11:37 AM EST

Massachusetts Institute of Technology, Cambridge, MA, United States
21°F Mostly Sunny

Low Power nRF24 Node

/*
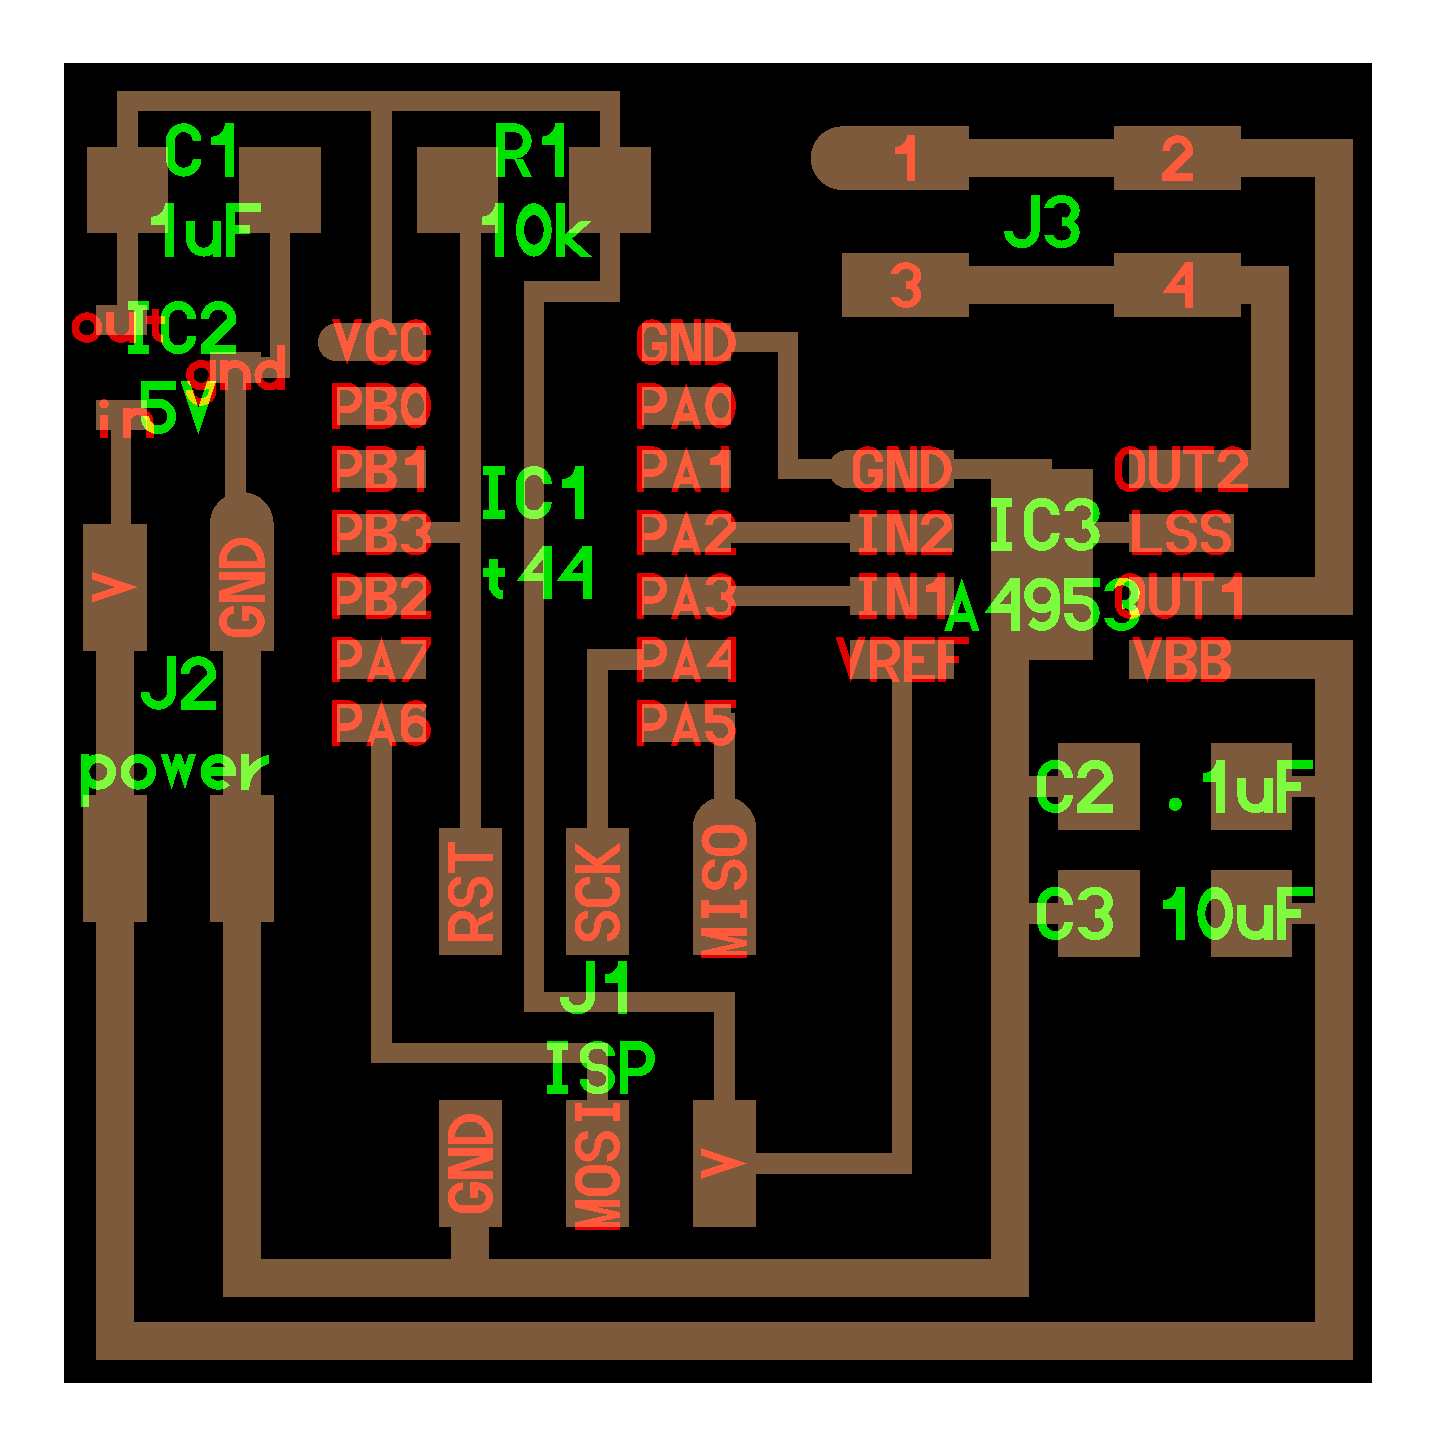
    ATtiny24/44/84 Pin map with CE_PIN 8 and CSN_PIN 7
  Schematic provided and successfully tested by Carmine Pastore (https://github.com/Carminepz)
                                  +-\/-+
    nRF24L01  VCC, pin2 --- VCC  1|o   |14 GND --- nRF24L01  GND, pin1
                            PB0  2|    |13 AREF
                            PB1  3|    |12 PA1
                            PB3  4|    |11 PA2 --- nRF24L01   CE, pin3
                            PB2  5|    |10 PA3 --- nRF24L01  CSN, pin4
                            PA7  6|    |9  PA4 --- nRF24L01  SCK, pin5
    nRF24L01 MOSI, pin7 --- PA6  7|    |8  PA5 --- nRF24L01 MISO, pin6
                                  +----+
*/

// CE and CSN are configurable, specified values for ATtiny85 as connected above
#define CE_PIN 8
#define CSN_PIN 7


#include "RF24.h"
#include <avr/sleep.h>
#include <avr/wdt.h>

RF24 radio(CE_PIN, CSN_PIN);

byte address[] = "KK123";

// attinycore pin ordering
const int in1 = 2;
const int in2 = 3;
const int led = 10;

const int idleTimeout = 1000;

const int deviceId = 1;


typedef struct {
  int motor;
  int target;
  int mode;
} CommandPacket;

CommandPacket message;
CommandPacket messageStaging;
unsigned long lastMessage;

void setup() {
  pinMode(in1, OUTPUT);
  pinMode(in2, OUTPUT);
  pinMode(led, OUTPUT);


  // Setup and configure rf radio
  radio.begin(); // Start up the radio

  radio.setPALevel(RF24_PA_LOW);
  radio.setRetries(15, 0); // Max delay between retries & number of retries

  radio.openReadingPipe(1, address);
  radio.setAutoAck(false); // Ensure autoACK is enabled
  radio.startListening(); // Start listening


  // blink for 550ms to indicate startup
  for (int i = 0; i < 5; i++) {
    digitalWrite(led, HIGH);
    delay(10);
    digitalWrite(led, LOW);
    delay(100);
  }


  ADCSRA &= ~(1 << ADEN); //Disable ADC, saves ~230uA

  //Power down various bits of hardware to lower power usage
  set_sleep_mode(SLEEP_MODE_PWR_DOWN); //Power down everything, wake up from WDT
}


void loop(void) {

  if (radio.available()) {    
    while (radio.available()) {  
      radio.read( &messageStaging, sizeof(messageStaging) ); 
      if (messageStaging.target == deviceId) {
        message = messageStaging;
        lastMessage = millis();
        wdt_disable();
      }
    }
  }

  bool isIdle = (millis() - lastMessage) > idleTimeout;


  if (isIdle) {
    message.mode = 0;
    message.motor = 0;
  }

  if (message.mode == 0) {
    digitalWrite(led, LOW);
  } else if (message.mode == 1) {
    digitalWrite(led, HIGH);
  } else {
    if ((millis() / message.mode) % 2 == 0) {
      digitalWrite(led, LOW);
    } else {
      digitalWrite(led, HIGH);
    }
  }

  if (message.motor == 0) {
    digitalWrite(in1, LOW);
    digitalWrite(in2, LOW);
  } else if (message.motor > 0) {
    digitalWrite(in1, LOW);
    analogWrite(in2, message.motor);
  } else if (message.motor < 0) {
    digitalWrite(in2, LOW);
    analogWrite(in1, -message.motor);
  }


  if (isIdle) {
    radio.stopListening();
    radio.powerDown();
    setup_watchdog(WDTO_2S); //Setup watchdog to go off after 1sec
    sleep_mode(); //Go to sleep! Wake up 1sec later and check water
    radio.powerUp();
    radio.startListening();
    delay(50); // some time to pick up messages
  }
}


//This runs each time the watch dog wakes us up from sleep
ISR(WDT_vect) {
  //Don't do anything. This is just here so that we wake up.
}


//Sets the watchdog timer to wake us up, but not reset
//0=16ms, 1=32ms, 2=64ms, 3=128ms, 4=250ms, 5=500ms
//6=1sec, 7=2sec, 8=4sec, 9=8sec
//From: http://interface.khm.de/index.php/lab/experiments/sleep_watchdog_battery/
void setup_watchdog(int timerPrescaler) {

  if (timerPrescaler > 9 ) timerPrescaler = 9; //Limit incoming amount to legal settings

  byte bb = timerPrescaler & 7;
  if (timerPrescaler > 7) bb |= (1 << 5); //Set the special 5th bit if necessary

  //This order of commands is important and cannot be combined
  MCUSR &= ~(1 << WDRF); //Clear the watch dog reset
  WDTCSR |= (1 << WDCE) | (1 << WDE); //Set WD_change enable, set WD enable
  WDTCSR = bb; //Set new watchdog timeout value
  WDTCSR |= _BV(WDIE); //Set the interrupt enable, this will keep unit from resetting after each int
}


include define

Monday, Dec 19, 2016, 11:38 AM EST

Massachusetts Institute of Technology, Cambridge, MA, United States
21°F Mostly Sunny

nRF24 Controller

This code runs on an Arduino and broadcasts commands which are picked up by other nodes.

Hook up the Arduino to the nRF24 like this:


/*
* Getting Started example sketch for nRF24L01+ radios
* This is a very basic example of how to send data from one node to another
* Updated: Dec 2014 by TMRh20
*/

#include <SPI.h>
#include "RF24.h"


/* Hardware configuration: Set up nRF24L01 radio on SPI bus plus pins 7 & 8 */
RF24 radio(7,8);
/**********************************************************/

byte address[] = "KK123";

typedef struct {
  int motor;
  int target; 
  int mode;
} CommandPacket;

CommandPacket message;


void setup() {
  Serial.begin(115200);
  Serial.println(F("RF24/examples/GettingStarted"));
  Serial.println(F("*** PRESS 'T' to begin transmitting to the other node"));
  
  radio.begin();

  // Set the PA Level low to prevent power supply related issues since this is a
 // getting_started sketch, and the likelihood of close proximity of the devices. RF24_PA_MAX is default.
  radio.setPALevel(RF24_PA_HIGH);

  radio.setRetries(15, 0); // Max delay between retries & number of retries
  
  radio.openWritingPipe(address);

  radio.setAutoAck(false); // Ensure autoACK is enabled
  
  // Start the radio listening for data
  radio.startListening();
}

void loop() {
  
    radio.stopListening();                                    // First, stop listening so we can talk.
    
    message.motor = 250;
    message.target = 1;
    message.mode = 100;

    Serial.print(F("{ motor: "));
    Serial.print(message.motor);
    Serial.print(F(" target: "));
    Serial.print(message.target);
    Serial.print(F(" mode: "));
    Serial.print(message.mode);
    Serial.println(" }");
    
     if (!radio.write( &message, sizeof(message) )){
       Serial.println(F("failed"));
     }
        
    radio.startListening();  
    
    // Try again 20ms later
    delay(20);


} 
include

Monday, Dec 19, 2016, 6:52 PM EST

42.3614° N, 71.0918° W
23°F Cloudy

More Acrylic Spools

We seemed to run out of 3mm black acrylic, so I made the parts for two spools out of clear acrylic.

I had made an extra spool’s worth of acrylic, which I had later repurposed as a base for the solenoid/electromagnet

Monday, Dec 19, 2016, 7:44 PM EST

42.3614° N, 71.0918° W
21°F Cloudy

Four Anchors

Here are four of the completed anchors. The original plan only called for 3, but the first one was printed pretty poorly and it seemed not unlikely that things might randomly break.

This kinda reminds me of the game Simon Says....

Monday, Dec 19, 2016, 9:38 PM EST

Massachusetts Institute of Technology, Cambridge, MA, United States
21°F Mostly Cloudy

Electromagnetism

I used a power drill and some magnet wire to create an electromagnet out of a screw

Here it’s lifting a screw!

Tuesday, Dec 20, 2016, 3:46 AM EST

43–45 Vassar St, Cambridge, MA, United States
19°F Cloudy

A quick little adventure in learning C!

I have some code which uses a buffer of structs like such:

typedef struct {
  CommandPacket packet;
  unsigned long expires;
} Device;

Device deviceBuffer[DEVICE_BUFFER_SIZE];

And I have to reference into a field in the i’th index of that deviceBuffer, which means I have to write code like

deviceBuffer[i].expires = 42;

Which seems like a lot of annoying typing, so I’d like to do

Device d = deviceBuffer[0];
d.expires = 100;

// later on
printf(“Expires: %d”, deviceBuffer[0].expires);

But it turns out that in C structs are pass by value, so this just copies the data in deviceBuffer[i] to a new variable.

We can use pointers, but this ends up with the nasty *d stuff:

Device *d = &deviceBuffer[0];
(*d).expires = 100;

Turns out that’s exactly what the -> syntax was invented for!

Device *d = &deviceBuffer[0];
d->expires = 100;

Neato.

Thanks to Michael Spectre for help!

Tuesday, Dec 20, 2016, 7:45 AM EST

Massachusetts Institute of Technology, Cambridge, MA, United States
19°F Mostly Cloudy

Javascript Serial Access w/ serialserver.js

Here’s a minimal code snippet for accessing a serial device through the fab mods serialserver.js protocol. http://mods.cba.mit.edu/js/serialserver.js

serialserver.js Installation

mkdir serialserver
cd serialserver
wget http://mods.cba.mit.edu/js/serialserver.js
npm init
npm install ws serialport
node serialserver.js 127.0.0.1 1234

Code

This is code meant to run on a browser, and since it accesses websocket it must be run from a local server (not file:///).

var serial = {
    address: '127.0.0.1',
    port: '1234',
    device: '/dev/cu.usbmodem1411',
    baud: 115200
}
var url = "ws://"+serial.address+':'+serial.port
var socket = new WebSocket(url)
console.log('connecting to', url)

socket.onopen = function(){
    open_socket()
}

var buffer = ''
socket.onmessage = function(event){
    buffer += event.data;
    if(event.data == '\n'){
        console.log(buffer)
        buffer = ''
    }
}

function open_socket(){
    var msg = {}
    msg.type = 'open'
    msg.device = serial.device;
    msg.baud = serial.baud;
    msg.flow = 'none'
    socket.send(JSON.stringify(msg))
    console.log('opening socket', serial.device, '@', serial.baud + ' baud')
}

function send_string(str){
    var msg = {}
    msg.type = 'string'
    msg.string = str
    socket.send(JSON.stringify(msg))
}

Tuesday, Dec 20, 2016, 10:05 AM EST

Massachusetts Institute of Technology, Cambridge, MA, United States
25°F Mostly Sunny

Web Interface

Here’s an interface where I can trigger any of the actuators and things