Assignment 2
electronics production
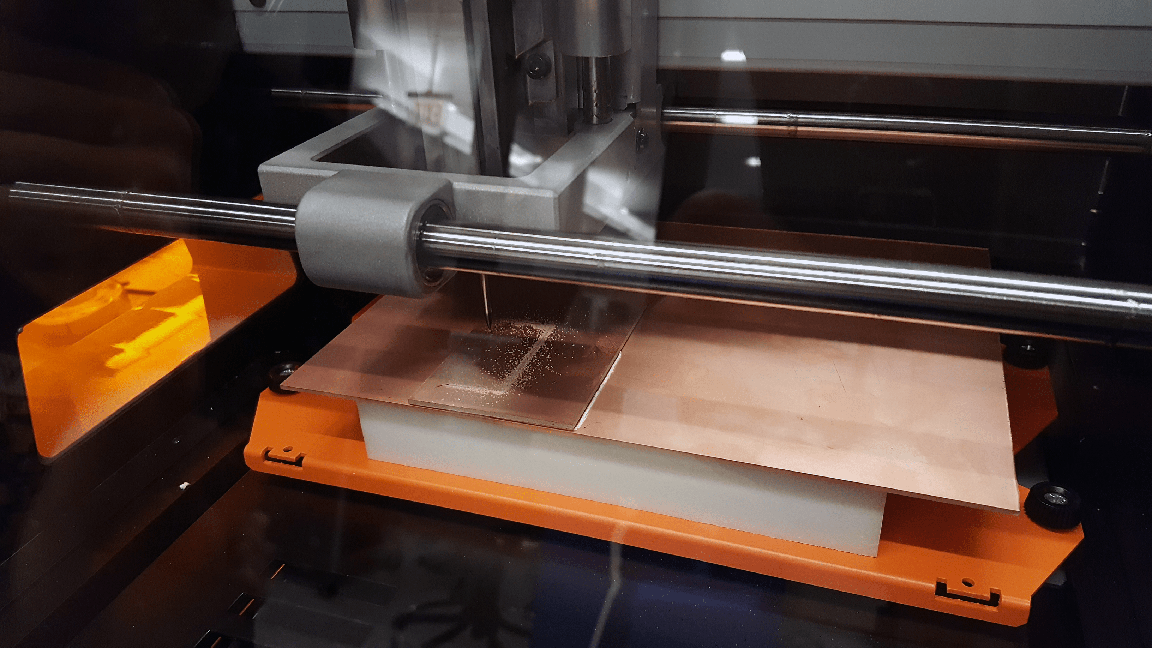
The first part of the process was learning to use the mill - we used a Roland SRM-20 in our section. Using the mill is fairly straightforward!
- open printer server from desktop, tape down your material
- choose the correct machine for the printer software (Roland SRM-20 PCB)
- upload image onto top left panel in data chart
- choose the right mill - 1/64 for fine details, 1/32 for outline
- click calculate on "mill raster 2d" - this generates paths for the machine to traverse
- find the right origin for x, y (keep z high until you’re ready to set that)
- lower z but don’t let it hit the board
- loosen the end mill and let it fall down until it makes contact with your material
- tighten again, set origin to the current z value you last jogged to
- click “move to origin” and send to print, vacuum between prints!
Here's what came out of my experiments in milling! Of course, I ran into a few problems along the way. The top two parts of the image show trials I did until it finally worked out at the bottom.
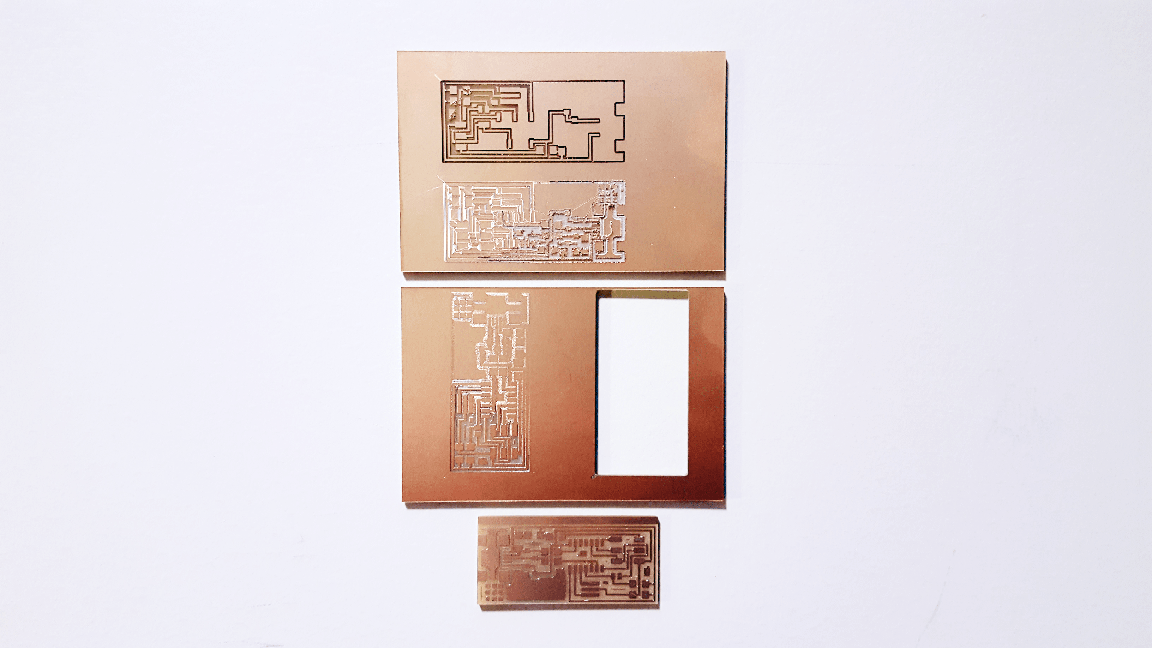
In my first 2 tries, the endmill I was using was actually broken so the results didn't come out right. You can see that some details just didn't even get drawn in the first try, and by the second, the machine nonuniformly removed the copper. After these, I replaced the endmill and found later that the reason this try didn't work was due to 2 possible things: the first was that the endmill was physically too lower relative to the set screw, making its connection to the machine less secure + opening up for uneven torque during the process. The other possibility was that the endmill rose a little while it was being tightened into place, so it wasn't making enough contact.
troubleshooting -
- check if the server is running
- try turning printer on and off if it's not moving (this happened when I got to the machine)
- remember that the sacrificial surface edges aren’t the edges of the board, move your board inside a little from the outer edge
- make sure the end mill makes contact with surface - if its too low, when you tighten the set screw it might go up a little bit and loose contact
- make sure the end mill is deep enough in, so its secured in place
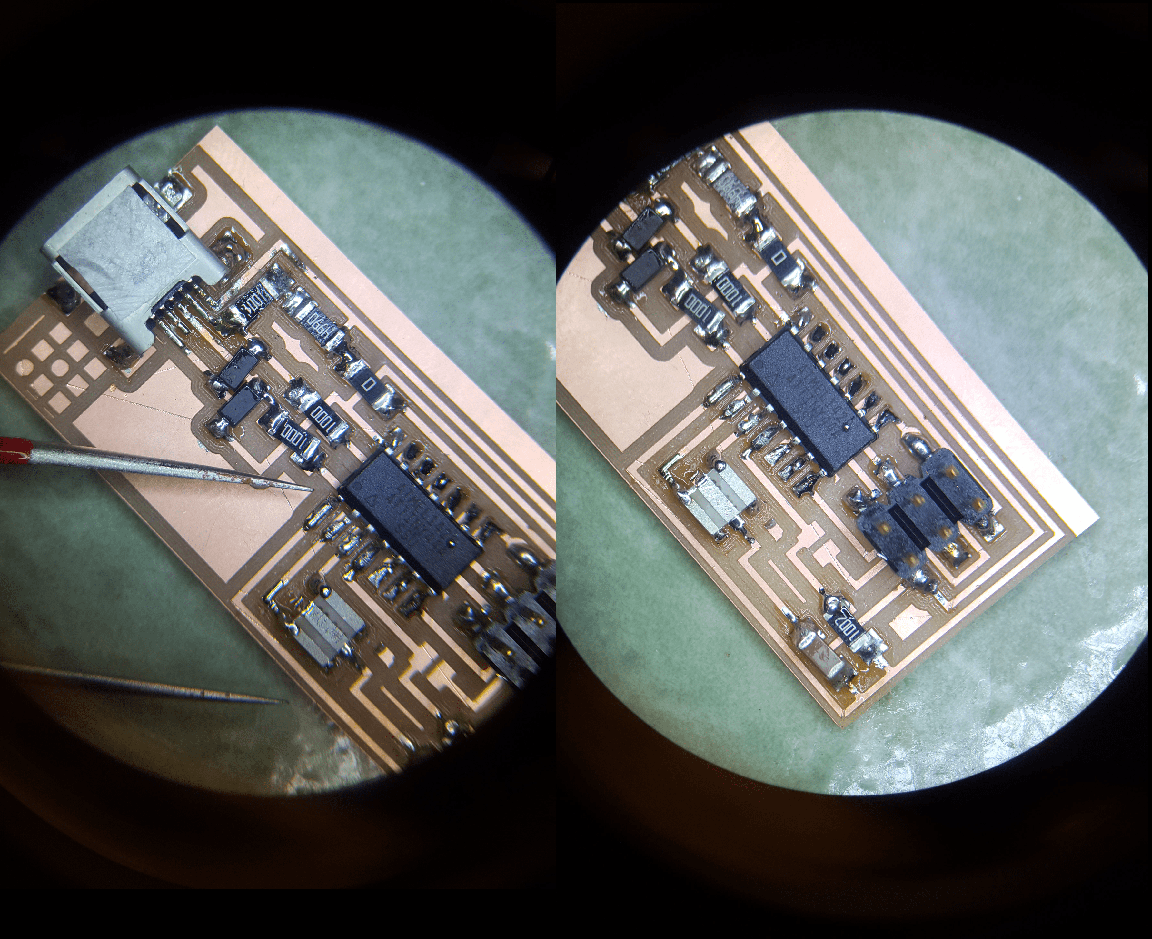
Now that everything was printed, it was time to solder. A few gotchas that I faced that were important to be aware of were in the diodes and the crystal. The diodes have a directionality, but its hard to see unless you make a concerted effort to tell which side should be soldered to A and which to C (C is the side with the line). For the crystal, there were 2 options - one meant for 2 pins, and another for 3 pins. The design I ultimately went with used the 3 pin one.
Soldering under a microscope with a fine tip and soldering regularly were extremely different experiences - I think for most parts of the circuit, soldering without a microscope or anything special was fine. But under the microscope, I was very aware of how sloppy it looked (maybe more than I wanted to be). Soldering itself got easier with time, but I definitely could improve in this in the future with practice!
protips -
Checking that each connection was strong under the microscope, and using the multimeter to confirm that the right things were connected was really helpful to get some validation that the soldering was successful!
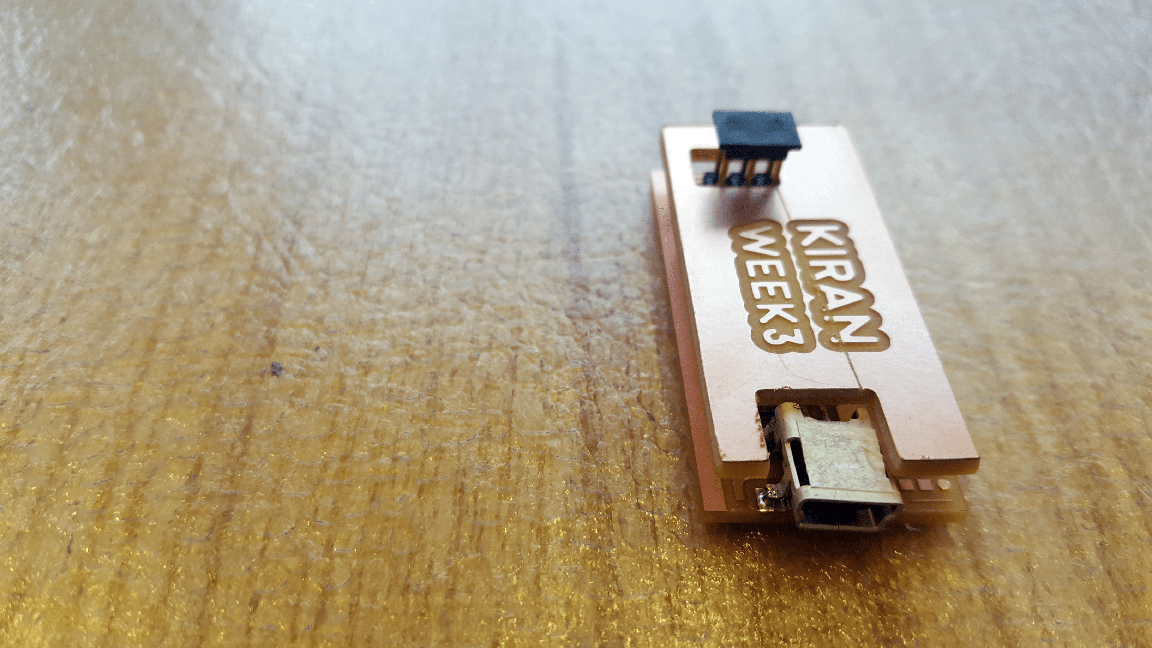
Here's what it finally looked like when it was done! I milled a tiny cover for it just for flare, though in the future, this could be better done with the laser printer on thin acrylic (and then you can see into it and not worry about the copper oxidizing). The final step was adding the firmware and seeing that it all worked out- I was able to successfully flash code onto my ISP but couldn't get my computer to recognize the device. In the future, I'd like to find out what went wrong (maybe its specific to Macs?) Below is the output from my attempts...
RLE-EECS-MTL-DHCP-19-200:FabISP Firmware kiran$ make clean
rm -f main.hex main.lst main.obj main.cof main.list main.map main.eep.hex main.elf *.o usbdrv/*.o main.s usbdrv/oddebug.s usbdrv/usbdrv.s
RLE-EECS-MTL-DHCP-19-200:FabISP Firmware kiran$ make hex
avr-gcc -Wall -Os -DF_CPU=20000000 -Iusbdrv -I. -DDEBUG_LEVEL=0 -mmcu=attiny44 -c usbdrv/usbdrv.c -o usbdrv/usbdrv.o
avr-gcc -Wall -Os -DF_CPU=20000000 -Iusbdrv -I. -DDEBUG_LEVEL=0 -mmcu=attiny44 -x assembler-with-cpp -c usbdrv/usbdrvasm.S -o usbdrv/usbdrvasm.o
avr-gcc -Wall -Os -DF_CPU=20000000 -Iusbdrv -I. -DDEBUG_LEVEL=0 -mmcu=attiny44 -c usbdrv/oddebug.c -o usbdrv/oddebug.o
avr-gcc -Wall -Os -DF_CPU=20000000 -Iusbdrv -I. -DDEBUG_LEVEL=0 -mmcu=attiny44 -c main.c -o main.o
main.c:88:13: warning: always_inline function might not be inlinable [-Wattributes]
static void delay ( void )
^
avr-gcc -Wall -Os -DF_CPU=20000000 -Iusbdrv -I. -DDEBUG_LEVEL=0 -mmcu=attiny44 -o main.elf usbdrv/usbdrv.o usbdrv/
usbdrvasm.o usbdrv/oddebug.o main.o
rm -f main.hex main.eep.hex
avr-objcopy -j .text -j .data -O ihex main.elf main.hex
avr-size main.hex
text data bss dec hex filename
0 2002 0 2002 7d2 main.hex
RLE-EECS-MTL-DHCP-19-200:FabISP Firmware kiran$ make fuse
avrdude -c usbtiny -p attiny44 -U hfuse:w:0xDF:m -U lfuse:w:0xFF:m
avrdude: AVR device initialized and ready to accept instructions
Reading | ################################################## | 100% 0.00s
avrdude: Device signature = 0x1e9207
avrdude: reading input file "0xDF"
avrdude: writing hfuse (1 bytes):
Writing | ################################################## | 100% 0.00s
avrdude: 1 bytes of hfuse written
avrdude: verifying hfuse memory against 0xDF:
avrdude: load data hfuse data from input file 0xDF:
avrdude: input file 0xDF contains 1 bytes
avrdude: reading on-chip hfuse data:
Reading | ################################################## | 100% 0.00s
avrdude: verifying ...
avrdude: 1 bytes of hfuse verified
avrdude: reading input file "0xFF"
avrdude: writing lfuse (1 bytes):
Writing | ################################################## | 100% 0.00s
avrdude: 1 bytes of lfuse written
avrdude: verifying lfuse memory against 0xFF:
avrdude: load data lfuse data from input file 0xFF:
avrdude: input file 0xFF contains 1 bytes
avrdude: reading on-chip lfuse data:
Reading | ################################################## | 100% 0.00s
avrdude: verifying ...
avrdude: 1 bytes of lfuse verified
avrdude: safemode: Fuses OK (H:FF, E:DF, L:FF)
avrdude done. Thank you.
RLE-EECS-MTL-DHCP-19-200:FabISP Firmware kiran$ make program
avrdude -c usbtiny -p attiny44 -U flash:w:main.hex:i
avrdude: AVR device initialized and ready to accept instructions
Reading | ################################################## | 100% 0.00s
avrdude: Device signature = 0x1e9207
avrdude: NOTE: "flash" memory has been specified, an erase cycle will be performed
To disable this feature, specify the -D option.
avrdude: erasing chip
avrdude: reading input file "main.hex"
avrdude: writing flash (2002 bytes):
Writing | ################################################## | 100% 3.03s
avrdude: 2002 bytes of flash written
avrdude: verifying flash memory against main.hex:
avrdude: load data flash data from input file main.hex:
avrdude: input file main.hex contains 2002 bytes
avrdude: reading on-chip flash data:
Reading | ################################################## | 100% 3.62s
avrdude: verifying ...
avrdude: 2002 bytes of flash verified
avrdude: safemode: Fuses OK (H:FF, E:DF, L:FF)
avrdude done. Thank you.
avrdude -c usbtiny -p attiny44 -U hfuse:w:0xDF:m -U lfuse:w:0xFF:m
avrdude: AVR device initialized and ready to accept instructions
Reading | ################################################## | 100% 0.00s
1 RLE-EECS-MTL-DHCP-19-200:FabISP Firmware kiran$ vi Makefile
avrdude: Device signature = 0x1e9207
avrdude: reading input file "0xDF"
avrdude: writing hfuse (1 bytes):
Writing | ################################################## | 100% 0.00s
avrdude: 1 bytes of hfuse written
avrdude: verifying hfuse memory against 0xDF:
avrdude: load data hfuse data from input file 0xDF:
avrdude: input file 0xDF contains 1 bytes
avrdude: reading on-chip hfuse data:
Reading | ################################################## | 100% 0.00s
avrdude: verifying ...
avrdude: 1 bytes of hfuse verified
avrdude: reading input file "0xFF"
avrdude: writing lfuse (1 bytes):
Writing | ################################################## | 100% 0.00s
avrdude: 1 bytes of lfuse written
avrdude: verifying lfuse memory against 0xFF:
avrdude: load data lfuse data from input file 0xFF:
avrdude: input file 0xFF contains 1 bytes
avrdude: reading on-chip lfuse data:
Reading | ################################################## | 100% 0.00s
avrdude: verifying ...
avrdude: 1 bytes of lfuse verified
avrdude: safemode: Fuses OK (H:FF, E:DF, L:FF)
1
avrdude done. Thank you.
I really enjoyed this project. Moving away from software and design brought me into a really foreign space, but I felt like I was able to learn a lot this week! It's exciting to be able to go from remembering virtually nothing about circuits to having made this ISP, and getting familiar with more fab (the mill + soldering).
