The Design Process
I wanted to challenge myself this week and create a design that used kerfing. I wanted to create a shelf essentially with kerfing on two sides, and dovetail joints on the other sides. Two cross pieces of plywood also creates shelving and structural support. I researched quite a bit online but did not find concrete numbers on how to estimate cutting depths for kerfing. So, off to testing with the Shopbot!
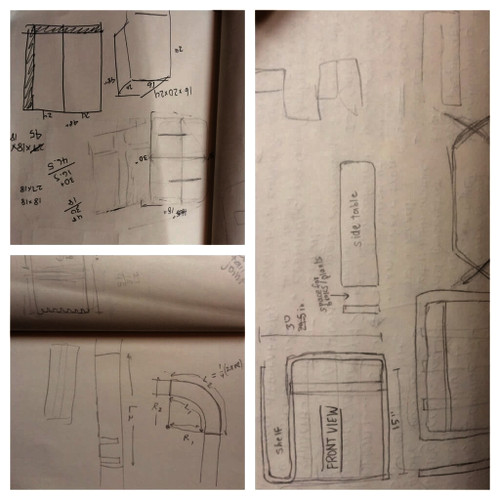
My initial sketches and plans
I liked the look of alternating slots and thought it would make an aesthetically pleasing curve on my shelf, but quarter inch margins were not nearly enough to cause 3/4" plywood to bend. It maybe bent 5 degrees before the awful creaking of impending snapping wood would begin. After a few more tests, I realized that this pattern would really never get to 90 degrees, without taking out so much wood that it would not be structurally sound. So, back to the drawing board...
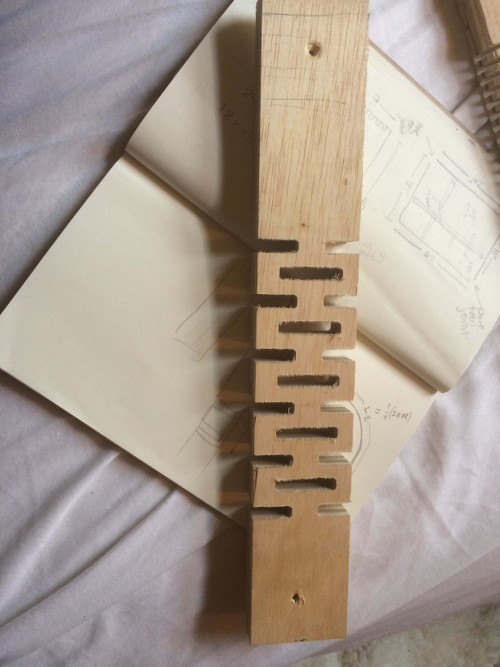
This kerf design didn't bend at all!
Second and third kerf test
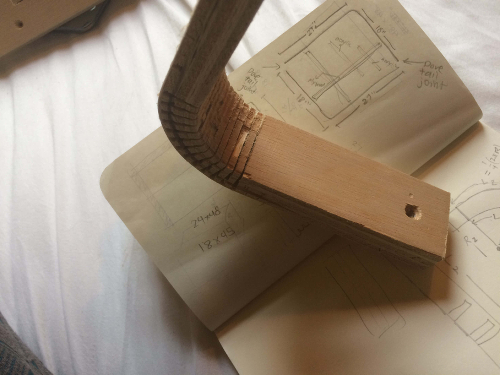
After researching online and investing past HTMAA students' work, I decided to go with long cuts perpendicular to the grain, leaving a certain amount wood left. From my research, I knew I needed to leave to have kerfing along 3 to 5" of wood, so I created two tests along 2 feet of plywood. For my first test, I used the 1/8" bit and made 1/8" cuts with 3/8" in between each cut. I made 10 slices in total. For the second test, I used the same 1/8" bit and left only 1/4" of wood between, with 13 slices total. I left 0.19" of wood remaining. Meanwhile, I also wanted to test out the dovetail joints. Since the wood was about 0.69" thick, I create square slots 0.69" x 0.69" x 0.69" I forgot about making "dogbone" joints so that the round drill bit can dig into the joint to make sharp corners. My final design will incorporate similar joints with the dogbones.
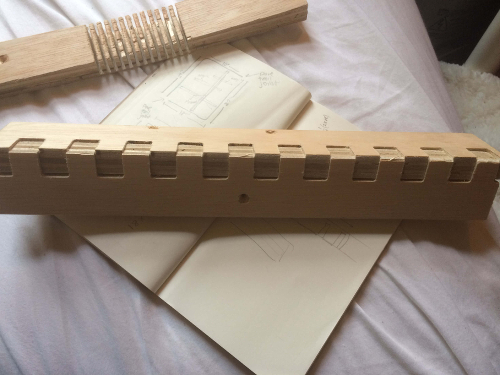
Dovetail joint success, but missing dogbones
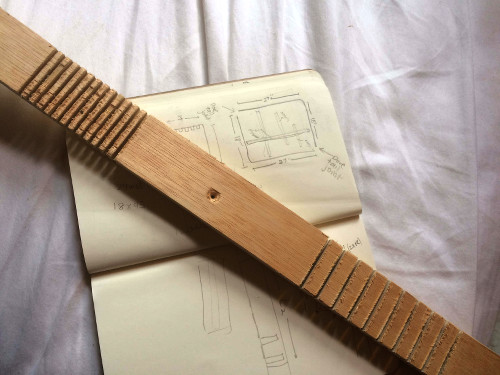
Can bend up to 60 degrees
Yay! Once I used the tabletop ShopBot to print each design, I lucked out! They were both successful, with the narrow cuts forming up to a 60 degree bend, and the wider cuts making a 90 degree bend, exactly what I wanted!
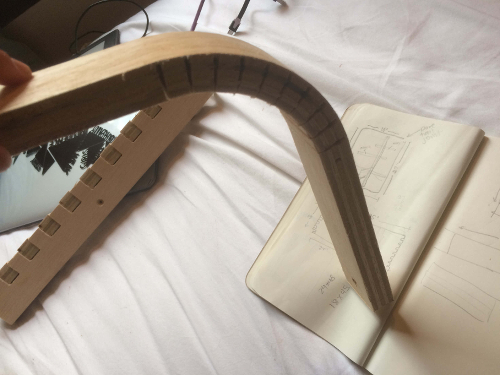
A 90 degree bend in 3/4" plywood!
To be honest, the progress I made this week was extremely time-consuming, since I had a really hard time using Fusion360. As for next steps, I am going to make a prototype out of cardboard, test out the new dovetail joints on OSB board, and then finally cut the final version out of the remaining plywood. So, while I'm disappointed that I didn't quite finish, I am planning on pushing ahead this week! Stay tuned...