Technologies Used:
❖ Xcode, Swift 3, Objective-C
❖ Arduino IDE
❖ Shopbot
❖ Rhino
❖ 3DWOX
❖ Eagle
❖ Silicone Mold
❖ ESP8266
❖ ThingSpeak Server
❖ OpenWeather API
❖ and many, many more!!
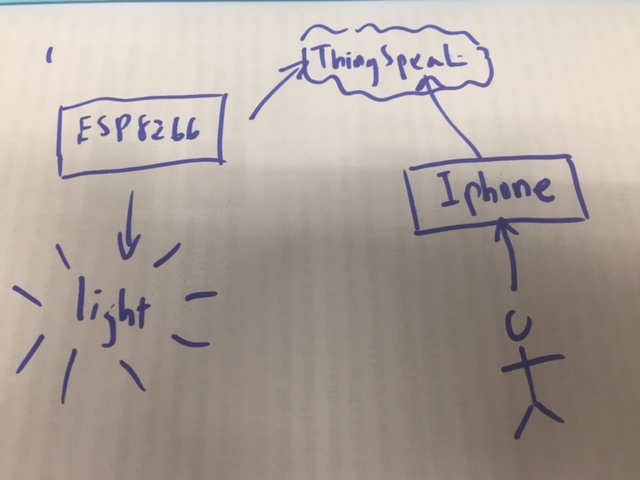
For my final project I decided to stick with my original idea of making a light that would react to to outside stimulus - I had initially decided the "stimulus" would be a GPS tracker that would update the light as my location changed. The initial plan was then to use the light as a way to reflect the distance I was from a set point, and the iPhone would be the GPS that tracks the data. I would make use of the interfacing that I created in the previous weeks, and my main challenge would be to figure out the code from the iPhone, and design the light itself.
Part 1: GPS Locator
Casing Design
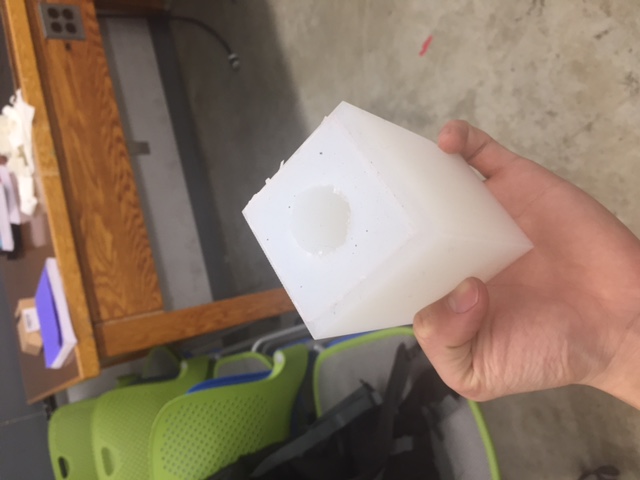
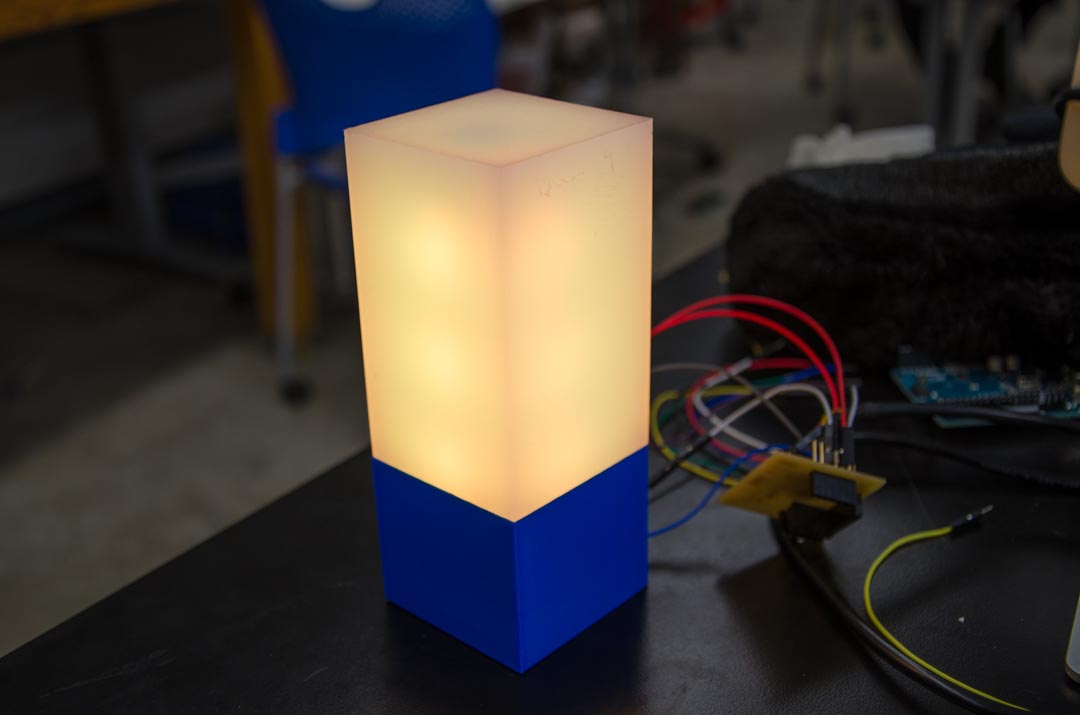
I wanted the light design to be able to gracefully show many RGB LEDS, but at the same time be aesthetically pleasing, and hopefully not too difficult to fabricate. The initial idea was to create a wooden box from some type of milling, and cut holes while placing translucent paper, which would allow me to shine the light. However, while looking through some of the past projects I got some inspiration to use translucent silicone, which would probably be a more straightforward and elegant solution. I generally like minimalist design, so the first idea that came to mind was a simple square that would contain the electronics at the bottom, and have the light at the top.
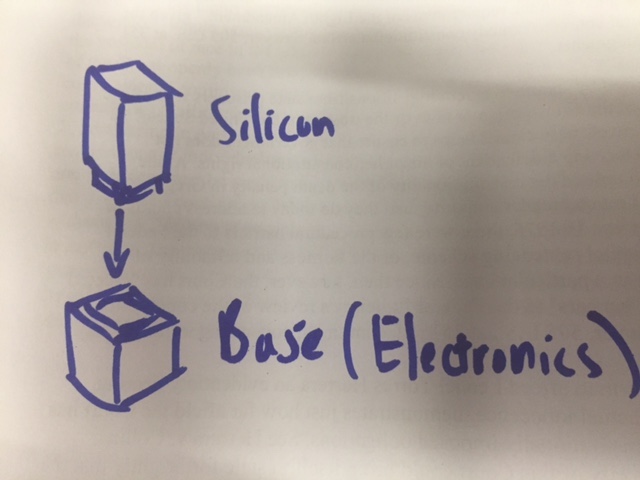
I used Mold Star 20T Silicone Mold Making Rubber (~$25).

In order to fit my electronics I wanted a base of at least 50x50 cm; sadly the wax molds we used in the previous week wouldn't support such a size. I contemplated a few ideas, including melting the wax together (but then realized our shop didn't have a bit long enough to make such a deep cut anyways), and milling boards and then gluing them together. I decided the most straightforward solution was a 3D print: I would get my exact dimensions without having to worry about user error, and I could create more complex structures I couldn't easily do with pieces of wood.
I used Rhino to create my mold, and added a convex piece to the bottom of my design so the mold would easily fit into the base. The 3D print was about 3mm thick.
In order to put my light piece inside, I would hollow out a cylindrical piece inside the mold. Thus, I also 3D printed a cylinder, that I would eventually tape together with the outer mold:
I ended up gluing both pieces of the mold to an aluminum sheet, which acted as a base for the casting.
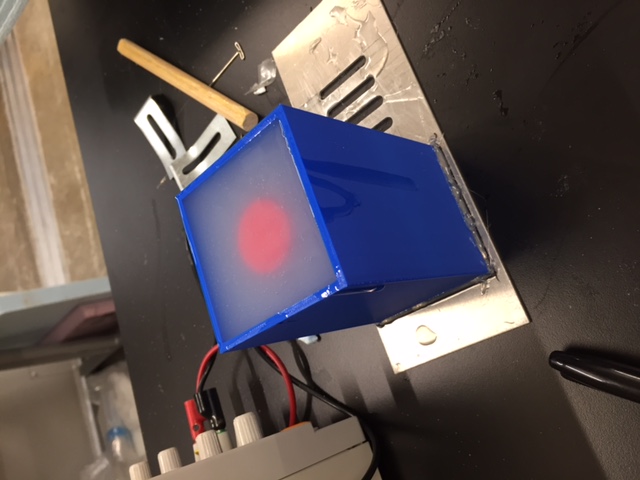
The silicone mold came out almost perfect, but I spent a good half hour trying to take it out of the molding. I didn't want to break my mold in case something during the process went wrong, but I also forgot to apply the mold removing oil. It took a combination of prying with a straightedge, and spraying WD-40 in order to finally pushing the silicone out. Luckily the surface didn't get scratched, and the exterior looked great after washing the piece under water.
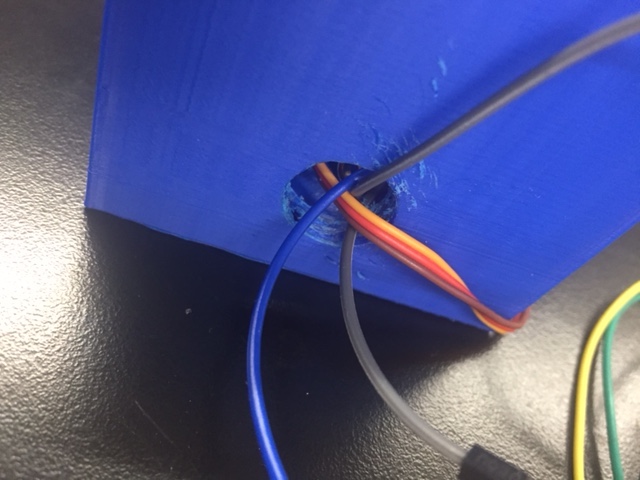
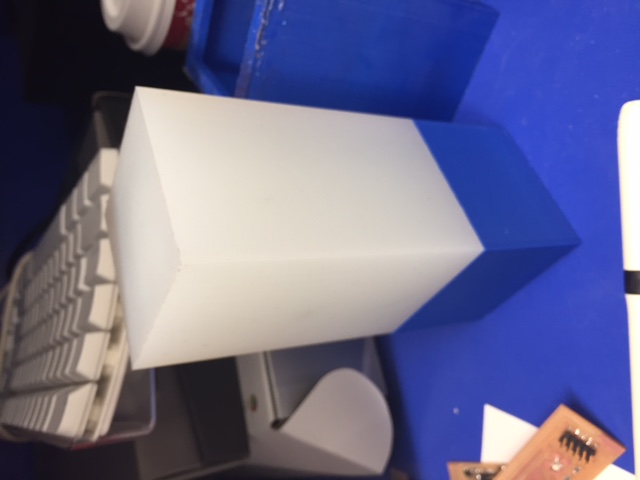
Creating the base was an easier process; I also created the object in Rhino, and 3D printed. I made sure to leave a small hole out the back for power. The only problem I ended up contending with was that the hole ended up being too small. I went around the shop and eventually found a power-drill that bit that was large enough to poke a sizable hole for the power cables.
The mold itself fit perfectly on top of the base.
Lights
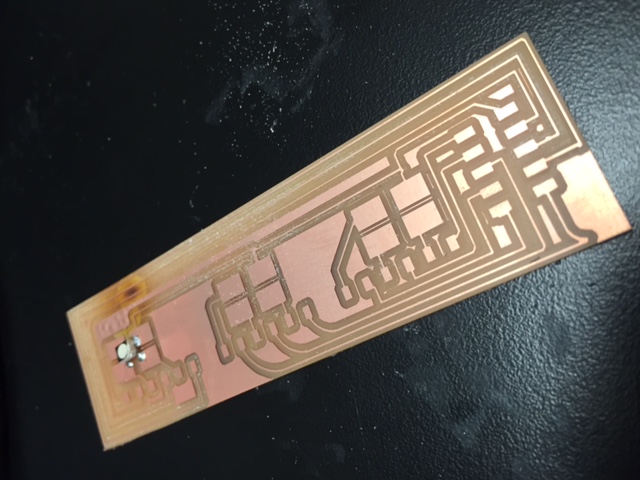
I wanted the lights to be RGB, and to shine in different colors depending on the distance I was at. The closer I was to the given location, the warmer the color, and vice versa. I decided to design a board that would make use of 3 RGB LEDs, using 9 pins, which was the maximum amount of pins my ESP8266 module could spare. I thought maybe down the line I would make another board to interface with my ESP, but it would likely not have that many more pins to use.
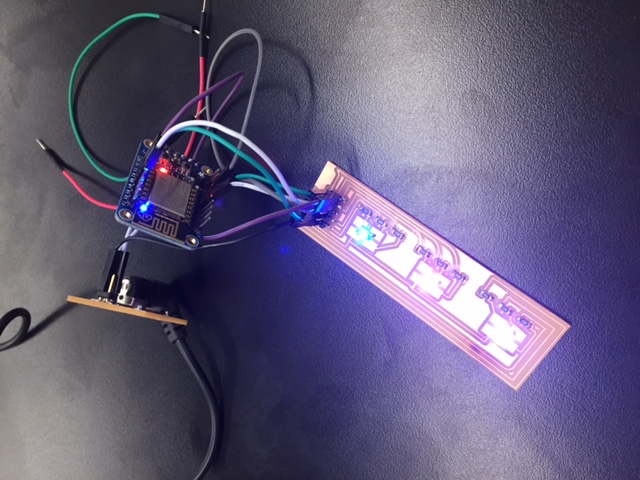
While everything worked as planned, I didn't like how the setup took so many pins, and the LEDs could only shine light directly in one direction. My TA Tiffany showed me RGB LED strips sold by Adafruit called Neopixels, where one pin (plus ground and VCC) could control up to 5050 LEDs, and separately control the color in each. I decided to give this a shot - pretty fancy:
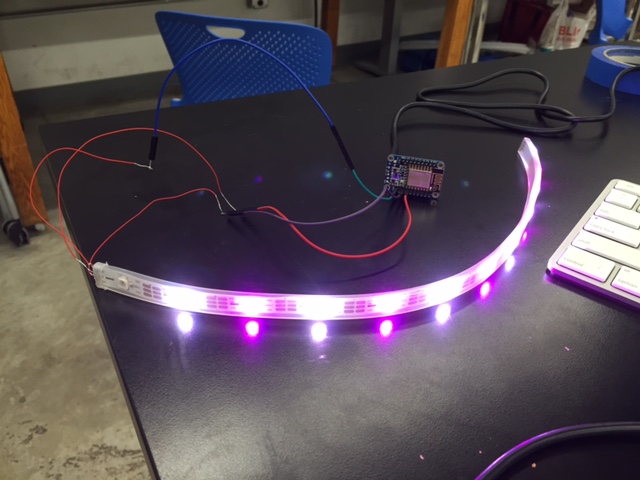
Change of plans: I would strip a 12-LED Neopixel strip of its outer plastic covering, chop it into 4 pieces of 3 LEDs, and then place each strip on a face of a square pole. Then I would stitch the 4 pieces together so they would act as if one strip, allowing me to use 1 pin to simultaneously control all 12.
The coding process was particularly straightforward with the NeoPixel.h library.
Coding (iOS)
Ah...coding. For some reason I thought the idea of running a process in the background of an iPhone, while referencing the internal GPS and sending HTTP requests to a server would be a straightforward endeavor. After many days of attempting to write my own code, I realized I was simply mistaken - the code would be very involved, particularly in regards to how iPhones treated background processes (some of which was a blackbox even for iOS developers).
I spent a good amount of time searching the internet to see if anyone had performed a similar project, and indeed someone did, a few years back. Bad news was they wrote it in Objective-C (rather than Swift), so I would have to familiarize myself with another language quickly, and this would be more complicated than the more user-friendly Swift.
I forked this lovely man's repo (https://github.com/voyage11/Location/tree/master/Location) and spent much time attempting to understand, and modify his code. The good news was up until the background process issue seemed to work smoothly after some small edits. I used a longitude/latitude tracker to mark my designated location at the law school, and attempted to measure the distance I was from the location:
Relevant code for HTTP Requests via Objective-C (for any future reference):
  //Send distance to ThingSpeak Server

  NSString *distanceString = [NSString stringWithFormat:@"%1.6f", currentDistance];

  NSString *post = [NSString stringWithFormat:@"api_key=H3MQFPAJ1IOK1WEI0W&field1=%@", distanceString];


    NSData *postData = [post dataUsingEncoding:NSASCIIStringEncoding allowLossyConversion:YES];


    NSString *postLength = [NSString stringWithFormat:@"%lu", (unsigned long)[postData length]];


    NSMutableURLRequest *request = [[NSMutableURLRequest alloc] init];

    [request setURL:[NSURL URLWithString:@"https://api.thingspeak.com/update"]];

    [request setHTTPMethod:@"POST"];

    [request setValue:postLength forHTTPHeaderField:@"Content-Length"];

    [request setValue:@"application/x-www-form-urlencoded" forHTTPHeaderField:@"Content-Type"];

    [request setHTTPBody:postData];

    NSURLConnection *conn = [[NSURLConnection alloc] initWithRequest:request delegate:self];

    [conn start];
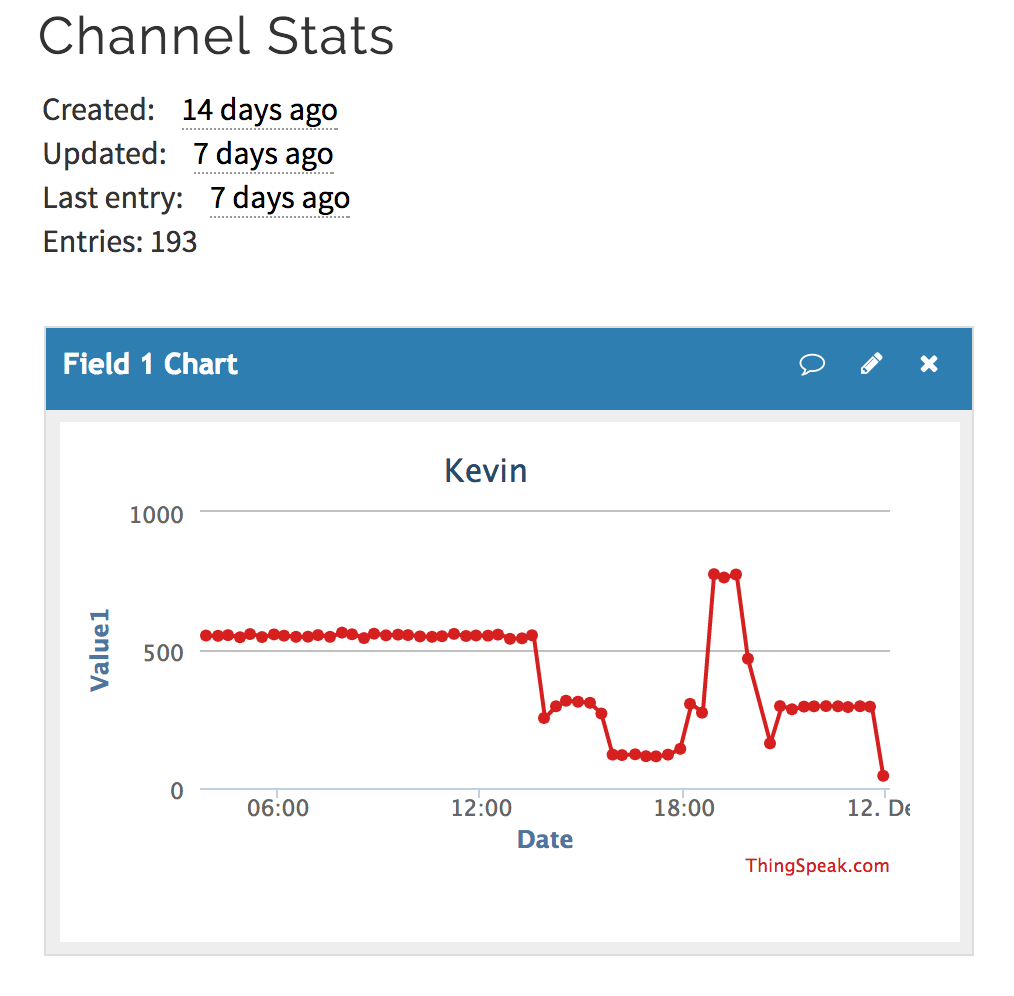
My Thingspeak Channel tracked the distance in 20 minute intervals, of how many meters away I was:
All was fine and well except that after many days of testing, I was unable to produce a stable program that could run for longer than 12+ hours without being randomly suspending by iOS. I decided that I didn't want to create a project that was only partially working, and I didn't want to invest any more time into developing iOS than I already had, so I did a quick pivot for my project direction.
Part II: Weather Tracker
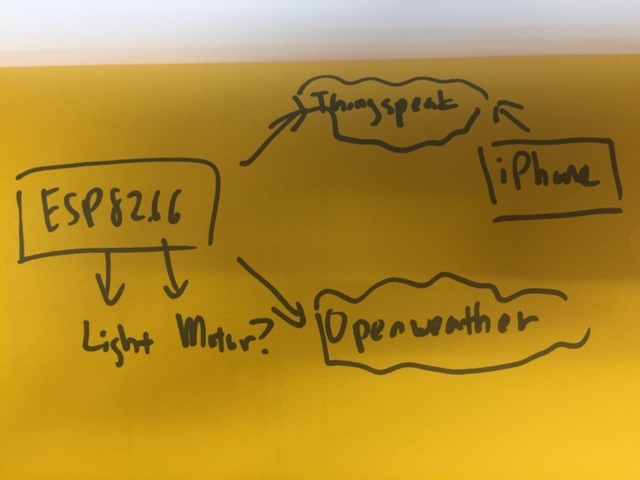
At this point I would switch gears and change my project form one that tracked my location through a phone to one that tracked weather at a particular location, and output the lights in various ways to reflect weather patterns. I would also write a quick iOS app that interfaced with the device, to allow it to change the location it was sending information for:
I contemplated adding a motor to the device...see more on this below.
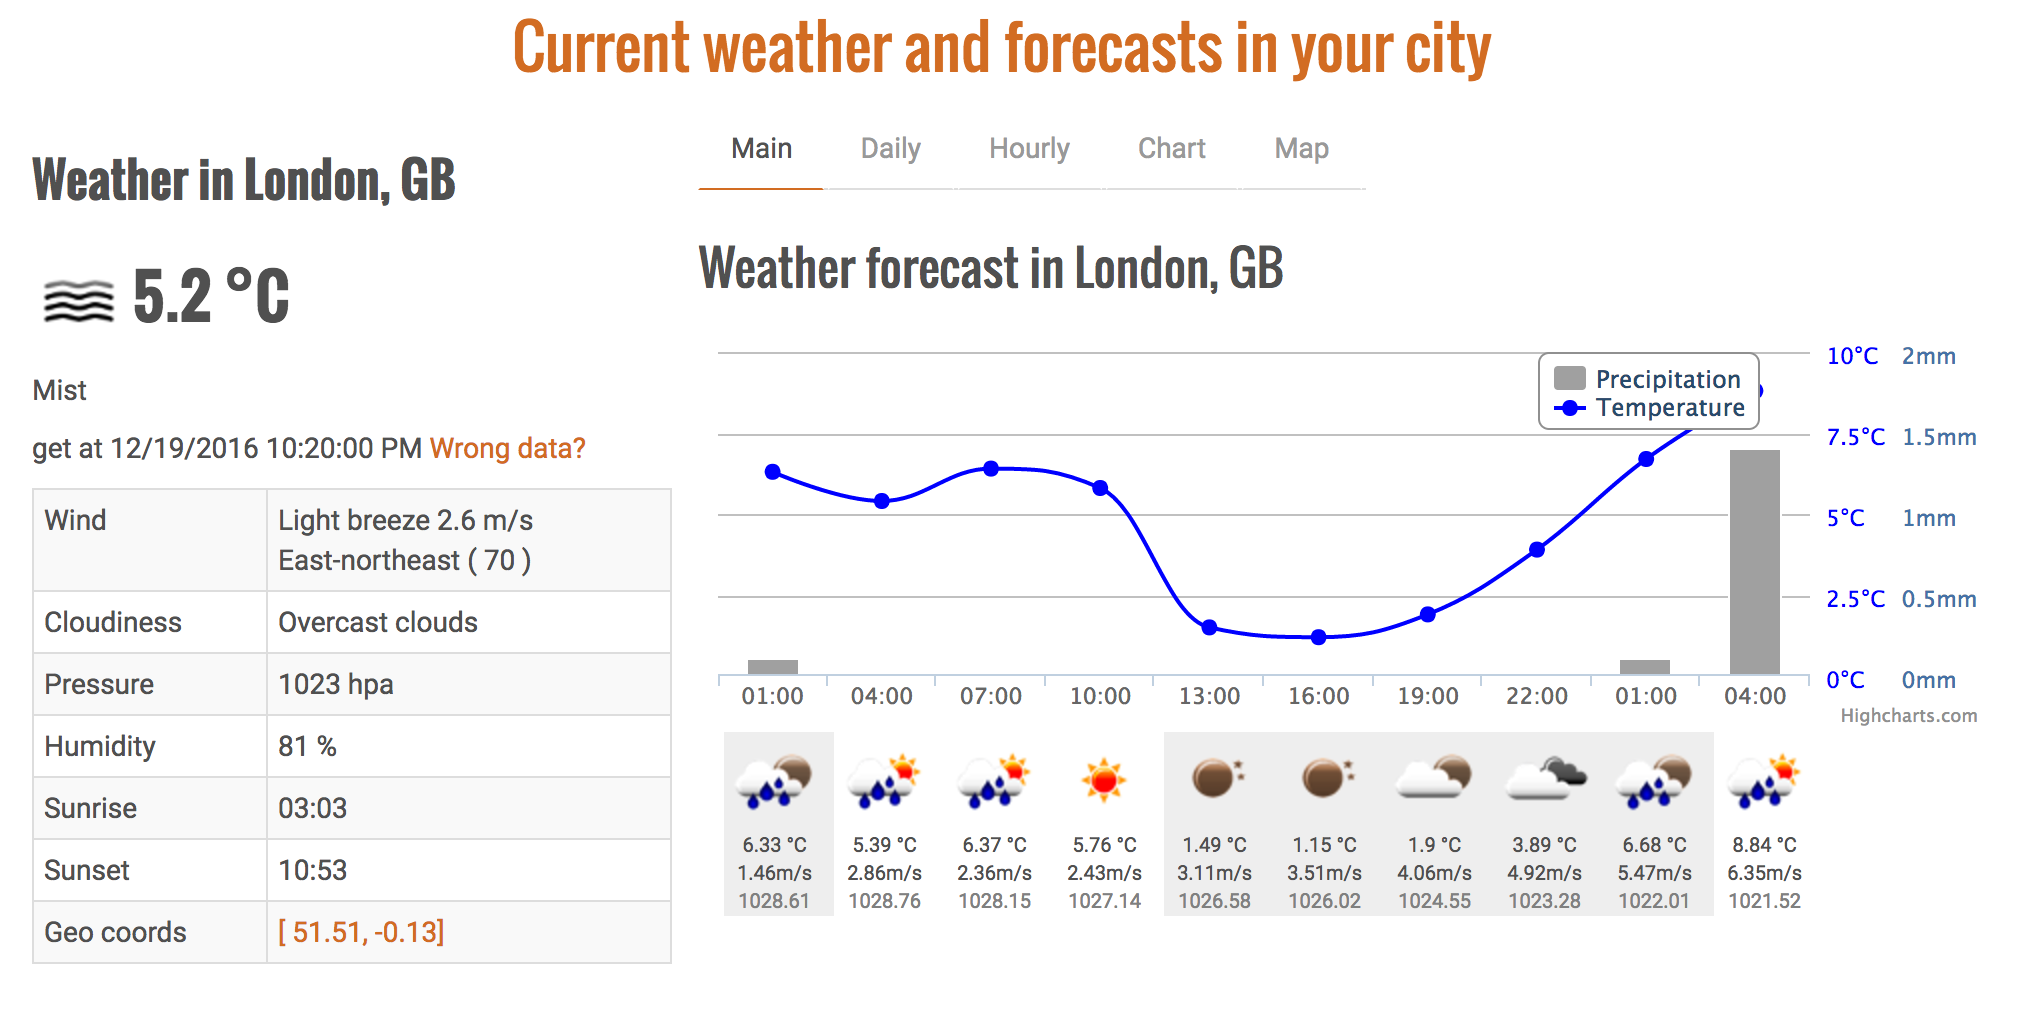
OpenWeather API
OpenWeather is a server that allows users to track and request real-time weather, using convenient HTTP calls and outputting the data in JSON.
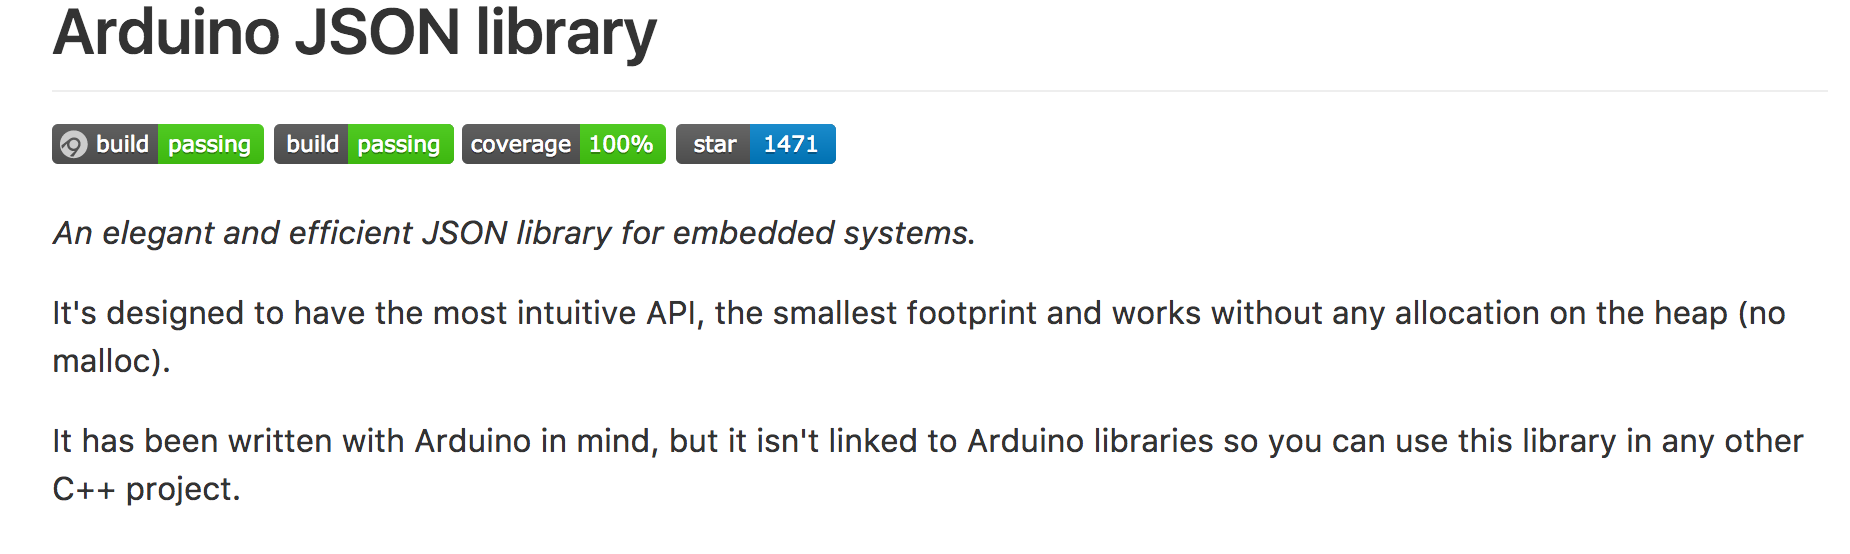
From the standpoint of my ESP8266 module, I would only have to slightly adjust my code to pull this data instead of data from the Thingspeak server. However, one issue I ran into was this website outputted exclusively in JSON. Luckily, I searched through Arduino libraries and someone had written ArduinoJSON.h, a convenient library for parsing JSON format.
My HTTP calls gave me a plethora of data given a unique identifier for a city:
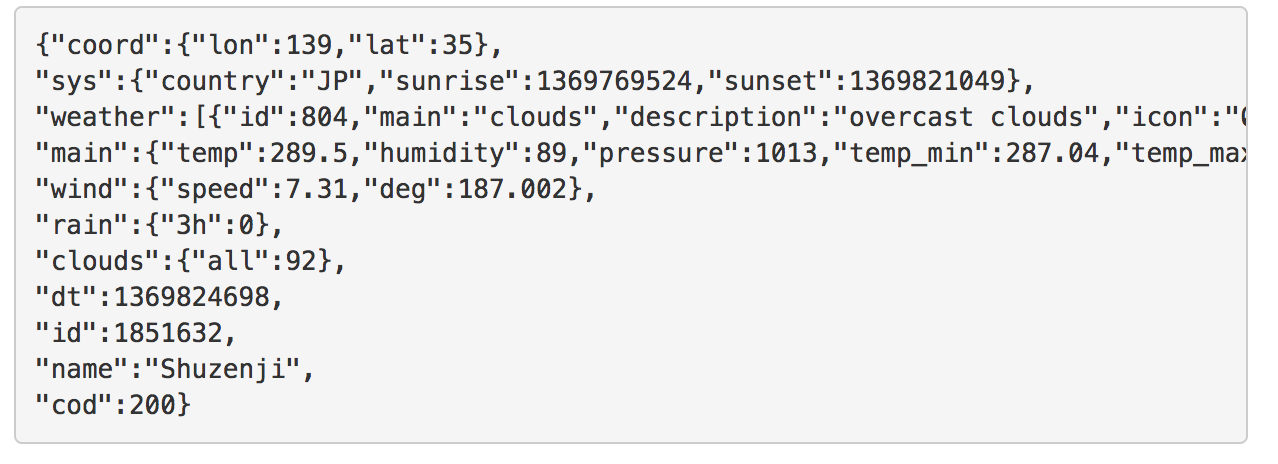
I specifically stored data related to temperature, snow, rain, and wind speed. My lights would: (1) show different colors depending on the temperature, (2) turn off lights one-by-one in a rain-like fashion if it was raining, (3) shine the lights one by one in max color (white, 255/255/255) if it was snowing, and turn a motor that shifted the lights if the windspeed hit a certain threshold.
iOS Interfacing
I wrote a simple app in Swift that allowed me to input a unique ID number, which was sent to my ThingSpeak server, which would be pulled down by the ESP8266, which would feed that into the ESP request for weather data.

This was easy enough to do from my experience from the interfacing week, but the challenge for me was to simultaneous do both requests in a reasonable manner while running the lights. I learned that while real multithreading wasn't possible, a quick workaround would be to use the millis() function and time each event to happen at specific intervals, in essence simulating a pseudo-multithreading effect:
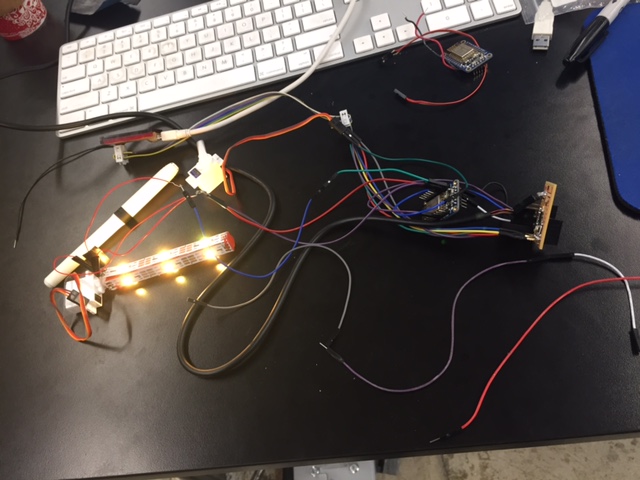
Motor
I wanted to add a motor to my project somehow, and with the new Neopixels setup, I thought I had enough leeway to place a motor at the bottom of my lights and "spin" the lights around to show windiness. Due to the size of my outer case, I had to stick to a servo motor, the smallest motor our lab had. The downsides was that the motor didn't turn more than 180 degrees (so I would be shifting back and forth), and the motor was loud. In the future I would probably try to use a small brushless DC motor, or a small stepper. I couldn't do the full 360 continuous rotation anyways with the wiring.
Initially I tried to run all of this off of the ESP, creating another "process" for my motor, but due to the amount of electricity it was taking and the complexity of the code my ESP couldn't handle everything. Furthermore, it was around this time I realized that the LEDs were burning up my regulator that was regulating my 9V wall plug into 3.3V. I scratched the 2.1mm jack.
To run the motor I had to create another board dedicated to doing this, while interfacing with the ESP8266. I decided to run a fabduino:
The process of cutting and making this board was a lot more complicated than I expected. I handled a variety of errors during compilation, and had to tweak my board.txt to get the fabduino to finally work. Furthermore, I had a lot of problems interfacing with the ESP8266. I wanted to both listen in on the RX/TX serial connection, while using the RX/TX to communicate. I tried using SoftwareSerial.h to give me more TX/RX ports, but the send and receive never worked, and I continued to get jumbled text/numbers for hours.
At this point I was entirely running out of time, so I decided rather than use Serial, I would just use one bit of communication through digitalWriteI(). digitalWrite allows me to send from one boards pin to another, only giving the signal of high or low. This process was easily implemented, and right now my motor only responds if there is a HIGH, so there is no resolution on the windspeed. In the future I could either use more pins to get a few more bits, or figure out serial communication.
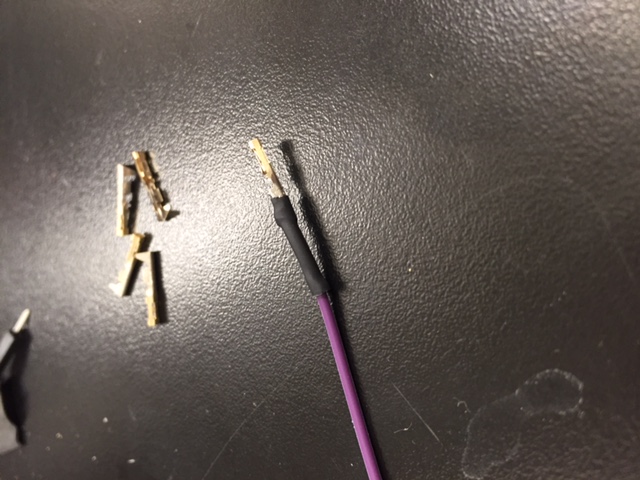
Furthermore, I was facing issues with my wires breaking during the spinning process, as they were extremely weak and susceptible to being snapped. To solve this issue I learned from rob how to make my own header pins, taking a wire, stripping off a small piece of the rubber, placing a female crimp header, and using a heat sensitive tube to wrap:
Also, one of my goals was to fit all the electronics inside the inner shell, which was something I was unable to accomplish by the end. I could only fit the ESP8266.
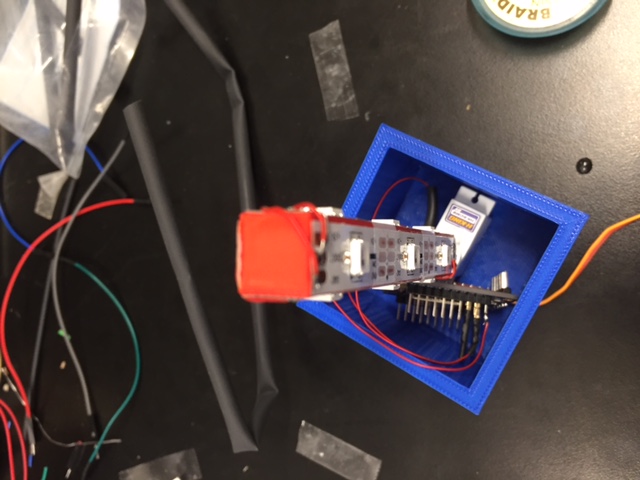
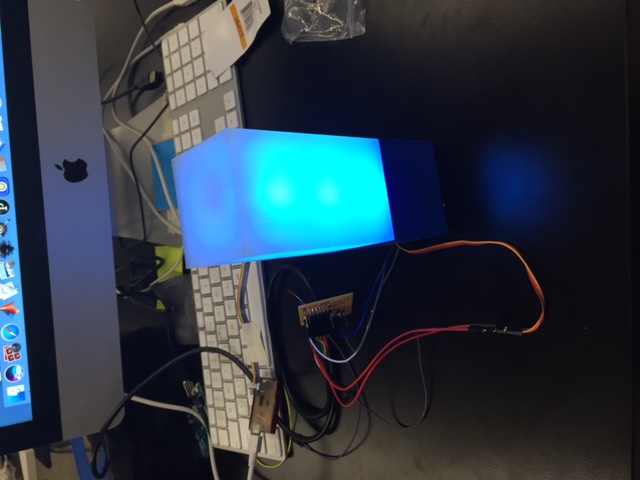
Finished Product
I'm generally pretty satisfied withe the outcome. For me, the implications of this project really stem from the networking I learned; I think the Internet of Things concept is extremely powerful, and once you're able to interface between a microcontroller and internet, that's so incredibly powerful. All the calculation could be done in the backend away from the controller, and the controller would simply be an output device. In terms of the rest of the project I learned a ton about 3D modeling, CNC milling, PCB creation, networking, 3D printing, casting and molding, both output and input devices, applications interfacing, and probably some other week I am now forgetting - I really ended up using the full range of skills.
To me so much of this class was not just learning how to make anything, but realizing what was possible - I'm bittersweet that this class is ending and I've just learned the basics to PCB design and embedded programming, and I wish I could have started the class with what I now know, I would definitely make something even more interesting.
Lastly, material count (everything was provided for by the lab except silicone):
Adafruit ESP8266 Breakout Board
Copper + components for Fabduino
3D printing material
Silicone
Neopixels RGB Lights
Servo Motor
A ton of wires, female crimp headers, etc
Arduinos, programmers...
Mac iOS Xcode (Swift/Objective-C)
ThingSpeak account
....
HTMAA2016 - Kevin Jiang