Computer-Controlled Cutting
Vinyl Cutter:
My housemates recently installed a gym in our living room. There have been many jokes about us starting an athletic club. The obvious first step was to come up with a logo and put it on a sticker so we could sticker the world. I found an image of a body builder online and added some text under it. I exported it as a .png from photoshop and put it in the fab module. The default setting was ~70dpi, when the fab module prepared to cut it had trouble with the letters. One of the TFs explained I needed to up the dpi on my export. I set it to 300dpi, below are the results.
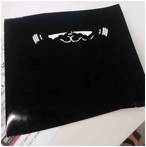

The right side of the ‘c’ in Athletic did not get cut so it came up when I did the big weeding. I gave it to the “boys” I will update when it gets placed in the gym.
Laser Cutting: Trees
from Trees J
Something that I imagine will become obvious over the course of the semester is my love of all things silly and absurd, as well as my interest in designing toys and playful objects. This project takes both into account as well as the upcoming fall. I made a kit of tree parts: trunks, leaves, branches, and a base that can be assembled, changed and destroyed. The idea of making trees out of cardboard (trees from trees) makes me happy, as well as both playing with the kit myself and sharing with others! Bellow is my process:
I started by drawing 2D images of the tree parts with my Wacom one in illustrator:
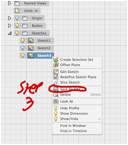
I saved the images as .svg and imported them as sketches to fusion360 (I am growing to learn and appreciate fusion but we are still on rocky ground, in a few weeks I imagine I will be a big fan of the tool)
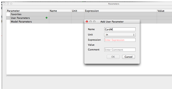
Next I created paramaters CardW = card width and SlotH = slot height. I found it very frustrating that fusion360 does not let you apply these variables across an entire project. Online they acknowledge that it would be a nice feature but it is at the bottom of their priority list! For the branches I made them all in the same file to avoid this problem.
Then I extruded the sketch to a distance of CardW. Made a new sketch on the surface and cut a box out of width CardW and height SlotH.
In order to get the file back to 2D and ready for cutting it needs to be a .dxf. Fusion lets you do this by right clicking on a sketch and exporting it. However at this point the sketch I need is the combination of two different sketches. What to do?? If you click new sketch and select the surface of your newly constructed object it will generate a sketch with the surface outline! (if you’re stuck and now reading this you are welcome!) You can then right click and export that for cutting.

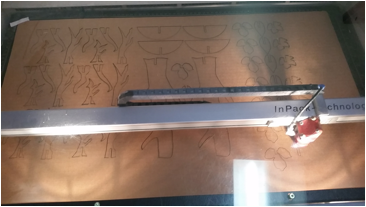
Time to cut!
I measured the cardboard at .17in. I decided to use the base pieces as a test. This was way too wide. The pieces fit inside each other but were very wobbly. One of my classmates recommended .14in. I tried that and it was a bit to tight. .15in was again too loose. I finally settled on .145in.
I then cut out one of each shape to see how they would react, the trunk wasn’t ready at this point.
They all seemed to fit pretty well, but I could tell some would fatigue faster than others.
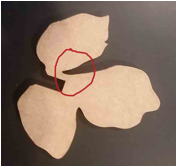
The branch on the far right was too skinny by the joint and quickly fell apart. I went back and made some new branches that would be thicker around the point that the slot was cut out to account for this. It is an interesting experience to try and sketch free hand and then convert it to something somewhat technical and in a material with particular constraints.
I also added chamfers to all the leafs and branches there was a noticeable difference in experience.
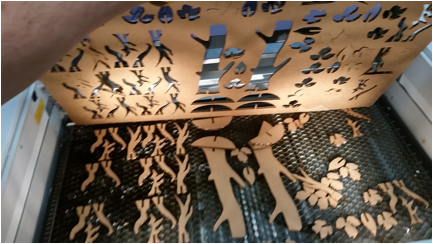
I made an inkscape file to cut out one of each part.
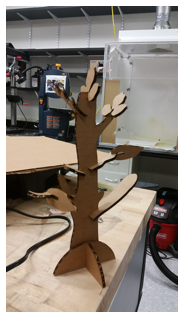
They all fit and resemble a tree!!!! I did not like the way the branch pictured bottom right above looked so I drew one more, tested it, then set up an inkscape file to cut out a bunch of parts, prepared the cardboard, and fired!
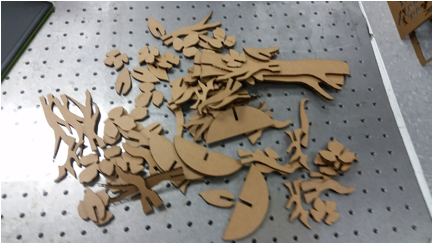
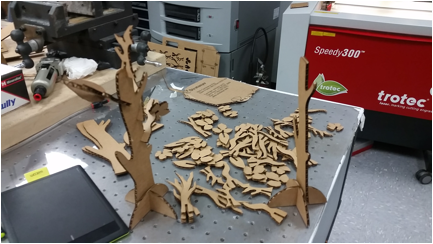
First Trees!
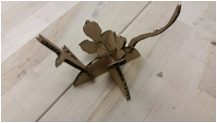
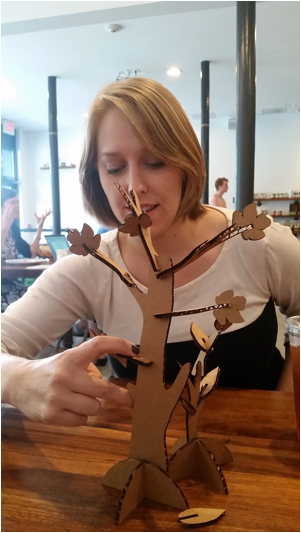
The next morning I had my parts in my bag when I ran into my friend Amanda at a coffee shop near school. For me one of the best parts of making something is watching others interact with it. She had fun playing with my kit, here are her creations!
After class I plan to make a bunch more kits, leave some at my favorite coffee shop and put some on the bar at work to see what people make!
One flaw that I know I need to fix is one of my leaf designs has a skinny section next to the slot and easily buckles. It works for now, but will be improved for the future.
Thanks for reading!
Here is the .SVG file ready for cutting if you want to make your own (scale is in inches).
https://drive.google.com/open?id=0Bwn9JkDLg-21YTYtR2hITnNDSEE