Electronic Design
The
goal of this weeks project is mainly to learn how to use an electronic design
software. We were tasked to recreat the hello-world board and add some
peripherals to be programmed. I used Eagle, which has a pretty non-intuitive UI
but once you get the hang of it, it’s not so bad (at least at the level of use
I had this week).
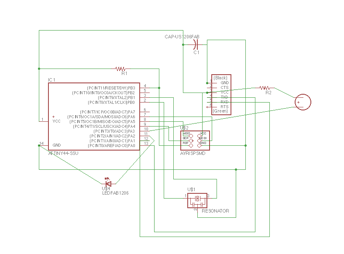
Modeling Hello-World board
I began by coppying the hello
world board.
I made this schematic in a
rush while trying to follow along with Jo who was giving a tutorial in our
section. It was hard to do both at the same time and so this schematic is a bit
hectic.
I tried the autoroute function in the board file but
it just made a mess.
I then routed the traces by
myself (thanks Jo for the pointer to go inside the IC)
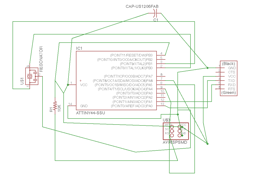
It was now time to add the
peripherals. The schematic was was really messy so I started over. Remade the
board (I screen shoted my first one and then used it as a guide in the second.
I added the components to my
schematic file (yes I forgot a resistor for the LED). I decided to add a
microphone and an LED. My plan is to program it so that the louder the you
speak / yell the brighter the light will get. I put a resistor in line with the
mic both because I will need it to make a jump over a trace and because I
thought I might need it to take out some noise in the signal. (I assumed that
the elctret microphone would work like a potentiometer as I was about to finish
my project Rob explained to me that that is not how it works. He said I might
still be able to get some functionality out of it so I kept it for this week, I should have done more research first).
But I couldn’t get these new
components to show up in my board file. After a while of googling I gave up and
started the whole process over again!
Final schematic:
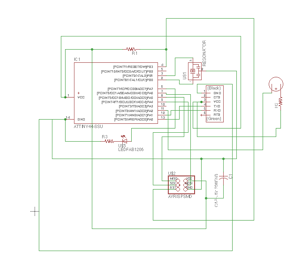
Holding down the alt/option button allows you to move
objects and connections on a finer grid allowed me to make my lines more clear. I then move to the board.
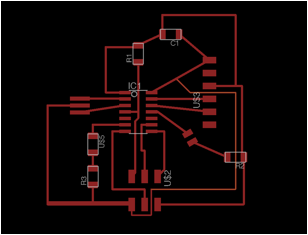
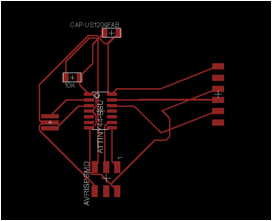
Having already made the board
without my new components I copied that design then found places to put the new
components. In the picture above you can see what Eagle is calling an unrouted
trace on a clearly routed trace. I had done this trace in the standard width of
.016, I was worried that it would be too thick to fit through the FTDI port so
I deleted it and redrew it at .01. When I did this that line reapeared, I
couldn’t get rid of it but it didn’t matter for milling. This is a window into
some of the wierdness (which i’m sure there is some underlying reason for) of
Eagle.
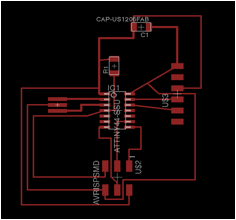
To export for milling I
turned of all layers except top.
Then file->export->image. Set the DPI high, >1000 and select window
(make sure all your traces are in the window).
To prepare for milling I
opened the file in photoshop and cropped down the image to contain less
background. Next I filled all the red lines to be white.
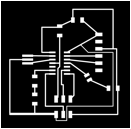
After that I saved the image
as outline so that I would have the identical formating to make my outline
around and know that I would not cut into any traces. I drew the outline in
white and then erased the inner traces.

After the processes followed
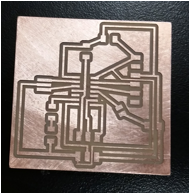
the same processe as week2 (http://fab.cba.mit.edu/classes/4.140/section.Harvard/people/Vizner/Week2/Programmer.htm).
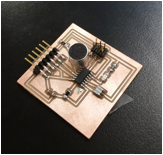
Here is a picture of the
board after milling
The assembled list of parts
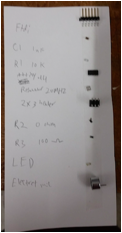
I am a big fan of the write
it out and use double sided tape system!
This time when stuffing the
board I ran into a new challenge of how
to attach some of the components to the board and almost did not have enough
room! The microphone had a (relatively) large presence on the board and
almost overlapped with the FTDI and JSP pins. I had to solder those down first
then the mic.
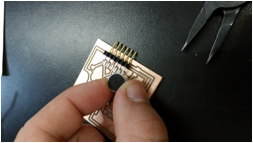

Also I used th resonator for
the first time this week and it seemed to be much thicker that the components I
had previously worked for. This presented almost a wall that needed to be
soldered down. I think I did it right….
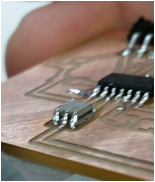
Here is the board all said
and … stuffed!
I am excited to program it,
and perhaps redo the microphone part, in two weeks!
Things I learned / You should look out for
·
Autoroute is not
perfect and might make a mess and leave strange artifacts, make sure it is
turned off if you choose not to use it.
·
Make sure you
understand how all the components you are putting on your board are supposed to
work, read the data sheets.
·
Holding down the
alt/option button allows you to move objects and connections on a finer grid
·
When you add
components you must take into account their physical size, this may become a
constraint.