Build a Bipolar Stepper Motor Driver Board!
Week 9: Output Devices
This week we learned about different types of output devices and fabricated PCB for controling the output device. For my final project, I decided to control the stepper motor for this week assignment.
Stepper Motor
I bought a bipolar stepper motor for my final project. It will be used for actuating the bubble iris attached with a string. NEMA 17- Body length: 34mmThe principle of a bipolar stepper motor is well explained on the below animation (referenced from link)
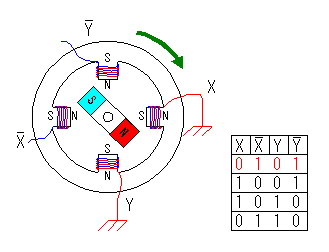 |
why not servo motor instead of stepper ?
 |
Circuit
I used the same circuit design of fab class as shown on the below image. The circuit uses two motor driver IC chip (A4953)
 |
First I fabricated the board using the mods but since I didn't check the firm adhesion of the copper board on the sacrificial layer of the milling machine, the trace had weird shape looks like drawn by hand. Also, when I tried to milling the outline of the board, the double-sided tape started to being detached from the sacrificial layer and I wasn't able to complete the board cut clean.
 |
 |
 |
So, I had to cut out the board manually using the wire cutter and some part of board's edge was teared apart and damaged the trace
 |
 |
 |
To connect the damaged traces, I just soldered a wire between the damaged traces which was the vcc line for the driver board. But when I tried to upload a code through the ArduinoISP, my laptop was not able to detect the ATtiny 44 chip on the board and the chip got very hot that even I couldn't touch it. But I couldn't find any shorted line on the board with multimeter and just assumed that the chip might be damaged. So I replaced only the chip but it still didn't work.
 |
 |
So I made another same board and this time I was able to fabricate the board unimpaired. Now I have two boards which are I call old and new.
Debugging
The problems I found during uploading the code through the ArduinoISP.
 |
 |
Test
DC Motor Driver
 |
 |
After making the stepper motor, I built a DC motor driver for my final project. I need to drive 2 DC motors (Fan, Peristatic pump) and decided to make two of this and connect individually.
 |
 |
Ran the fan and it worked!