Week 1: Computer Controlled Cutting
"Priyanka Learns HOW TO MAKE a Laser Cut Shoe Display Case"
For my first assignment for How to Make (Almost) Anything--which involved using the Laser Cutter and Vinyl Cutter in our machine/fabrication shop this week--I decided to jumpstart my efforts in achieving my Final "morphable shoe" Project by starting off designing and fabricating a "Shoe Display Case" that artfully and efficiently displays the final products of my Project at the end of the semester. The following sections lays out what occurred for this week's assignment.
Group Project: Testing out the Laser Cutter
We did tests on the chamfer size and realized that (assuming always a 45 degree chamfer slope), the size (length) of the chamfer didn't matter so much for short slots, but once the length of the slot increased to more than ~2'', a longer chamfer (of ~0.25'' length) on the tab makes sliding into a longer slot easier, yet maintains the stiffness required to keep the parts held together in place. We also tested for the optimal slot size thickness, based on teh type of material we were given, which was ~0.155'' thick corrugated cardboard (and which was also important to factor in when calculating chamfer size). After laser cutting several slot thicknesses (of equal increments of 0.005" +/- the material thickness) and testing the fit with another piece of that same material, we came to teh conculsion that hte optimal slot size is 0.145" (due to the compression of the corrugation), and have thus designed all my parts with slot thicknesses of 0.145" and chamfered part edges of 45 degrees and a 0.25" chamfer (for the 8 side walls, 4 middle panels, and 4 shelves) in my individual laser cutting project.

Figure 1: Laser Cutting Pieces to Test Notch Thickness Differences in the Cardboard
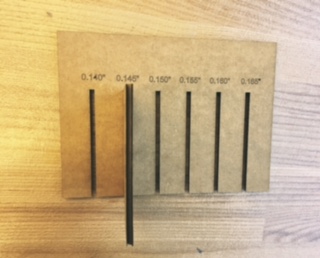
Figure 2: Inspecting the Fit of Two Carboard Pieces Together
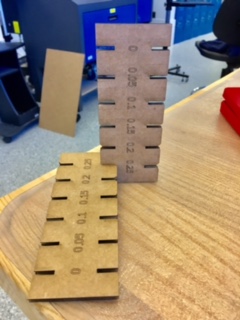
Figure 3: Deciding on the Most Effective Notch Size for this Specific Cardboard Stock
We cut circles of multiple diameters (1",2",3",4",5") wiht the sizes vector engraved and rastered onto the surfaces, to test for optimal speed and power required to cut pats of different sizes. We did multiple tests on the 2" diameter circles and did tests on teh laser cutter for power percentages (calibrated fromt eh machine default--for "Matboard" mateiral of (specified) 0.155" thickness) of 50%, 60%, 70%, 80%, 90%, 100%, 110%, 120%, 130%, 140%, 150%. The (perceived) percentages above 100% were "achieved" by DECREASING the cutting SPEED, while maintaining 100% power on the machine's software interface.
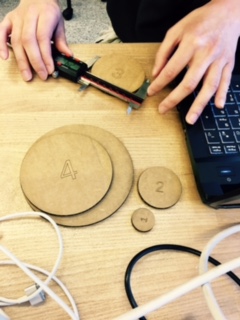
Figure 4: Rastored Numbers on Laser Cut Circular Pieces of Carboard to Determine Optimal Feeds & Speeds
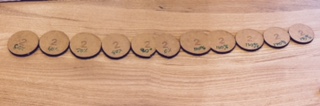
Figure 5: Our Observations from a Variety of Different Circle Sizes
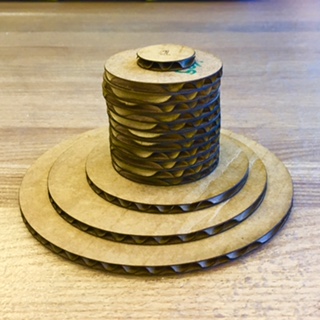
Figure 6: A Pretty Display of Circles
Here is our team (with me behind the camera), the Purple Anteaters!

Figure 7: Go Team!
Individual Laser Cutter Project: Press-Fit Miniature Shoe Display Case
The first thing I did for my individual laser cutting project of creating a quarter-size version of the shoe display case I will make for my final project was to create a 3D model of it in my CAD program of choice: Onshape. I've worked with SolidWorks for most of my life, but I always hated having to use a Virtual Machine to make it usable on my Mac. Once I learned about the cloud option of Onshape, I was hooked. Anyways, I decided to design up my Shoe Design on Onshape -- after doing some research and observing pretty shoe displays in the stores around Boston -- and came up with the idea of doing a circular shelf model -- that will ultimately be rotating (using a "Lazy Susan" bearing) and be able to showcase my work artfully. Here below you can see pictures of my process.
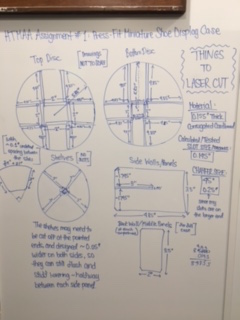
Figure 8: My Initial Design Sketch
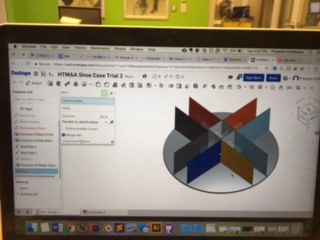
Figure 9: Onshape CAD Practice
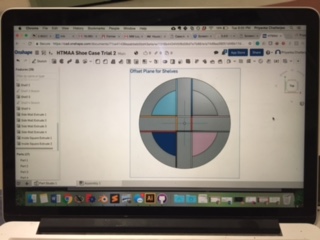
Figure 10: Merging Parts Together
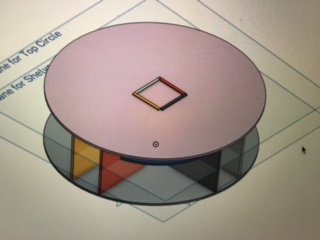
Figure 11: First Draft of Shoe Rack Design
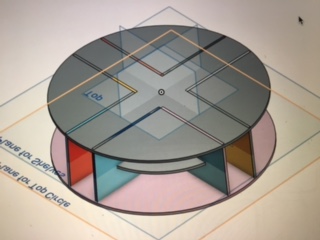
Figure 12: Backside Orientation of Design
Finally, I projected the 3D model into 2D planar pictures and then exported them into Adobe Illustrator where I made the images ready for laser cutting. Here below is a picture where I have designed the slots in the top and bottom circular bases for the display case.
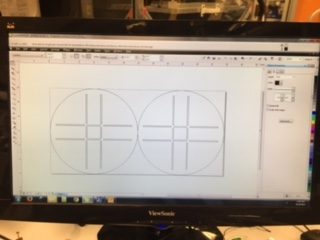
Figure 13: Transferring Design to CorelDraw
Unfortunately the EDS shop closed a bit earlier than I was ready for, and so I had to finish up the 2D projection work in the mini CBA shop where my brother works, but once I got to finally being able to laser cut, I realized that the shop did not have anymore cardboard. Therefore, I plan to today finish the actual laser cutting of my press-fit parts. Here below is the setup in CorelDraw and with the Laser Cutter in the CBA ready to cut once I get some cardboard.
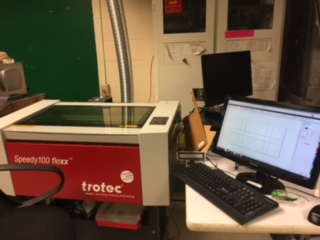
Figure 14: Preparing to Laser Cut!
Individual Vinyl Cutter Project: Project Logo and Figure Skate
To start off my adventures with the vinyl cutter, I decided to first work with an existing PNG file online to give the machine a trial run. I picked out a PNG file of a figure skate online and uploaded it onto the vinyl cutting software in the EDS lab, and away it cut! The outcome on black sticker vinyl tape was wonderful. The dimensions for the image was about 4 inches by 4 inches.
Next, I decided to again be proactive with my final project idea and design my first iteration of my project logo. I am no graphic designer (yet!) but I was able to go from a pen-and-paper free-hand 2D drawing of a tentative logo for my project called MorphWear. The logo comprises of an M tangent at the legs and above a W, with its top edges touching flush with the bottom edges of the M. I went from scanning it and then uploading it onto both Inkscape and Adobe Illustrator (I decided to forge ahead with Adobe Illustrator in the end) and then cleaning up some of the edges and printing it out on the vinyl cutter, as well. Below you can see the beautiful outputs that are now displayed on my Macbook!
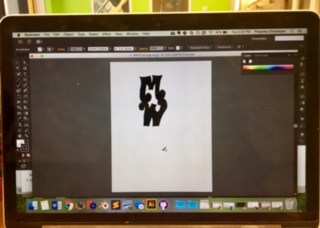
Figure 15: Handdrawn Logo for Final Project that was then Scanned & Imported onto Adobe Illustrator to PNG and then Cut!
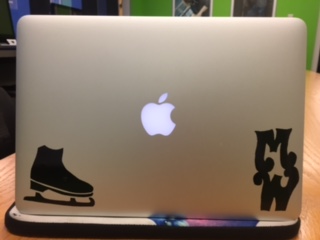
Figure 16: My Final Vinyl Cuts!
UPDATE!
I finally got around to working with Adobe Illustrator to make my 2D components with the correct sizing and scaling with the proper tab sizing for the corrugated cardboard. Here below is a picture of my drawing and layout for the shoe rack components (for a "3 Story" Shoe Display Case) that will then be made on a larger scale as well.
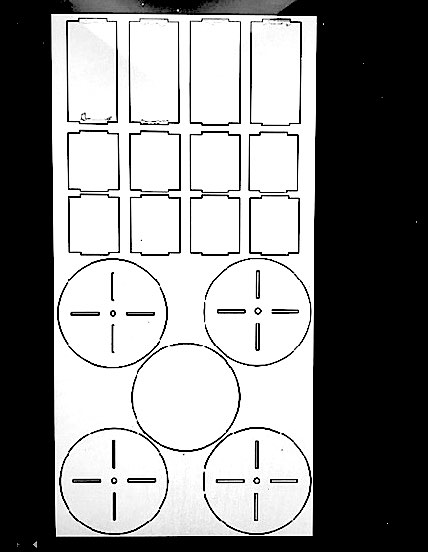
Figure 17: Updated Final Pieces to Fully Laser Cut
I then exported my design as an STL file into CorelDraw, that is connected directly with the Laser Cutter in the EDS shop, set my feeds and speeds based on using the corrugated cardboard in the shop, set up my cardboard matboard onto the laser bed, oriented and zeroed the laser nozzle, closed the machine, and let the laser cutter start cutting out the components.

Figure 18: Laser Getting Started!
In just about 2 minutes, my whole design was cut!
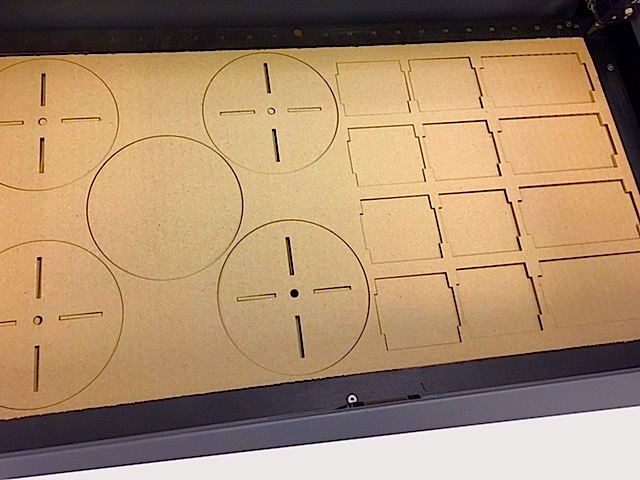
Figure 19: Finished Cuts
And now ready for the pieces to be separated out from the carboard stock and then put together! You can see my first attempt at the press fit of this little cardboard mock up of my shoe display case below.
Here it is assembled with just one section:
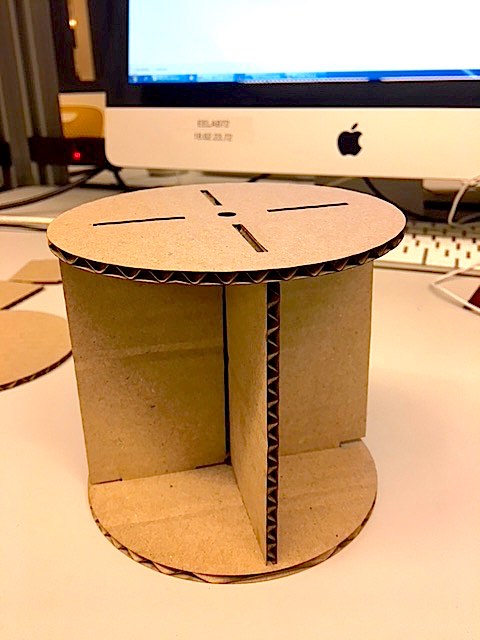
Figure 20: First Story for Mini Press-Fit Shoe Rack
And now to the final "3 Story" miniature-version of my shoe rack display case:
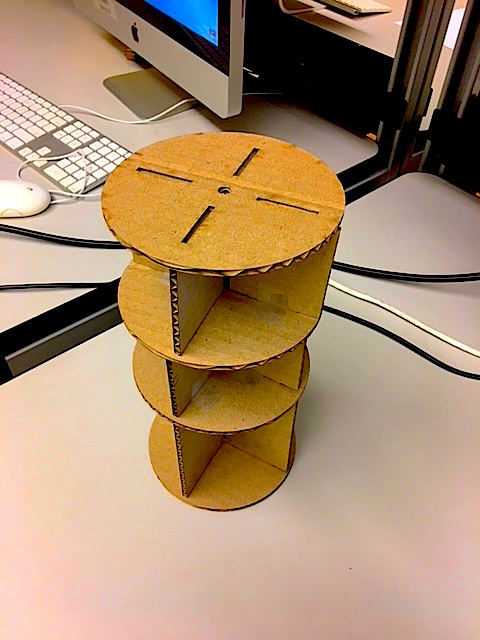
Figure 21: Full 3-Story Design (Mini Scale)
Hooray!! Here's to more fun laser cutting adventures to come! :D