software I attempted not to break: iterm, sublime
hardware I attempted not to break: mill, soldering station, isp, laptop
----how do games work----
This week, I want to make something that could possibly be useful for my final project. I'm still fleshing out my project and deciding how exactly the game should work and what hardware components it should have. But I think one cool thing it could have is individual life trackers. So far for my project (keep track of it here!) I have decided that I want to make it similar to games like Mafia, Ultimate Werewolf, Secret Hitler, and Betrayal at House on the Hill, where there are secret roles or groups of people who are technically working together but maybe don't know that they are. One thing that characters will have to keep track of as the game goes on is their health, so I figured as an initial step I would create a physical health tracking system.I decided first to make the LED array board. I always lean towards more visual systems so I thought the LED array could be a cool way to show health versus like just displaying a number on a LED strip. Since I've been out of lab and it's been a while since I've worked with electronics, I decided first just to make the board from the website and then change the C file to make it do what I want it to do. My initial plan is to make the board and put the given C file on it just to make sure it works. If that works out, then I'll update the code with the function I will write to display a heart that slowly empties. I think for now I will just attempt to first make a heart show up, and then make each row of the heart turn off one by one just on a set time scale. In the future though I would want some input to the board that will tell it when the heart should lower.
----milling----
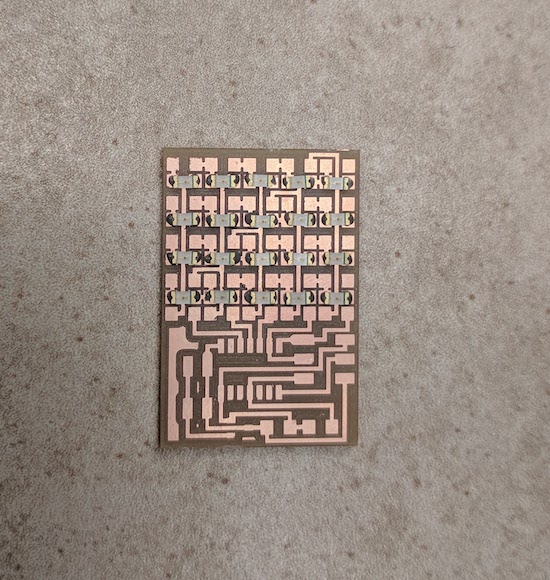
Milling was a surprisingly difficult struggle this week. I had my png files and was going to use the Roland in the EECS lab. Unfortunately, when I got in, it turns out that the 1/32 end mill had just broken and no one could find a replacement. We waited for a few hours until Shirin's office hours (and emailed Gavin in the meantime) when hopefully she could help us. Once she came in, she was able to find more end mills, so I was set to start milling my board. I put in the trace file and milled the first round. After, I noticed that for the most part the mill did not actually remove any material - it just slightly scratched the surface so that the surface was still mostly flat. However, in one corner, it milled out as it should have. I assumed this was just a problem with the top piece of material being slightly not level, so I took it off and reapplied tape across the entire board and stuck it back on. I then tried again, and the same thing happened, and then tried a third time after making the mill cut out .005 depth instead of .004. At this point, Shirin suggested replacing the sacrificial layer since it's possible that's what was making the top layer uneven. I replaced the sacrificial layer with Shirin's help and the first try still turned out very rough, but at least mostly cut through. I tried one last time using a deeper cut and also a different end mill and this try finally worked out.

----why did I do this to myself----
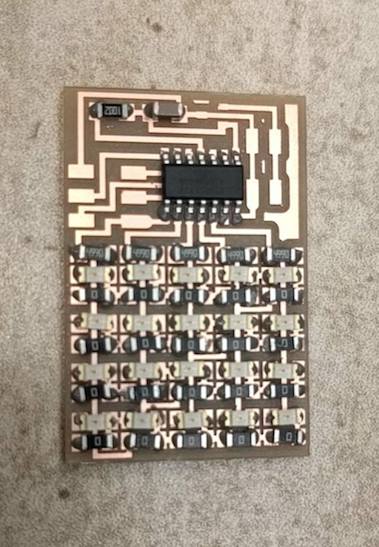
After the obnoxiously complicated milling came the soldering. I quickly realized that the led array was going to drive me insane. Thankfully, before Shirin left, she taught me how to use the solder paste and suggested I use the reflow oven so I didn't completely hate my board.It worked? Kinda?
Admittedly, the soldering paste is infinitely easier than actually soldering it on. Just dab a tiny blob on the pad and bam, led stuck. However, because of how many pads there were and how close they were together, I kept accidentally scraping paste into the wells when I was trying to position the LEDs and resistors. I tried to scrape it out, but unclear if I actually managed to. Shirin did tell me that apparently the oven kind of magically makes the solder adhere to the pads, so she said I might not have to worry too much about it. And honestly, it was still a ton easier than normal solder, so I think it was worth it. Using the actual oven was super simple too. I just placed my board in it, turned it on, and let it solder itself. It even looks like most of the solder did end up entirely on the plates!
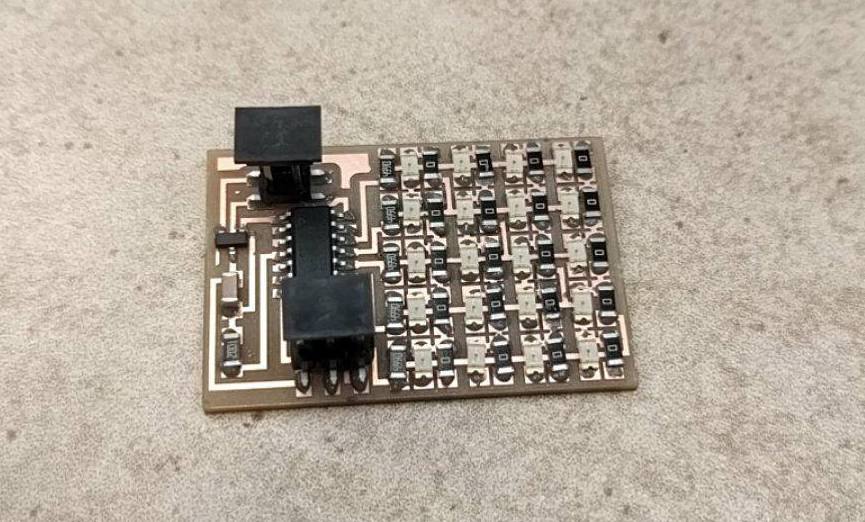
Unfortunately, because of the problems with the mill and some issues being able to see the small pieces (boston allergies -> watery eyes -> putting resisters upside down. Whoops), I wasn't able to actually program my board this week or see if it worked. Seeing as how this was my first electronics week back in studio since the very very first one, though, I'm pretty proud of how this board turned out. I also did end up writing the functions that should (hopefully? maybe?) display a heart and then display a fading heart over a few seconds, so I'll test that out later this week.