Away from electronics and back to manufacturing. That is nice. But this workflow! Design in Fusion, explode in Rhino, CAM in MasterCam, mill wax, cast a negative rubber mold, cast a final product. This was labor intesnive and not the seamless digital fabrication of my dreams.
Learning Fusion 360
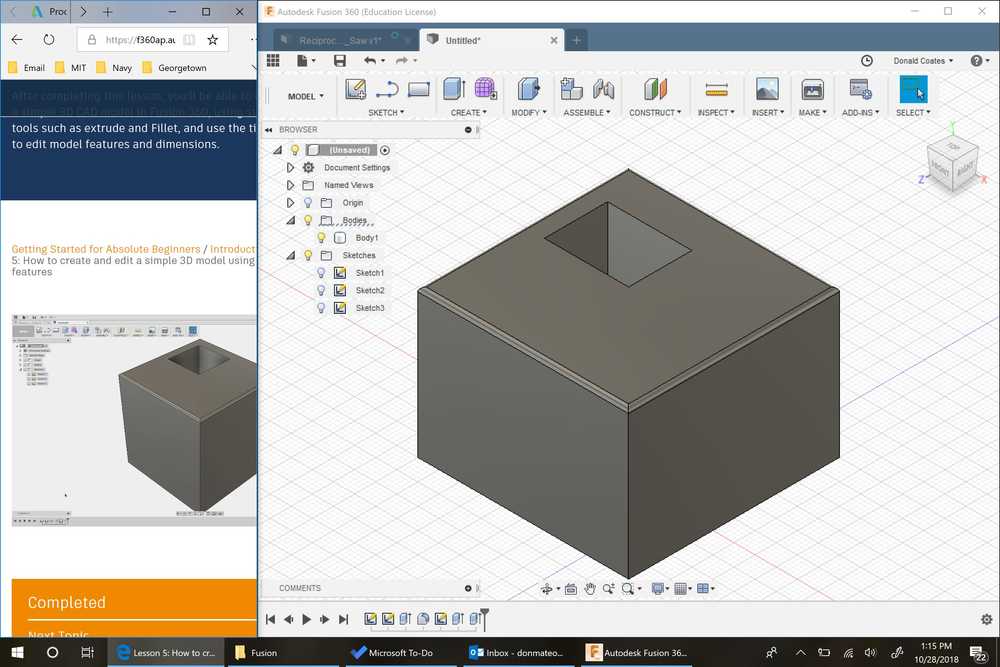
I have been dragging my feet learning Fusion 360. Being in the Architecture Shop, everyone in the spaces is much more comfortable with Rhino and more help is available. But for this project, I decided to jump in. Also I interviewed for an internship at GM in their Additive Manufacturing Division and they use Autodesk to do this thing called Generative Design - interesting. Anyway, took advantage of the Gettering Started Videos from Autodesk.
I created a basic 3d model of a submarine on Fusion. I wanted to creat support beams so it could stand up. However, I felt I had too many sharp corners and small details. So I got rid of the supports and filleted all my my corners. I then created the brick around the sub. I found out that the clearance between the walls and some of the sub features were less than 1/8". But Fusion with its timeline made change things very easy! I could go back and change the dimension and all the follow-on features were parametrically changed. It was so much easier than grasshopper.


Download final Fusion file:

Creating a CAM file using MasterCam
We were using the ShopBot in the Architecture Shop. I brought in the file and attempted to transfer the design to MasterCam with the help of Jennifer's handy wiki on the subject.
I found out that transferring it was not too easy. I exported it as a .step file. However, I needed to be able to choose individual surfaces in MasterCam. I am not sure if this was the best method, but I opeend up the .step file in Rhino and exploded the surfaces. Jennifer then helped me clean up the file for MasterCam by basically deleting every single vertical surface. It made my fins look like they were floating. I also translated the brick to the origin and deleted all the exterior surfaces that represented the wax. We encountered one problem in MasterCam that turned out to be a duplication of a surface. After deleting that duplicate surface, we were able to create the initial rough tool path with the 1/4" drill. I later came back and was helped by Alexandre, one of the shop staff. MasterCam is not intuitive and his and Jennifer's help with all the individual tool settings was invaluable.
Download Rhino File ready for MasterCam:

Milling
The Shopbot was a pretty manual process. I used a hot glue gun to anchor the piece of wax to the spoil board. We then used the torque rench to put in the 1/4" bit. We then warmed up the spindle. We had to restart the machine, since we couldn't communicate with the shopbot to spin at 9000rpm instead of the max of 18000. We then zeroed the machine, which included closing a circuit to zero the Z axis. The manual zerioing was not perfect, and we ended up losing the backend of my mold as you can see in the bottom left. Molly's block was on the board at the same time, so we milled that before replacing the bit with the 1/8" piece. Because two jobs were done, we had to manually re do the zero for the finishing job. It was off by just a bit, so I lost another one of my thin walls. Oh well. By leaving some extra material on the roughing pass, the actuall mold was not affected by the manual resetting of the zero.


Download final MasterCam File:
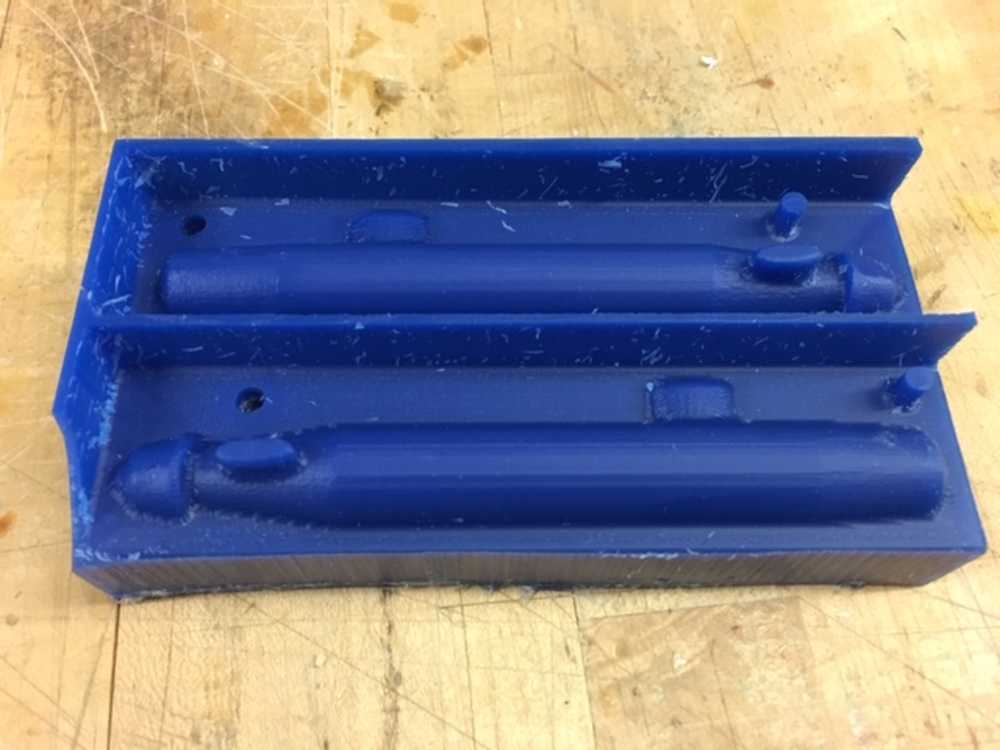
Creating the Mold for the Mold
I had to put small pieces of balsa wood around the mold to replace the fallen walls. I mixed the two parts of the Oomoo. There were a fair number of bubbles, even after I tried to trickle it in there. I tapped the mold, and popped a few of them as they came to the surface. I thought it would only take a little over an hour. But almost two hours later, it was still a little squishy. So I left it over night. Came the next morning, and the balsa wood side turned out to be fortuitous, since it made it easy to pull out of the mold. And here is when common sense failed me - I didn't put a pour hole in my mold. I drilled one into the 'sail' of the submarine. This is key as I saw other people have problems with their plaster: I mixed the plaster by by using a small scale - 18 parts water to 100 parts powder. The directions said 'must' use a mechanical mixer at +1000 rpm. My hand going at about 100 rpm had to suffice. As I started pouring, I realized a lot of air was definitely going to be trapped in the back of the sub. I needed a bigger spout, since the plaster was just glopping in. So I decided to just split it in half.


Casting the submarine
I let the plaster sit for about 45 min. And there it is! Two halves of a submarine glued together to make one!

