Furniture
week 6 (10/10 - 10/17): Computer-Controlled Machining
{machine: Shopbot}
Table of Contents:
1. Week Project: Extend my Workbench's Storage
1. Week Project: Extend the Storage of my Workbench
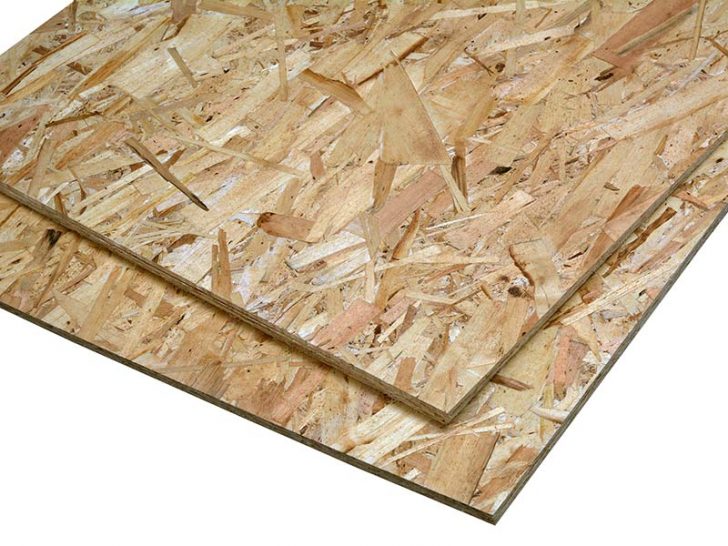
This week's project is tom make something big using computer-controlled machining. The machine is the most great Shopbot. THis week is a great opportunity to organize my messy workbench at CBA by extending its storage capabilities with shelves. We are given an piece of stock piece of oriented strand board(OSB) that Neil has baptized it as the wood sausage. I was curious to look in to search online and learn more about this type of wood. Wikipedia informed me that OSB was invented by Armin Eimendorf in California in 1963. It is a type of engineered wood formed by adding adhesives and then compressing layers of wood strands (flakes in specific orientations). Its characteristic wood strands make it easily identifiable:
2. Parametric CAD Modeling
My CAD design software for this week is again Fusion from Autodesk. As I move on with HTMAA I realize day by day the power of parametric modeling. My plan is to make a series of stackable shelve units to populate the area above the existing storage unit of my workbench. When I started modeling my shelves I was not in the lab to measure the dimensions of the living area of my shelves.But who cares? Hre comes the power of parametric modeling. I designed my unit shelve model having a form factor that is a function of user defined parameters as I show in the 3D printing week with values equal to a rough estimate of these dimensions. Parametric modeling allows me to update my design by simply changing the values of these user-defined parameters.
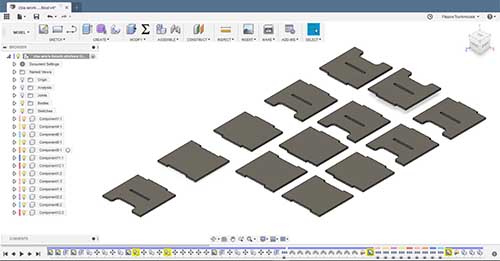
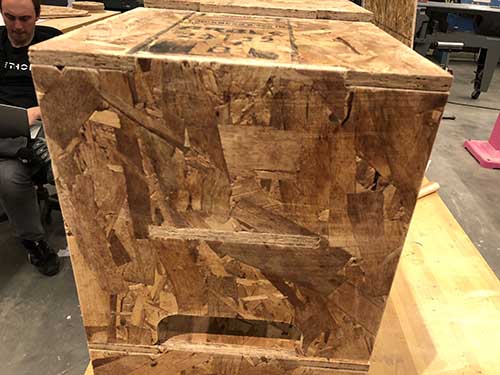
My unit shelve is composed of 2 identical vertical pieces held together by two horizontal pieces with tight-tolerance
dogbone finger joints. Since the unit sits on a flat surface, it provides 2 racks, whose floors are the middle horizontal
pieces help by the joints and the the flat surface, respectively. To parametrically model this, I defined the following
user parameters in Fusion:
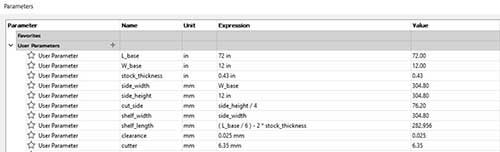
All sketches are fully defined with dimensions being a function of the user parameters shown above:
To get tight finger joints with this type of wood was a challenge due to its variable thickness. I measured stock thickness ranging from 0.41 to 0.47 in. Tom suggested suggested to use a stock thickness value equal to 0.43 in for tight joints and he was right. The rest of the parameters were defined based on the length and the width of the surface area of my existing workbench storage.
3. Preparing my CAM file
I decided to use Tom's workflow for this week. He is using VCarve Pro to generate the Shopbot toolpath after importing a dxf file with vectors for all the cut-outs. To get this file, I laid all parts flat using planar joints between them and the stock which I modeled inside Fusion as a separate body. To be able to apply joints I transformed all bodies to components. I also made sure their upper and lower surface is flash to the upper and lower surface of the stock, respectively. This allowed me to move them freely online within and across the stock's plane and efficiently place them so that they cam all fit within the stock with the predefined dimensions. As a last step I projected all the side profiles in a single sketch which I exported as a dxf file.
After that I imported the dxf file in VCarve Pro by opening the software, choosing a "New File", verifying the depicted stock dimensions and then doing File -> Import -> Vectors. The software allows me to set the tool dimensions. I used 1/4 in for all my cuts. Under Toolpath, I choose Profile toolpath with 2 tabs per piece and either inside or outside cuts for the slots and the outline, respectively. For the slots I din't use any tabs, but I made sure to have this toolpath happening first in the job. As a last step, I saved the toolpath and then got my .sbp file that I could feed into Shopbot's software to do my cuts.
4. Making it
Everything went well!
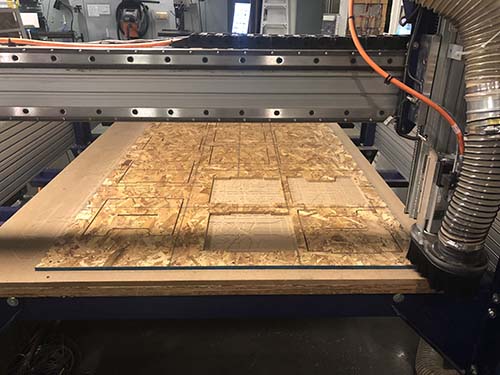
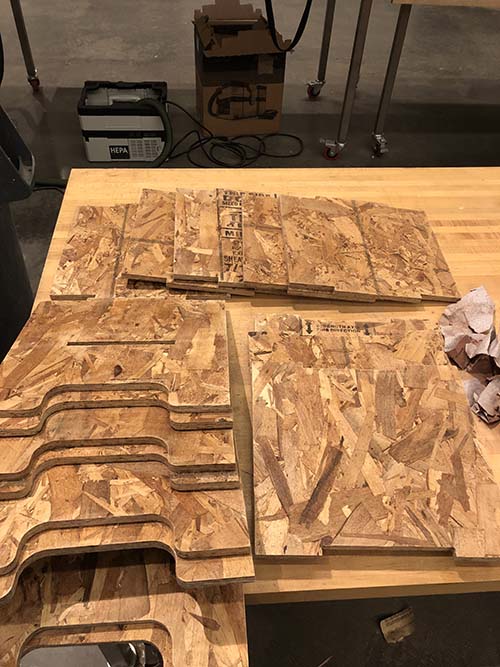 With one stock piece I was able to get 4 double-rack unit shelves. I run a test cut to make sure
that my finger joints were tight enough. Everything was perfect! Thank you Tom for the tip! Then, I used the
orbital sander and a piece f sanding paper to smooth out the sides of all the pieces. After that, I assembled
4 units by press fitting all the cut parts and here are my shelves:
With one stock piece I was able to get 4 double-rack unit shelves. I run a test cut to make sure
that my finger joints were tight enough. Everything was perfect! Thank you Tom for the tip! Then, I used the
orbital sander and a piece f sanding paper to smooth out the sides of all the pieces. After that, I assembled
4 units by press fitting all the cut parts and here are my shelves:
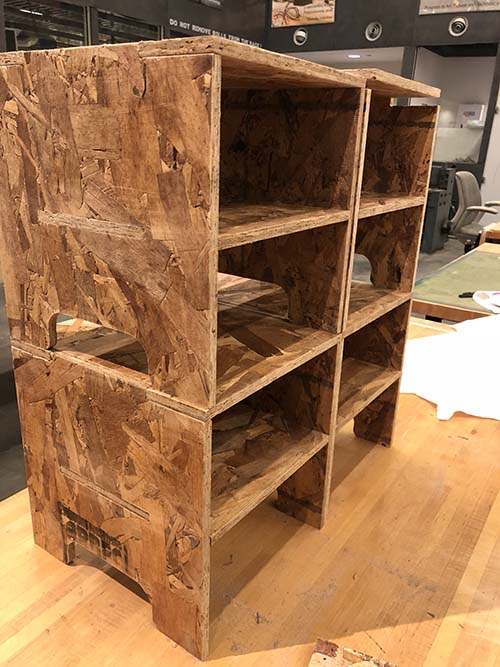
It turns out that OSB is a great material! Easily machinable and with a bit of post processing you can make beautiful things. Next time I will try to be more creative...but shelves was an immediate need! There are some spare OSB sheets. I will cut one more piece today to get 8 shelves in total.