Electronics Production
Making a Board Results:
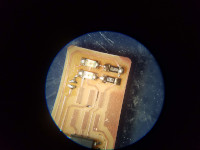
Overall the board came out better than I expected. I have no background or skills in this area so I expected a challenge...
and it was. I feel that it's a bit sloppy and will improve with time but for my first attempt it was successful.
The Process:
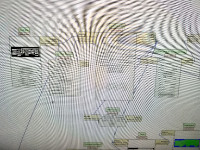
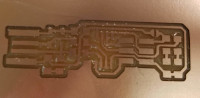
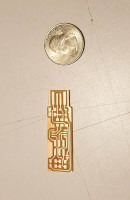
First I milled the traces on the board. To do this I first used MODS to import the tool path and communicate with the Roland MDX-20
milling machine. The challenges of this step were the settings within MODS. It took me few times through to understand the MODS
interface.
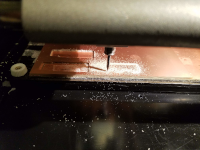
Then I set up the MDX-20 to mill the board. This required securing the material to the bed of the machine, also called the sacrificial layer.
This is a piece of material under the board that will get cut into slightly while making the board and therefore "sacrificed" in order to
ensure that we cut all the way through. Then I had to set the endmill in the collet. And finally I set the x,y,z zeros. Next I ran the
job.
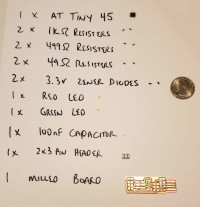
The next step in the process is to use the standard board design "Brian" with his list of needed components to set up to "stuff"
the board, in other words, solder the individual components to the board. The challenge here was simply identifying the components. Even
though all the drawers with the components were clearly labeled it required focus and attention to detail so as not to confuse 49 with 499
ohm resistors.
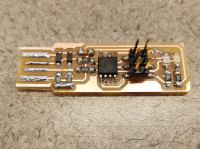
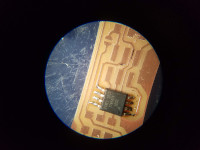
Finally I soldered each individual component to the board. To do this I first laid a spot of solder on the board. Then I set the component
in place with one "leg" on the solder. Then I used the soldering iron to heat the spot of solder and used the tweezers in the other hand to
press the component down into the now "flowing" solder. The challenge of this part was the lack of deterity that I have in my left hand.
Even though I'm right hand dominant I can still do a number of things with my left hand... This week I found that things at such a detailed
level as stuffing a board is not yet one of those things. I then proceeded to place all the components.
In the process I made a mistake and placed a component in the wrong location. The mistake was due to haste and not clearly identifying the
component I was placing. This allowed me the opportunity to learn how to remove a misplaced part. As Neil suggested in class I used
tweezers to hold the component while simulataneously using the soldering iron to reheat the solder and then just waited for gravity to pull
the board away. This required timing to get both sides of the soldered component heated up sufficiently at the same time but eventually it
worked.

What I learned:
Making boards is not easy. However, I thoroughly enjoyed the process, which was unexpected. I expected to enjoy 3D printing, laser cutting,
and "make something big week", but not the weeks that had to do with electronics or board making. I found this to be somehow theoropeudic.
It was a strange combination of tedious, frusterating and "looks easy to do but actually difficult" but yet successfully placing each
component was a small victory and the board as a whole... a large one for me. I can only liken it to Golf for me. Every hole is a challenge and
several times a round I ask myself why I even went out to play. Yet at the same time, finishing out each hole and each round is somehow
satisfying enough and brings a big enough sense of accomplishment that by the end of the round you're ready to play 18 more.