How to Make (Almost) Anything | Lizbeth B. De La Torre
Final Project Process
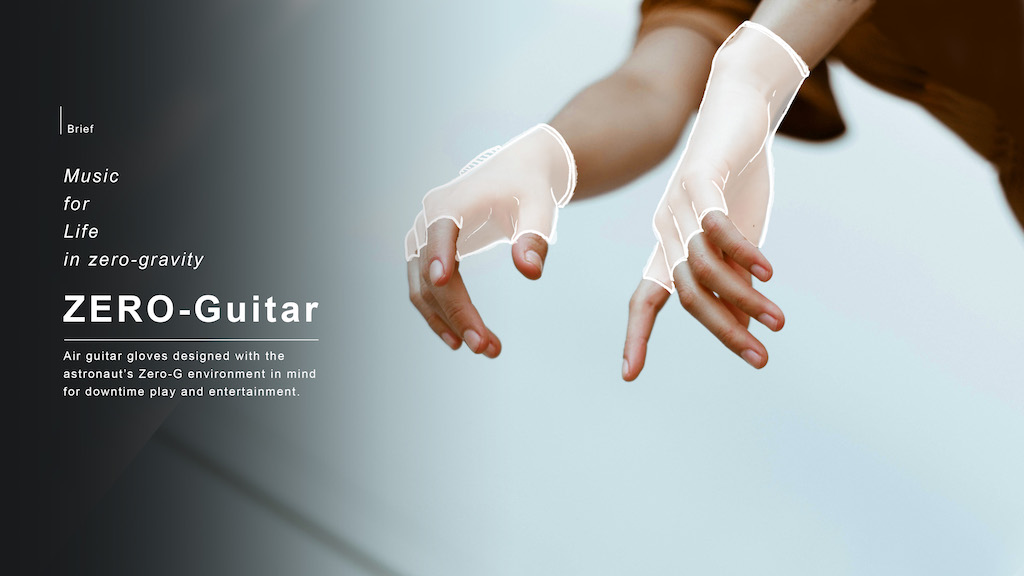
Zero-Guitar | Music for life in zero gravity
Questions Answered:
What does it do? These gloves work together to play one guitar chord. A Phototransistor on the left palm detects a finger hovering over an IR LED, which allows a signal from the accelerometer on the other hand to send data over serial to a laptop that will play the sound.
Who's done what beforehand? Others have created air guitar gloves before.
- Also,Here is a link to the Air Guitar World Championships!
What did you design? A phototransistor and accelerometer combo that doesn't require multiple finger sensors. The phototransisor detects your finger and the accelerometer is supposed to "strum" by playing a preselected guitar chord.mp3
What materials and components were used? Where did they come from? How much did they cost? Where did they come from?
- Gloves: 1 yard athletic fabric, grey | $20, Gather Here, Cambridge
- 5X5 inch felt, beige | $2, Gather Here, Cambridge
- Elecronics: Motherboard | CBA Stock 10K Resistor(1), 1K Resistor (1), 0om Resistor(1), 2x3 ISP Header(1), 2x2 ISP Header(1), ATTINY44(1), IR LED(1), Phototransistor OP522(1) Childboard | CBA Stock ADXL343 Accelerometer(1), 3.3V Regulator, 2x2 ISP Header
- Programming | CBA Stock AVRISP II programmer(the blue one), FTDI to USB Cable
What parts and systems were made? I am proud to say I made everything myself apart from the code, which I mashed together from Neil's existing codes.
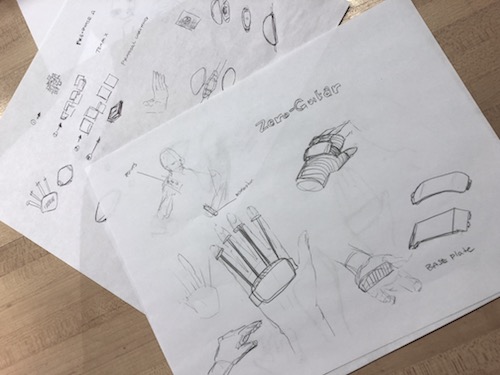
What processes were used? Below is an overview of my process:
- Research on guitars in Zero-Gravity Illustrating the prototype on paper and Adobe Photoshop
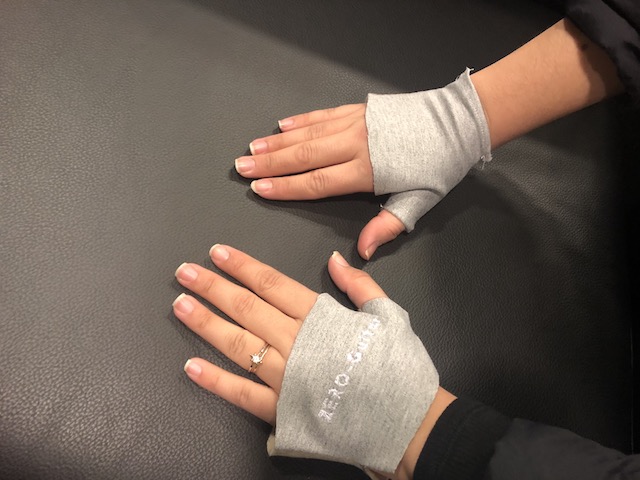
- Creating a glove template in Adobe Illustrator
- Used the template to cut and sew fabric
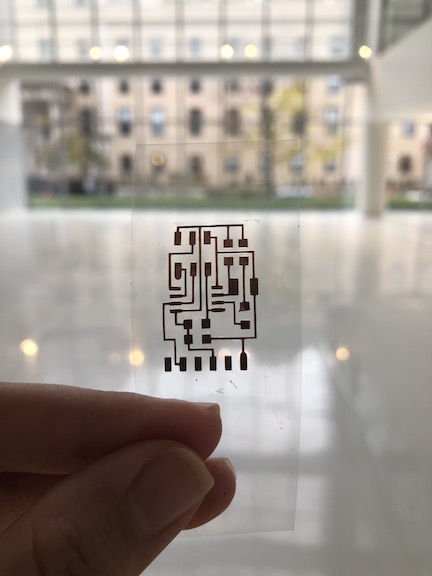
- Designed the electronics in Eagle from two references: Neil's Synchronous detection board and the Accelerometer board.
- Combined the boards so both sensors are now connected on one ATTINY44
- Milled the boards on the Roland Mill and Vinyl Cutter
- Learned about communicating over I2C!
- Put everything together
What questions were answered? I had a lot of questions about attaching two sensors to one micro controller, but Sam was awesome and helped me out! I only needed SDA and SCL to listen to the Accelerometer.
How was it evaluated? I tested individual parts of the chip first. (Just the phototransistor, then the Accelerometer) The accelerometer was not sending data in the end because of incorrect voltage.
What are the implications? I would like to make full guitar one day now that I know it can recognize a chord!
What tasks have been completed, and what tasks remain? The initial task has been completed, though I will be switching it to bluetooth in the near future for freedom; right now it’s still attached with a wire. I also need to figure out how to work the accelerometer.
What has worked? what hasn't? The accelerometer is not working. My first thought is bad soldering, however I made 3 boards with awesome soldering and none work. I believe it's not getting the right amount of power.
What questions need to be resolved? How can it recognize more complex chords? This will be the biggest issue! Multitouch would be cool, but not very ergonomic.
What will happen when?During IAP Ill be spending some time making this wireless and adding more chords. Maybe a Space Ukulele would be easier at 4 chords haha.
What did you learn?I learned how to make almost anything! But really I’m most excited about knowing how to make smart systems using sensors. I learned a lot about the “Spiral” technique of accomplishing tasks because as an artist I have a certain process that doesnt work as well with electronics.
I began by creating a mannequin to model and hold the prototype! This was 3D printed on the Sindoh using this tutorial. It was easy to follow and came with the support systems in place, however I did have to modify the support on the palm and one finger
Materials:


I drew some hands to mentally explore how hands might move in a glove (I havent drawn in a long time!) and started sketching out the placement of the electronics and what the casing might look like

I then drew a glove template in Adobe Illustrator and used it to make the gloves. The fingers were really tight, so I ended up making fingerless gloves for better mobility. I used wildcard week for embroidering and sewing.


Ive been experimenting with copper on acetate recently to get the flexibility for a glove. Previous Air Guitars have been really bulky and Id like this one to be pretty flexible and comfortable. I thought of using the multi touch sensor to detect chords, but I wanted the fingers to not have to touch the palm. I ended up scrapping the acetate idea for now because of the instability of the coppertape on the acetate. My Ftdi Headers kept coming off! I will try again during IAP. For now, check out my vinyl cutting process in week 9.

This is a really rough sketch of the final circuit design; (showing three sensors on the left hand instead of the one I ended up using) I modifyied two boards: The synchronous detection board, and the accelerometer board. The synchonous board will detect a finger on a "chord" and the acceleromter will be triggered to play the sound when strumming down.

Here are the final Schematics and boards. I had to re-do these multiple times because I glossed over a very simple thing: to attach the RX to the Attiny44. Thats why it wasn't sending data!


I also had to add the accelerometer footpads into the library and modify them to be a bit larger so the mill wouldnt cut them out (Thanks Tina for recommending this!)
The accelerometer is so tiny, I went through 5 boards trying to get it right.

These boards milled well! Unfortunately, the acetate boards I spent a ton of time vinyl cutting and weeding did not have the RX connected, so I switched to the mill to save time for this round. (below are incorrect boards)

I tested the Phototransistor and accelerometer seperately with their respective codes; The phototransistor works! The code that gets the phototransistor and accelerometer to talk to eachother is complete and can be downloaded below. Unfortunately the accelerometer wasnt sending signal when testing, but it programmed well.
I had difficulty with coding because I have zero experience, but I was able to switch from the Attiny45 to the Attiny44 pretty smoothly with tutorials from previous classes.
What really made switching to the ATTINY44 from the ATTINY45 was this set of code that is now correct for the 44. The bits are specific to the microcontroller:
ADMUX = (0 << REFS1) | (0 << REFS0) // Vcc ref
     | (0 << MUX5)| (0 << MUX4)| (0 << MUX3)
     | (1 << MUX2) | (1 << MUX1) | (1 << MUX0); // ADC7
  ADCSRA = (1 << ADEN) // enable ADC
     | (1 << ADPS2) | (1 << ADPS1) | (1 << ADPS0); // prescaler /128
  ADCSRB = (0 << ADLAR);  // right adjust;
Here are all of the files! They include the final file for getting the two sensors to talk to work together, and modified codes of Neil's to test synchronous detection and the accelerometer on the ATTINY 44 (instead of the 45)
Code:
guitar.c: Combined Phototransistor and Accelerometer Code
hello.reflect.44.c: Neil's Synchonous Detection board modified for ATTINY44
hello.reflect.44.make
hello.reflect.44.3.py: Play a sound with the Synchronous Detection board. Electronics: For guitar.c, one important piece is this if statement that tells the code to constantly read the Phototransistor. If the difference equals 500, it will begin reading the accelerometer. The number 500 still needs fiddling with to find exactly the right value. Sam C. helped me a ton with getting the If statement right! Originally, I wanted the gloves to play sound directly from the Attiny and I found a tutorial for converting .mp3 files into numerical values Here for Arduino PCM, but because of lack of time, I modified Neil's Accelerometer.py to play a sound when X falls below a certain number. The easiest way I found was to use Python's pygame extension. I added the first line above "Import Tkinter", and the rest right above the "check command line arguments" This code ended up not working! I had trouble installing pygame. I also couldn't get the accelerometer to work, so as a last push I ended up modifying Neil's Hello.Reflect.45.py, to play a sound when it detects a finger. I created an If-Then statement with help from Will, and found the following code online (first line is for install) I loaded the updated .py and it worked! Here is a video of what I have so far. During IAP I plan to get the accelerometer working. Thanks Erik for the sound file!
        while (1) {
      readphoto();
          if (on-off=500) {
            readaccel(); //Phototransisitor analog sends Accelerometer code through Serial
from pygame import mixer
if (x=> x0+100*x1)
mixer.init()
mixer.music.load(‘Library.info’)
mixer.music.play()
pip install playsound

import playsound  //placed at the top

if (filter > 0):
playsound.playsound('/path/to/filename.mp3', True) //My If statement