Week 4
3D Printing and Scanning
Assignment:
1) Test the resolution of a 3D printer
2) Design and print an object that can only be made in a 3D printer
3) Scan and 3D print an object
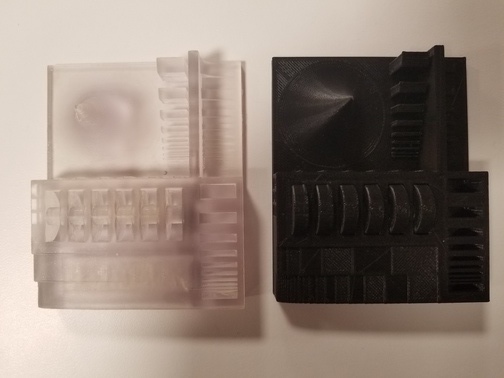
To test the limits of our 3D Printer, we used a test file, linked to in class and hosted on Thingiverse, a crowd-sourced shared library of 3D printable designs. The feature-size that was too small for the print to resolve properly tells us about where the limits of our printer's abilities are.

I decide to stick with Fusion360 to design an object that can be, and can only be, 3D printed. Two objects that wrap around each other seems like a good direction. I design a link for a chain by making an oval in 2D and extruding it into 3D. I use some features of Fusion360 that allow me to make parameterized dimensions and equivalencies to make sure the middle of my oval is centered.

A basic 2D sketch in Fusion360.

My 2D sketch, extruded into 3D. I rendered it to show surface texture, filleted around the edges so that the links will slide nicely past each other, and duplicated the entire object. I rotated the duplicate and moved it so that it will print in the correct orientation to the first link.
I sent my .STL file of my chain links to be printed by the shop manager on the fancy, high-resolution 3D printer that we are not allowed to operate ourselves. The print comes encased in support material, which needs to be washed away. The shop has a special shielded powerwash station for that.
After a quick wash, the chain is clean and looks great. The links slide past each other easily.
Now it's time for part three, scanning and printing a real-world object. We were told to only print small objects, so I pick a small object to scan: a ring.
It does not work. After, I find out that the ring is too shiny for the scanner (it reflects light, complicating the scan) and is too small. You can see how well it did not work here:
Next, I try something larger and less shiny, a banana. Again, it's no good. Possibly the banana should have been propped upright to create a more uniform distance from the scanner to the object, and the scanner settings could have been changed to focus on a larger object.
As an attempt at a fool-proof scan, I try again with an object that I know is 3D printer friendly because it was already previously printed by someone else. It's this acorn-looking thing:
The scan works, minus a few small bits that didn't scan properly. I use the scanning software's automated correction feature to fill in the holes and stitch the object together.
To prepare the file for printing, it needs to be transalted from an .STL file, which is good for creation and editing the object, into a Gcode file, which tells the printer what print path to follow to make an object that looks like the one in my file. The print starts off OK, but I'm seeing plastic start to spool out in a sort of uncontrolled wild spaghetti-like way that does not seem in place with the orderly, controlled deposits the printer is making the rest of the time.
You can see that one side is a nice curve, and the other is a squiggly mess. The printer seems to be trying to print in the air, rather than on a level surface. This might complicate my print if I let it continue. Since the print's expected to take 2.5 hours, I stop the print, re-open my file, and add support structures for smoother printing. Here's the new GCode file showing the supports:
Now, with the support structures at the base, the printer is off to a more orderly start.
When I remove the supports, which snap off easily, I have a perfect, useless little acorn-like object. Success!