Week 8
Molding and Casting
Assignment:
1) Cut something out of a wax block using the Shopbot.
2) Mold and cast from your wax model.
Gotta say, I loved this stuff and may have gone a little overboard this week.
My initial designs for the wax block wouldn't work. They required too much fine detail that the Shopbot can't execute, because the endmill is 1/8 inch wide, and the wax block we are cutting is only 3.5" x 3".
My first design was a dinosaur, but that required too much detail. Next, I tried a Jurassic Park logo that I modified to say "Hello World." I also modified the image to take out a lot of the finer detail but still couldn't get it good enough to work.

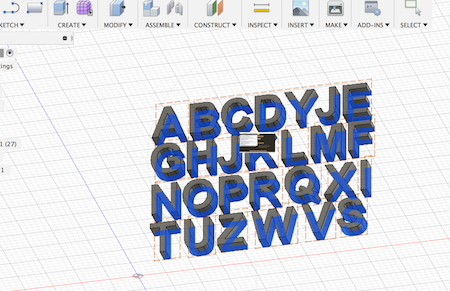
Instead, I rendered the alphabet (keeping it simple) in Fusion360. To make the letters as large as they could be and take up most of the space on the block, I rearranged the alphabet to "nest" the letters in a way where they wouldn't be too close to touching each other, otherwise the endmill wouldn't have enough clearance to carve out the separate letters.
I hot glue gunned a wax block to a sacrificial piece of OSB, taking care to keep it level. Then, I drilled the board onto the Shopbot, set the x,y axes and zeroed the z axis.

To get more detail, I used a thinner endmill, the 1/16" inch mill instead of the 1/8" mill we'd been given for this assignment. I changed all the Shopbot settings to accomodate the thinner endmill.

A small problem is encountered On the first cutting attempt, the Shopbot started cutting my block...and then continued cutting right off the block and into the air. I immediately stopped the machine. I checked the settings, suspecting something about the orientation of the block was probably wrong, making the machine cut where it thought the block was (but wasn't). Indeed, in the settings page to orient the block, the x,y origin I had set was default marked as being in the middle of the block, not a corner. I updated the setting and this fixed the problem.

Everything looks good now. You can see that the roughing toolpath has done an initial rough cut of all the letters (upper left corner), and the finishing toolpath is about halfway done going over those cuts and fine-tuning them (lower right corner).
I wanted to cast my letters in a colored resin and then encase each letter in a clear acrylic block, making something reminiscent of a set of children's alphabet blocks. So I designed simple block shapes and cut those out of wax as well. These took longer to cut than expected, because even though the design was simple and rectangular, the Shopbot had been set to cut at a 45 degree angle, and so it was cutting at a diagonal to the blocks, rather than along their edges. This meant lots of small, unecessary cuts.

The Shopbot actually cut a bit wider than the wax block, which meant a tiny amount of cutting in the air. I didn't mind because I could still use 6 of the 9 blocks I'd designed, and I could fill in the sides of my block with cardboard to provide edges to pour the mold into.

To make my mould I used Ooomoo 25, a type of silicone rubber made by Smooth-on. I measued and mixed the material ingredients (Part A and Part B) in the amounts indicated on the label.

I put the oomoo in the vaccuum for a few minutes to draw out the bubbles. Then I poured my two molds and let them sit for an hour and a half.

The molds came out reasonably well but not perfect. There are some small air bubbles, but worse, the mold mixture didn't get into the small holes in many of the letters at all, such as the hold in "A". I cast the letters that turned out the best with a quick-drying white plastic, Smooth Cast 300. Once it's mixed, you have less than 2 minutes to use it before it hardens. It takes 10 minutes to fully harden.

These are the letters that came out the best.
Next, I poured a thin layer of epoxy resin in the brick-shaped molds I'd made. This stuff takes 24 hours to harden. I poked it a few times to see if it was hard enough to work with a few hours in, but it was still liquid.

Once this layer had hardened, I carefully placed one letter in the middle of each brick, then poured a fresh batch of resin over it.
Several of my letters started floating up on one side. This was really frustrating. My guess is that either there are air bubbles pushing part of the letter up, or more likely that the letter material is less dense than the resin is (once it begins to harden), and so the lighter letters float up. I kept returning over the next few hours to push the letters back into the resin with a push pin. A simple solution to this would have been to super glue the letters in place before I poured the second layer of resin, or to cast the letters in a denser material.

While this was going on, I made a new mold off my alphabet wax block to see if I could get a better version. This time, I wanted to make sure the Oomoo would reach into the nooks and crannies, particularly in the middle of the letters. I started pouring small amounts of material in those areas first and repeatedly tamping down the Ooomoo I'd poured with a paint stirrer, popping and refilling air bubbles. Then I poured in the rest of the Oomoo in a thin stream to break more air bubbles.
This worked really well. Here you can see my second alphabet mold and some of the resulting letters, which came out much cleaner. Most needed just a light scrape with an exacto knife. The "A" and a few other letters still had issues. I think a good way to solve that would be to carefully inject the Oomoo into tight spaces with a syringe.
All in all I think the letters came out ok, but I would definitely change a few things. I would use an acrylic that dries much faster than 24 hours, and that dries clear without so many air bubbles.

I would also prefer a clear resin that dries without forming this miniscus, which gives a curved surface and sharp edges.

But wait, there's more!I also wanted to try casting a found object. I used this delightful pumpkin that I snagged from a tablescape.

I used high-temperature resistant material to make the mold, as it will need to withstand the heat of molten metal. I selected Mold Max 60, which stands up to around 600 degrees.

I sprayed the pumpkin with mold release and let it dry for a few minutes. I also drilled the pumpkin into a piece of wood I could suspend it upside down from, so that the mold material could get all around the pumpkin (excepting the bottom)

Unfortunately I didn't have enough Mold Max to fill my mold completely. So, I threw in a bunch of stuff that would take up volume and effectively make the mold area smaller, allowing my mold material to rise higher.

I left the mold to dry. When it was time to get the pumpkin out, the mold material wasn't as flexible as I had hoped. I was intending to just yank the pumpkin out from the big opening on top. Instead, I ended up carefully cutting the pumpkin out in tiny slices, being careful not to cut to far and slice into the mold material.


With Sarah's help, we put bismuth metal in the oven to melt at around 900 degrees. This took over an hour. Meanwhile, I buried my mold in sand to help maintain its shape when the liquid metal was poured in.

I left the metal cast to cool overnight under an air vent.

Success! I had to cut the mold to get the pumpkin out, but the two halves can be out together to use the mold again.

There are small pieces of mold material that got embedded in the hot metal. I scrape these out with a pushpin.

I also try sandblasting the pumpkin in the sanblasting machine. This doesn't do much to get the mold bits off. Also it's essentially impossible to see what you're doing in the sandblaster.

Next up is polishing on the polishing wheel. I don't want to overpolish it and lose all the pumpkin texture I was able to capture. I like even the grainy imperfections because it shows that it's hand-made, but I do want some polish so that it has a more reflective surface that shows off the metal.


The pumpkin comes off the polish material covered in a thick dark gunk, like axel grease. I use ethanol and paper towels to get it off, plus q-tips and ethanol to get at the smaller bits. It takes many rounds of scrubbing to get most of the grease off. All in all I'm pretty happy with how it turned out. Honestly better than I expected.