Final Project

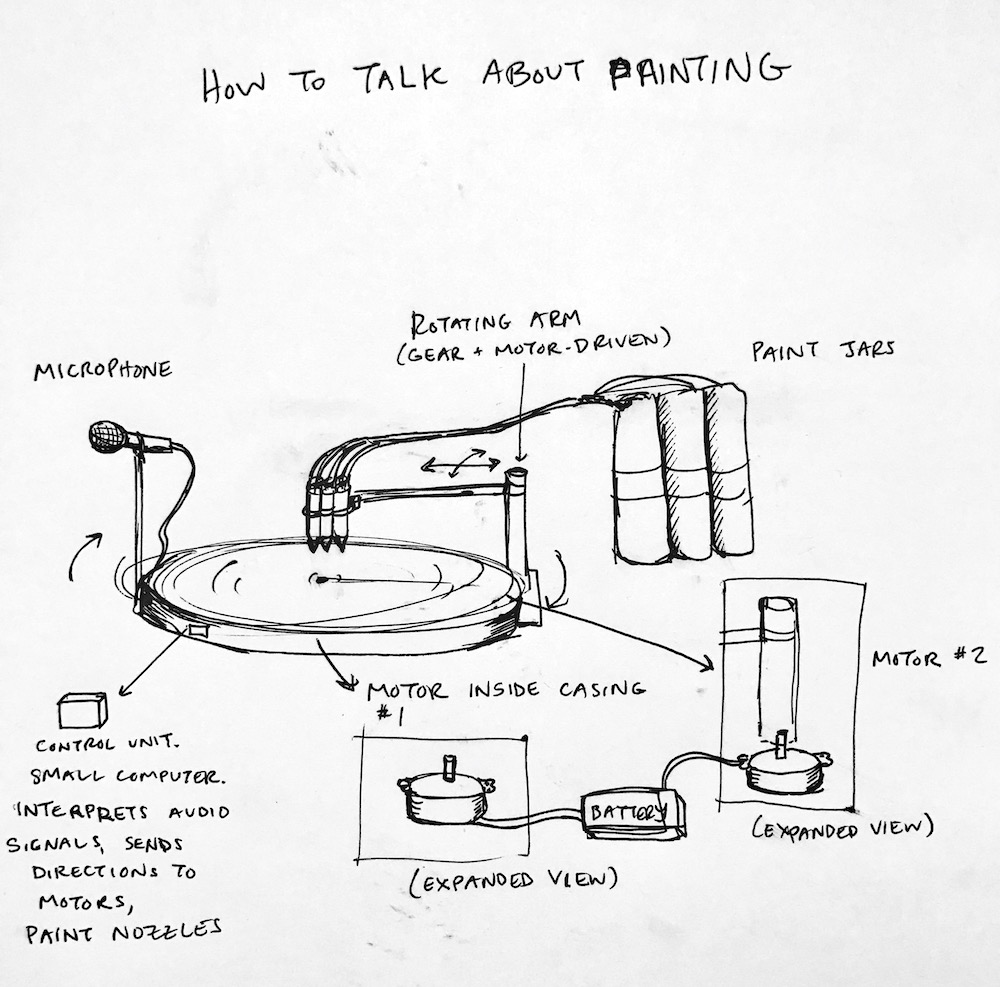
In Week 0, I came up with a (very rough) design for a machine that would listen to you speak, and interpret the audio as directions for a machine that would paint you an abstract picture. While I think this is acheivable, I'm not excited about the project. I'd like to come up with something that utilizes more of the skills we've picked up since then, such as using other kinds of sensors and molding & casting. Here are some of things I'm thinking about. I'm aware the clock is ticking, some I'm giving myself this week (Nov. 5) to lock down a project and get cracking.
Ideas
1. Painting machine
2. Thundercloud Lamp
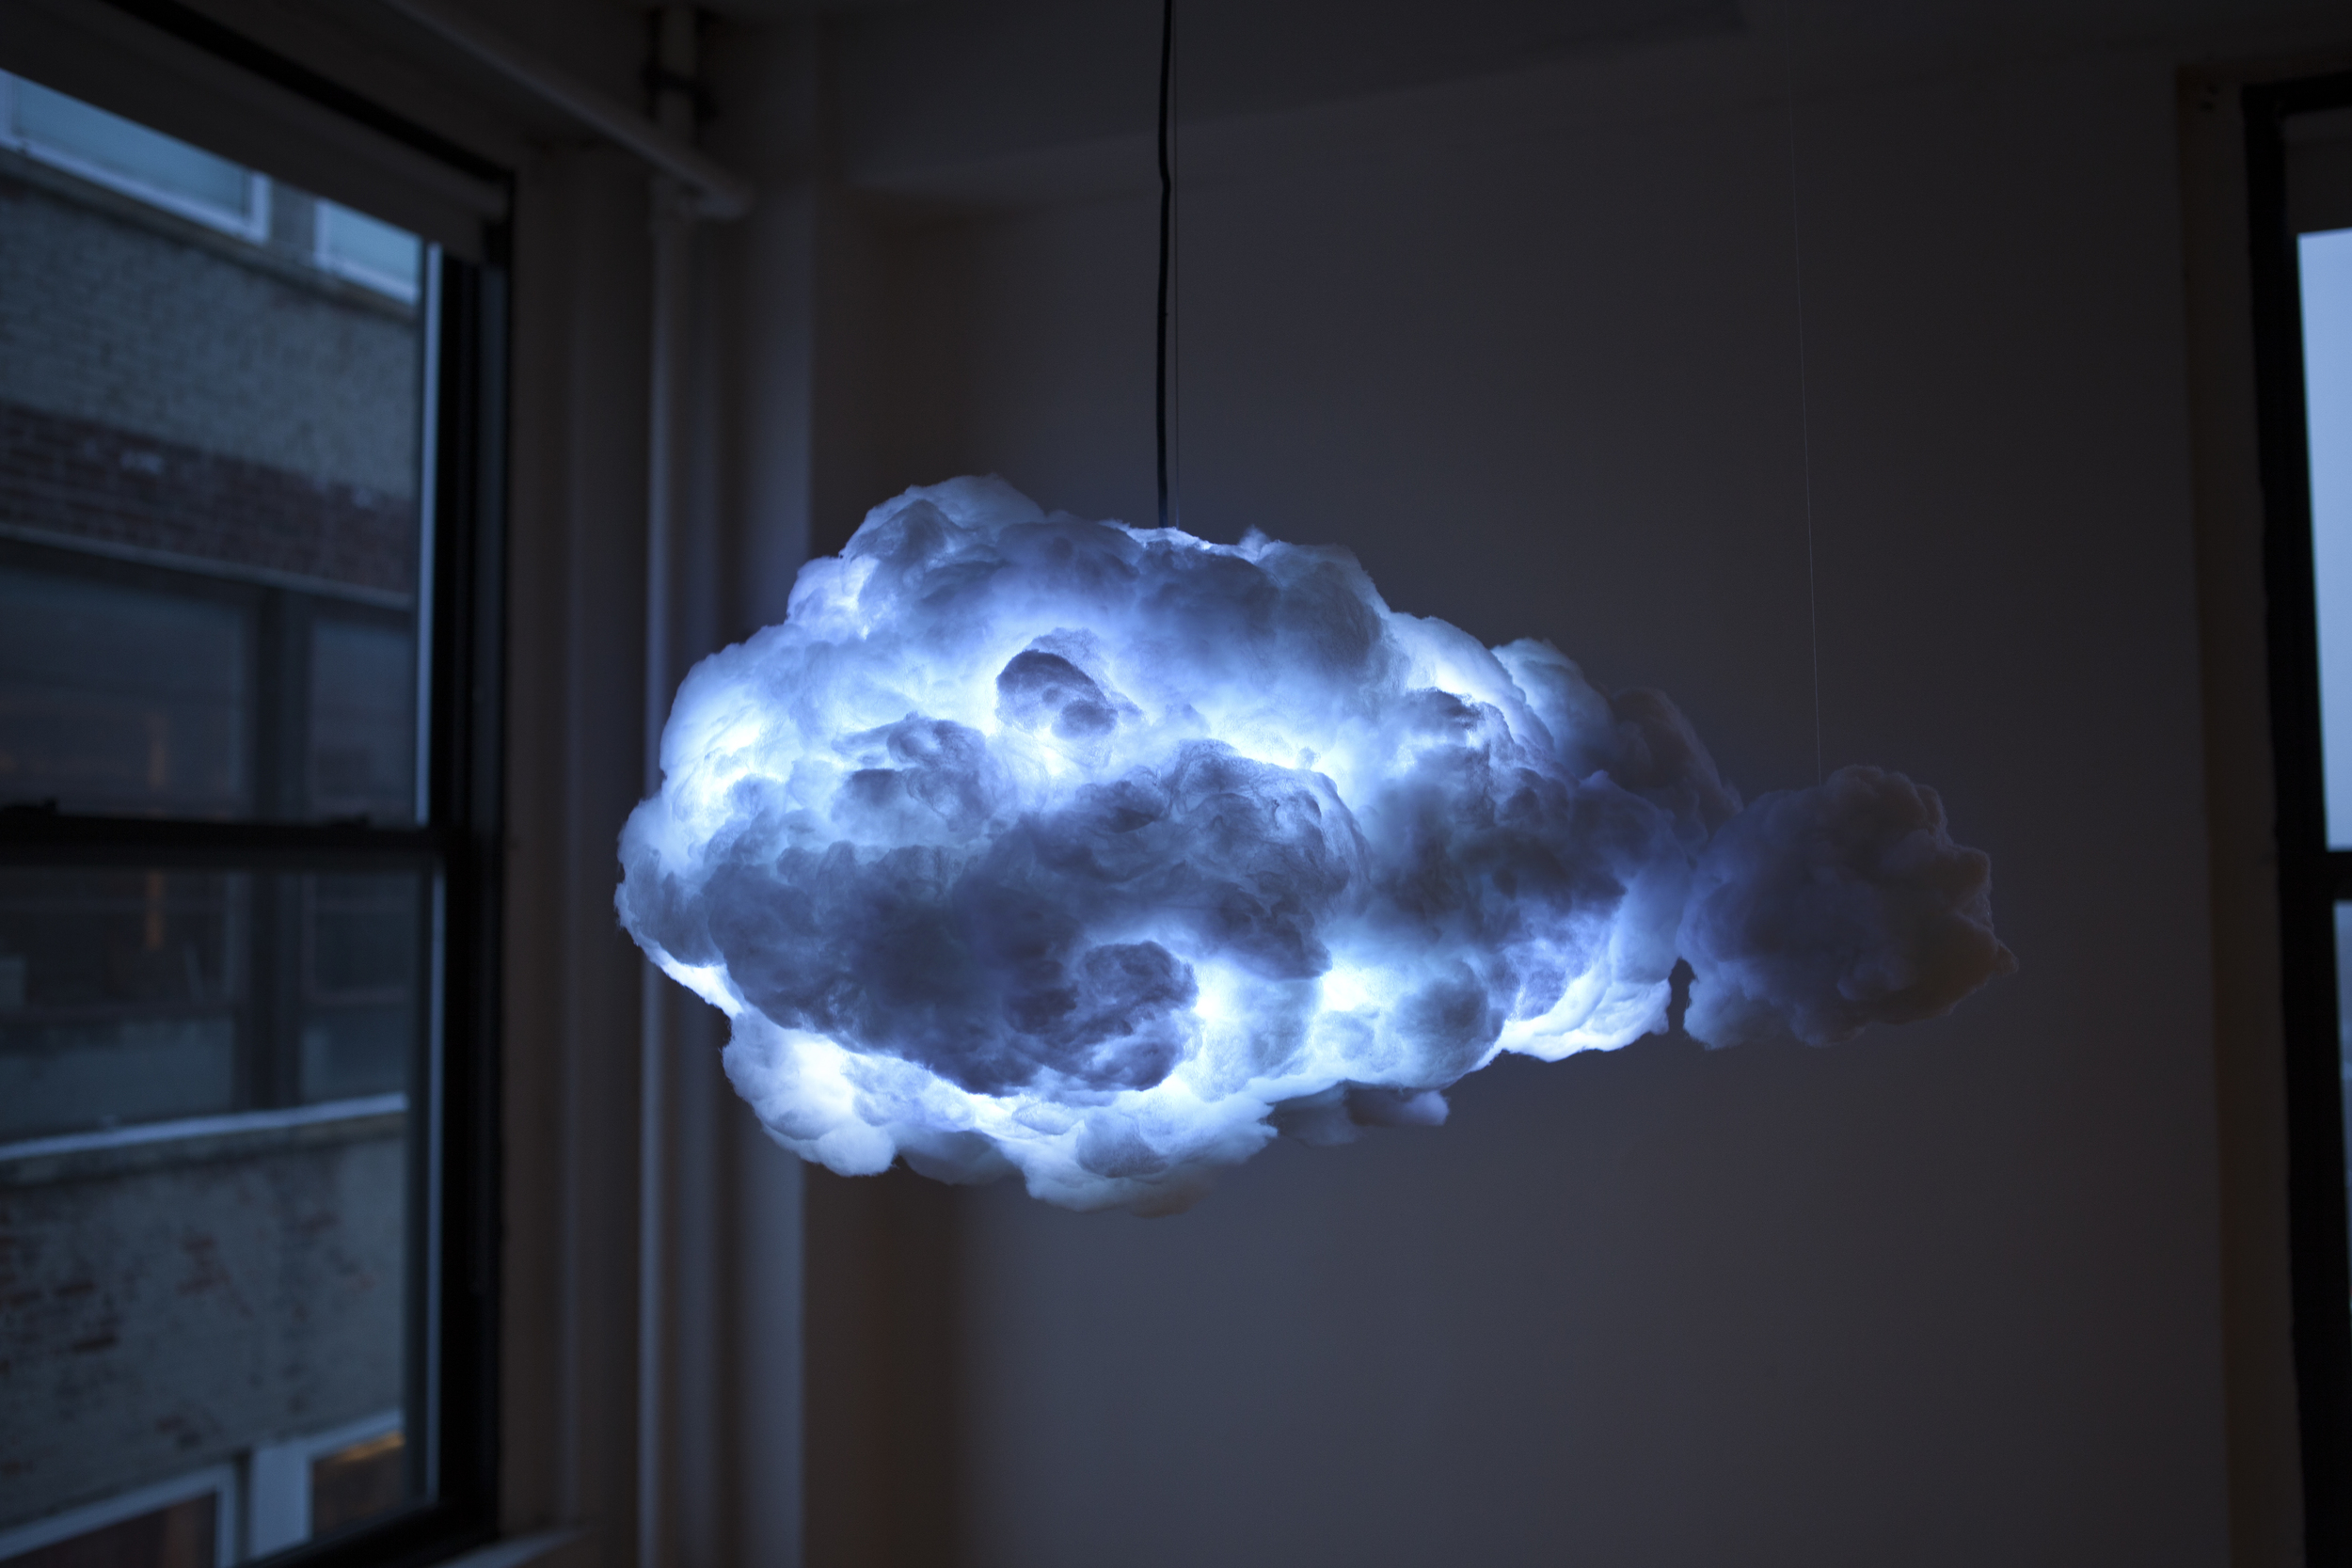
An interactive light. I really enjoyed seeing the Thundercloud Lamp, which captures the feeling, sounds and imagery of a summer thunderstorm indoors. I don't love that I would be picking a project that already exists. However, it's a good project in that it's achievable, and would teach me about integrating multiple sensors and coding. I could put my own spin on it by adding hardware and software to create new modes, such as "rainbow and birdsong after the thunderstorm." A different spin would be to change both the form factor, for example making a hard-plastic molded cloud or even a sphere, as well as the output modes.
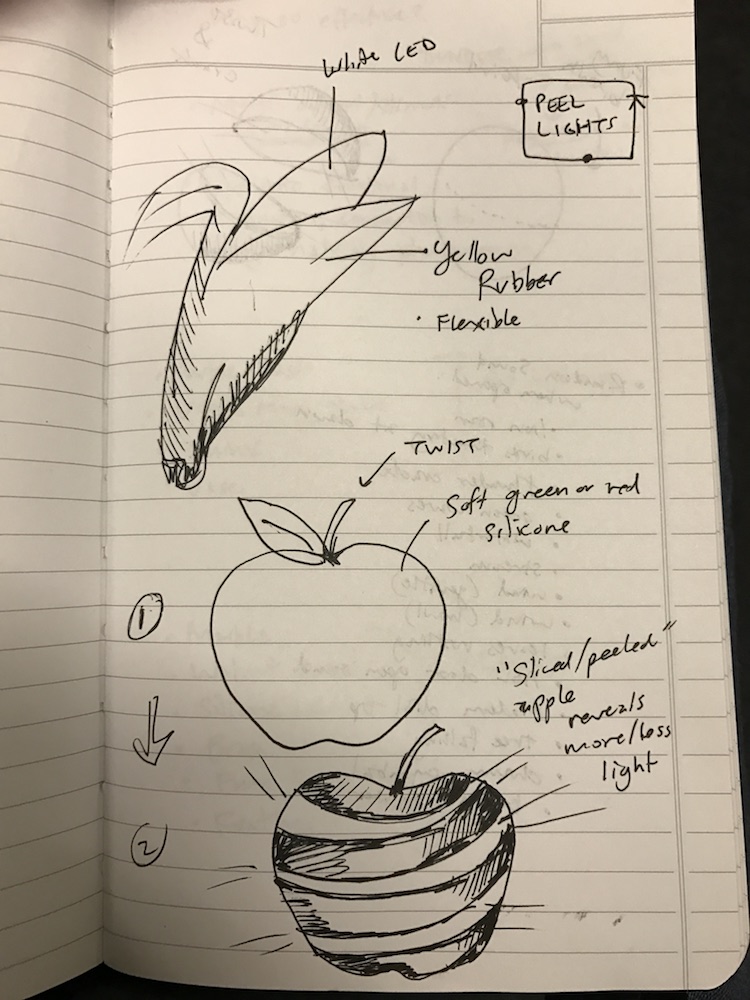
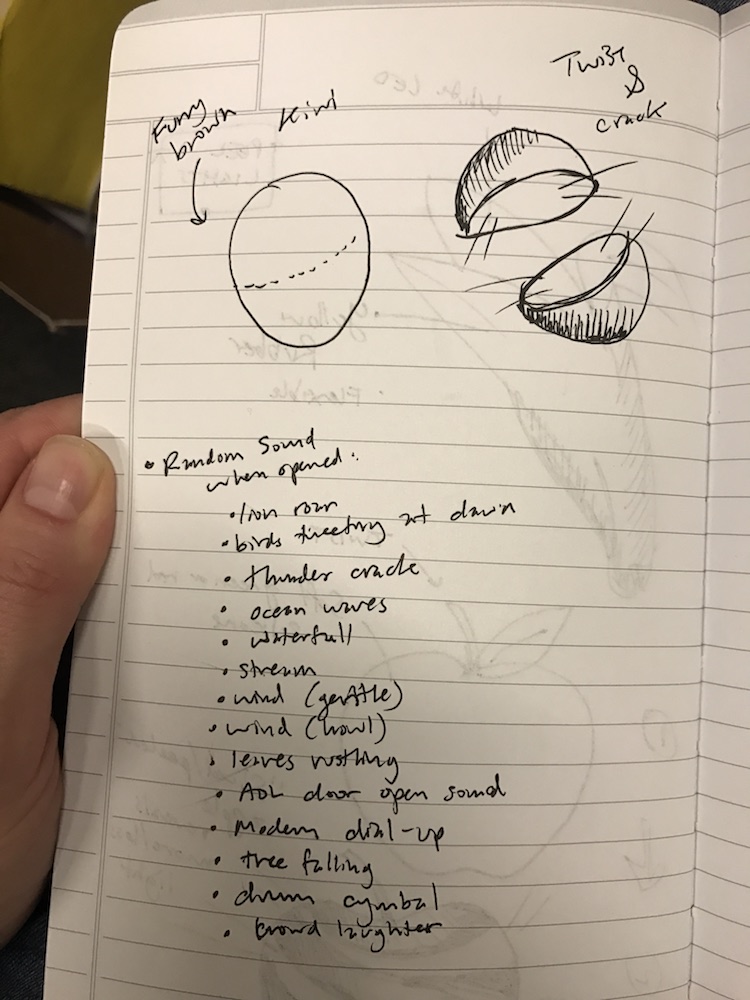
3. Surprise Fruits
These would be silicone cast soft fruits that you can peel. When you begin to peel one, a light turns on inside (eg, the fruit's flesh is a translucent white plastic containing a light. Also, a random pre-programmed "surprise" noise would briefly sound when you peel each item, eg: a lion's roar, a crack of lightning, a bell ringing. These could be both fun and functional, but mostly fun. Each piece would require LEDs, a microcontroller, a speaker, a light sensor or capacitance sensor and a battery inside.
Given the time restrictions, I'm going to go with a version of Thundercloud Lamp.
I'm going to try to add on to the original design by adding 1-2 additional modes with new outputs and programming. For example, a "calm after the storm" mode that displays a soft rainbow alongside birdsong.
Materials:
string-light LEDs, stuffing, other casing materials (molded translucent white silicone or plastic, glass), microcontroller, small speaker, cable and plug, potential sensor and/or button. I'll need to figure out where to store the audio files, as this might be too much information to store on the tiny microcontrollers we've been using....
Purchasing:
For the speaker, I'm considering either a small component like this Adafruit speaker, or a small commercial speaker which might have better sound quality?
For the LEDs, I'm looking at string lights such as these:
The RGB lights are fairly expensive at $65.
Questions:
1. Does each string of LEDs need its own pin on the microcontroller?
2. Identify which microcontroller will give me at least 4 outputs (3 lights plus a speaker)
3. How much power do I need for the LEDs and the speaker? Should they be driven by separate microcontrollers?
NOTES: This will be a plug-in device, not battery driven. I'll need a RGB capable string of lights for a rainbow or dawn mode. I'll also need to design either a button that can switch between modes, and on/off, or a wireless control for this.
Updates
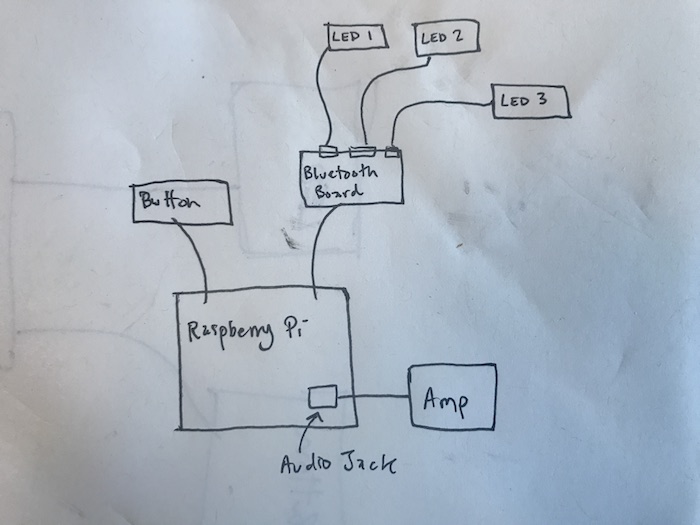
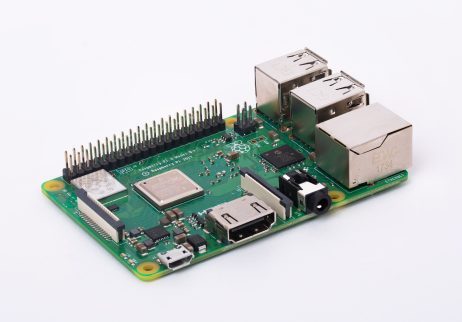
Here's the rough schematic of how the parts can connect. I decided to drive audio off a Raspberry Pi (but still make my own board for other things). This is because I need a good amount of storage for the audio files of thunder and birdsong, as I want high resolution and fairly long clips (at least 3-5 minutes per clip). I also want to output sound in realistic, high-resolution, which for now means a small commercial amplifier. My personal goals for this project are to learn to integrate different kinds of components and make them work as a whole, rather than focus on hand-making one subcomponent such as the speaker.
I purchased a Raspberry Pi and three strings of 60-LED-per-meter RGB lights from Adafruit.
A stretch goal is to make a lightweight app to control the light, which would allow the user to select different modes the light can display, and how long that mode should cycle for. The immediate goal is to have a button that can turn on the light/sound display.
Results
Lots of lessons learned here. I'll update more properly once I've had some sleep. Overall, some takeways:
1. What seems like shortcuts are often not. For example, I thought that adding a Raspberry Pi would make my life easier but it actually sucked up lots of time and was difficult to work with.
2. Debugging can take lots of time. It's best to triage. It can take 10 minutes to solve a problem or 10 hours. If you don't have lots of time and experts on hand, if you can't solve it in perhaps 30 minutes and it's not mission-critical, don't stay up till 2 trying to debug it.
3. We get by with a little help from our friends. ENORMOUS thanks to Elena, whose magic neopixel skills, Arduino wrangling, and expert debugging was life-saving. Many thanks also to the TAs for their advice, help, incredible patience, and willingness to stay late at office hours. Special thanks to Sam and Will for the many hours spent answering my questions and debugging my mistakes.
Debugging and Fixes

A quick run-down of some things that went wrong:
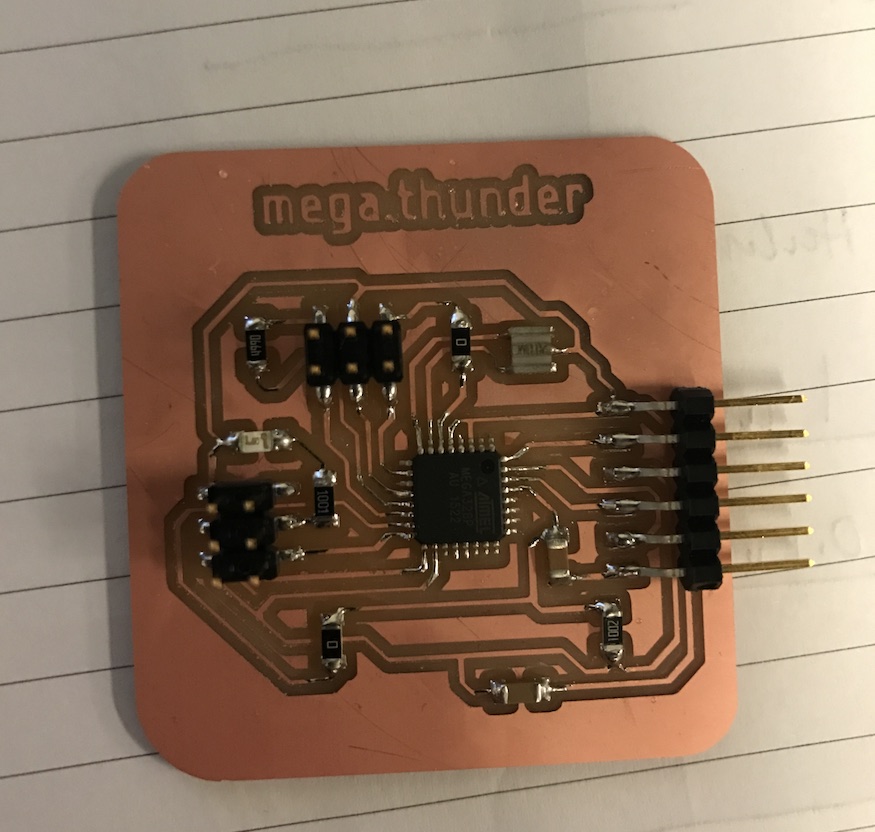
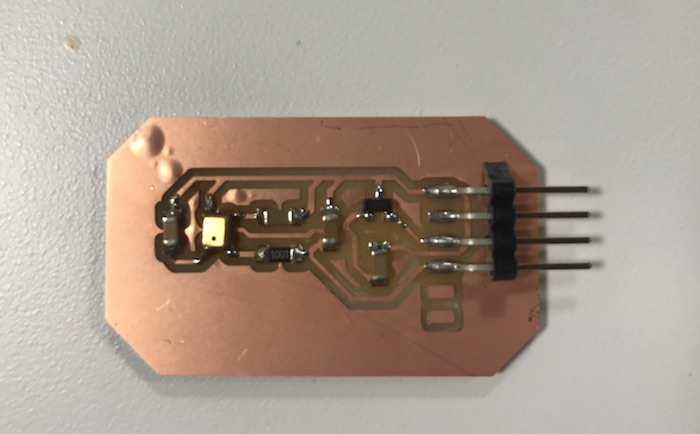
1. My initial board was designed with an AtTiny84, which supposedly would have enough space to run my programs. It did not. Just the neopixel library took up about 60% of the Tiny84's space. Ultimately, I was able to get the Tiny84 running using a smaller program for the neopixels (only 2 out of 3 "lightning" modes included) and a smaller Neopixel library, the FastLED library.
2. To get more room, I upgrdaded to the ATMega328p and made a new board designed around this chip. Initially, I couldn't get the chip to work, suspecting a clock speed and/or baud rate issue (this board has a 20mhz external clock). Using Arduino IDE, I set the clock speed to internal 8mhz and 9600 baud and was able to communicate and program the chip to make neopixels flash. However, the colors got shifted around! What should be white lights are now multicolored. Hours of debugging the code couldn't resolve the issue, so ultimately I couldn't use the Mega board in my final project. It might be an issue with the Mega interpreting the Neopixel library differently than the Tiny84 does, or a communication speed issue.
3. I made a new board with a microphone, that I programmed, but I wasn't able to get the mic signal good enough to use in the final project.
4. The Raspberry Pi was originally intended to communicate with my PCB via serial, but apparently Pis HATE serial and are not set up to do it, and it's a long and involved project to override that. So I did not get chip-to-chip serial working.
5. The Pi likes to give itself a new IP address every time you turn it on. This is a pain in the a@$. I need to setup a monitor and mouse to the Pi every time it does this, to read the new address directly from the Pi.
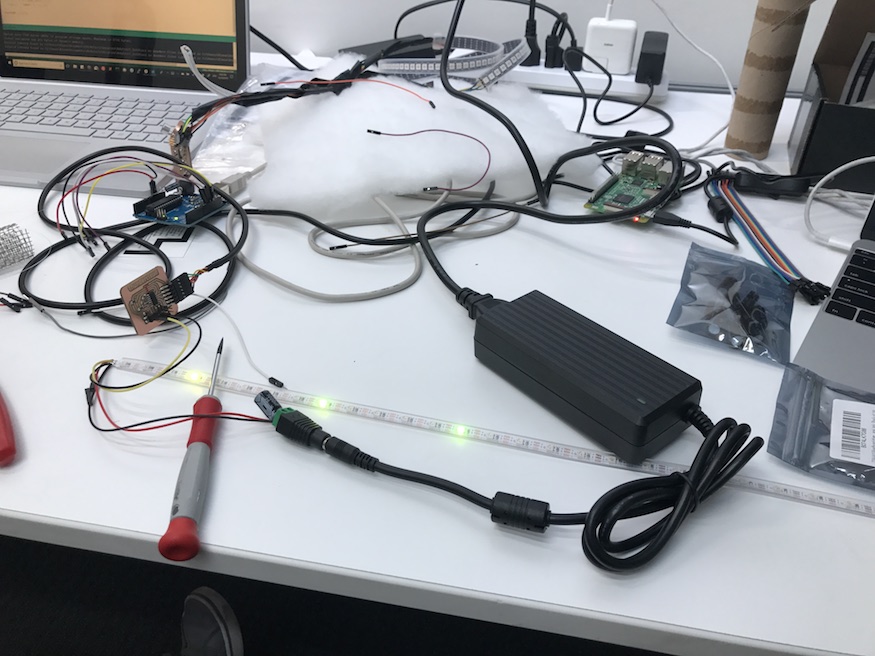
6. Before final assembly, I had tested all the electronics and they worked. Without unplugging anything except power, I did the final assembly, plugged it in at 3am and....nothing turned on. Ugh! After some debugging and multi-meter checking, it turns out that the wires I'd soldered to the end of the LED strip were coming loose, and the power line in particular had frayed and disconnected. They were resoldered back together and encased in glue from a glue gun to provide a stable configuration.
Getting the neopixels to flash using my thundercloud board with AtTiny84
The mic board that wasn't debugged in time. Would have allowed lights to flash in time to the thunder sounds.
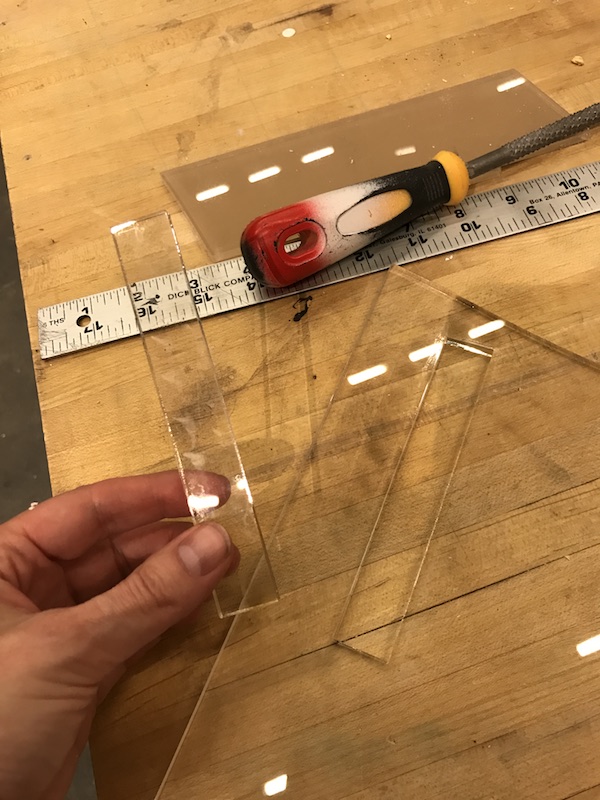
Laser-cutting an acrylic stand for the cloud.
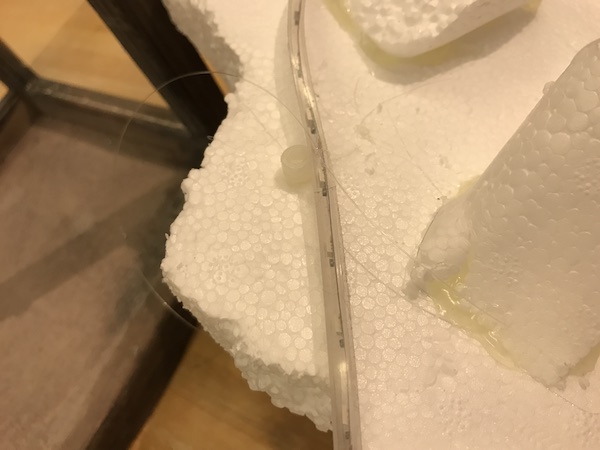
Attaching the neopixels to the cloud core.

Hole drilled to accomodate acrylic cloud stand plus neopixel strand.
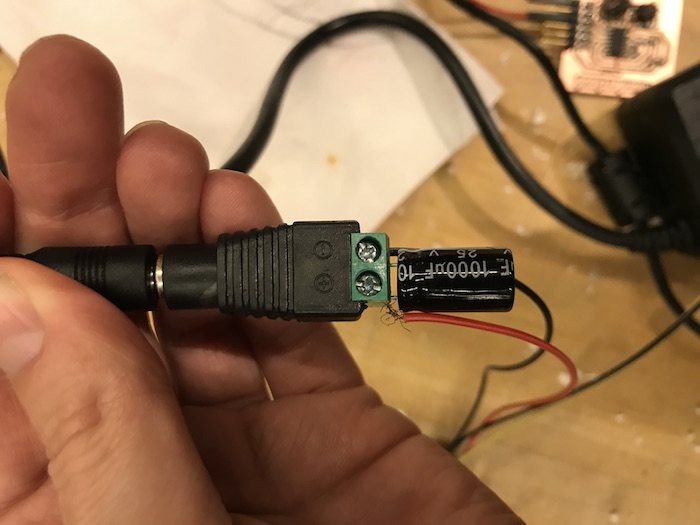
Frayed wire ws re-stripped, soldered, and coated in a hefty layer of protective hot glue.
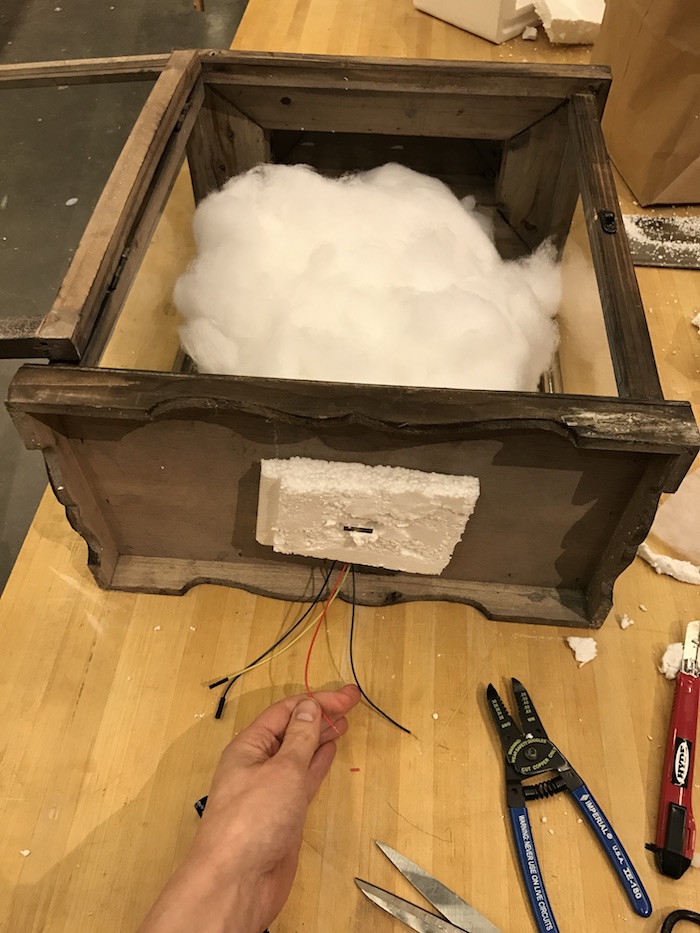
Assembling the cloud in casing.
Temporary monitor and mouse setup to the Pi to be able to check the Pi's IP address.
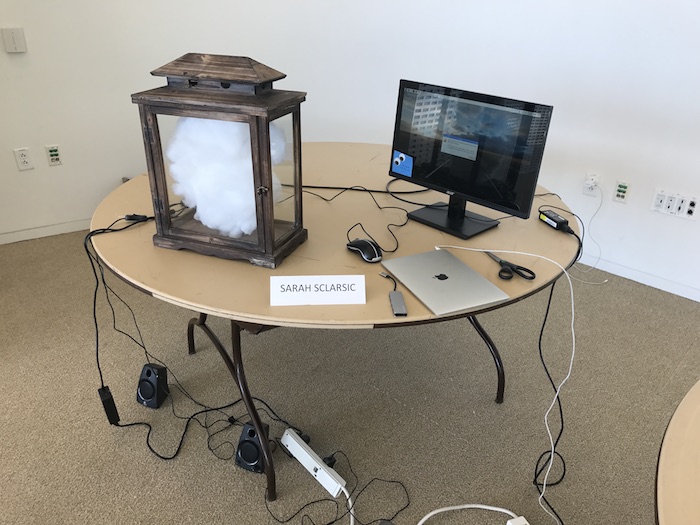
Successful test of the final assembled thundercloud lamp.
Equipment used:
Hot glue gun. Soldering iron. Exacto knife. Roland MDX-20 to mill PCBs. FTDI to USB cable and AVRIP programmer.
Used but not necessary: Laser cutter. Clear fishing line. Small white screws.
Final Materials Costs:
Neopixels: I used 1 meter of 60-LED-per-meter LEDs from Adafruit. My cloud is about 12"x14"x6". If you're making a bigger cloud you should plan for more LEDs. Mine cost $25/meter but you can probably find them cheaper, and can definitely get them cheaper if you just want white lights rather than multicolored.
5 volt 10 amp AC to DC power adapter and wall charger recommended for driving large amounts of neopixels. At 3.5 mp/meter this should be able to handle up to 3 meters.
Power supply for Raspberry Pi:
Raspberry Pi 3. The Pi is not strictly necessary for this project if you don't need wifi connectivity and can play audio from a separate device like a wifi connected speaker or laptop. Even if you do want wifi in the thundercloud lamp, you could build a chip to do that.
Quilt batting (the fluffy stuff inside quilts). I bought something similar to this at a JoAnn Fabric store. It's something like $7/yard, and I think a yard is enough for the cloud I made. I specifically did not use the "poly fill" acrylic stuffing that is the most common thing you'll see for sale on Amazon. It's used for stuffed animals and it has a glassy plastic texture, not soft and cloud-like.
Box/housing. I was able to buy a box that I could modify for $20. However, you could probably build one cheaper. The aesthetic I went for would be fine to make with crappy scrap wood. Sheets of pre-cut glass for the sides, or acrylic could be cut on the laser-cutter. Other than that there is just a cheap hinge, which one could make via 3D printing or molding & casting! but I did not have time to.
Box cost: $20.
Styrafoam from a discarded box, used to make core of cloud. Cost: free.
A half-dozen small white screws I found in the CBA shop. Any small screw or hook that you can jam into the styrafoam and use as an anchor to attach the neopixels is fine. Cost: basically free.
Total cost was about $117. You could definitely make one cheaper. I was optimizing for saving time rather than saving money. You can find the power chargers cheaper as they are common standard parts (if you're scrappy you can probably yank these off an old laptop, printer or other device someone is discarding). Switching to white LEDs from a different vendor should also let you save money. Building your own chips rather than spending $35+10 on a Pi would also bring down costs. The Pi is kindof overkill capabilities for this project.