not just goop
“design a 3D mold around the stock and tooling that you’ll be using, mill it, and use it to cast parts”
Materials
- plastic cups
- wooden tongue depressors
- Oomoo
- Drystone
- cardboard
- gaffer tape
Tools
- Shopbot Desktop
- hot glue gun
- xacto knife
- straight edge
Software
- Inkscape - to trace image –> path
- Fusion360 - to create 3d model
- Image2Surface Fusion 360 Add-in - to convert greyscale image to 3d surface
- ShopBot Partworks3D - to generate roughing and finishing toolpaths
- ShopBot 3 - to control the Shopbot Desktop
process
I tried many different things in approaching this project…
- casting a model of a functioning toilet. GrabCAD didn’t have a model, and I didn’t have time to make one…
- casting a model of a succulent. a few years ago, i used the lost wax casting method to create a succulent.I found a stl file I could use, but it would have been difficult to handle the undercuts.
- turning an image of me, my sister, and my grandma into a surface to mill and cast
-
First, I turned the color photo into greyscale via ImageMagick
convert <img_in> -set colorspace Gray -separate -average <img_out>
-
- Then, I used the Image2Surface Add-in for Autodesk Fusion 360
- Settings:
- Pixels to Skip = 5
- Stepover (mm) = 2
- Max Height (mm) = 5
- Settings:


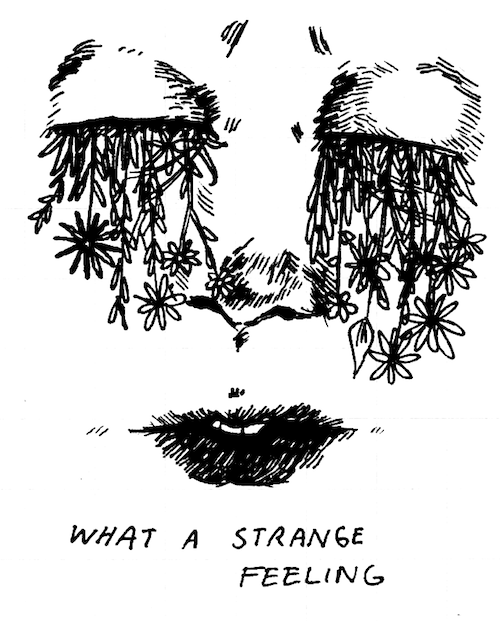
- converting a drawing into a surface “what a strange feeling” is a drawing I found on tumblr 7 years ago and have loved since. I thought a drawing would be better than a photo to convert to surface. I was wrong…


- use “what a strange feeling” to generate a path that i can extrude in Fusion 360 Inkscape had no problem generating the path, however Fusion 360 really struggled to handle the sketch, and crashed a lot


- extruding a less complex drawing I found this drawing on Tumblr and call it “swim time”. When I traced the image using Inkscape, I still got a complex path that Fusion 360 had trouble processing.


I tried to use Inkscape’s simplify path tool to make the svg easier to use in Fusion 360. this made it confusing to extrude the appropriate faces, so I went with the original unsimplified path and was very patient with each step.


making
I settled on the extrusion of swim time with the idea that I’d cast in drystone, and then color the concrete with paint or marker and then pour epoxy to create an art piece.
set up the milling job Using the PartWorks3D software, set up the milling job. Below are the settings that Tom suggested we use for a 1/8th flat endmill. I actually ended up using a 1/16th flat endmill so that I would be able to get finer detail. With Tom’s guidance, I followed some other settings.
- Machining Margins around Model > Symmetrical = 0
- Depth of model below service 0
- Roughing toolpath > create a new tool (1/16th flat) and specify the proper cut depth, cutting parameters and speeds and feeds.
- Finishing toolpath > use the saem tool
The rest of the settings and generated toolpaths can be found in this zip file.


mill the positive out of the machineable wax


- change the endmill in the shopbot if it isn’t the correct one. for the purpose of this class, most of us are working with 1/8th inch ball or flat end mills. Since my design has such intricate detail, Tom helped me use the 1/16th flat endmill.
- get block of machineable wax and fixture it (using hot glue gun) to something (like OSB) that can be screwed into the sacrifical layer on the shopbot desktop
- zero the x & y and then the z (using the plate), following a similar process as we used in the “make something big” week.
- upload the roughing part file.
- start the job!
- upload the finish part file
- start the job!
- unfixture the osb from the sacrificial layer
- vacuum the wax shavings. Neil mentioned that if you’re really clean, you can save the shavings, melt, and reuse the wax for future work.
cast a soft negative out of oomoo using the machineable wax
After milling the positive, i used cardboard, gaffer tape + xacto knife to create walls for my pour of oomoo.


Oomoo is pretty easy to work with, only consisting of two parts that mix at a 1:1 ratio by volume. One approach I tried to use when pouring was using a “ribbon pour” in which the thin layer breaks bubbles as it comes out of the cup and into the mold. The curing time for oomoo is around 75 minutes… just over an hour.
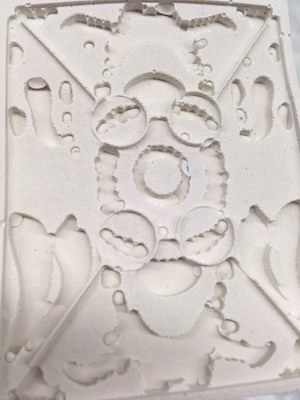
cast a rigid negative out of drystone using the soft oomoo mold
I wasn’t able to place my pour of the oomoo into the vacuum to remove bubbles, so there were some holes in the oomoo mold. Still, I casted using using drystone and got results i liked :) Drystone is a kind of white concrete. The instructions tell you to pour the mix starting from the corner.


cast a rigid negative out of hydrostone using improved soft oomoo mold
While the drystone was curing, I also casted a second oomoo mold to hopefully get better results. I succeeded by pouring more slowly and created flat ribbon layers across the surface rather than pouring small ribbon layers haphazardly around. Hydrostone is a stronger, grey concrete.
Using the improved oomoo mold, I decided to try hydrostone. A difference in process between hydrostone and drystone is that the hydrostone asks you to let the mixture sit for 2-5 minutes before high speed stirring and pouring into the mold. Another difference is that the instructions tell you to pour from the center of the mold.
BONUS
Oceane and I cast skeleton heads using Smooth-On 202 :)


