Week 6 - Computer Controlled Machining

This week was the famous (infamous?) make-something-big week. We were each given a 48”x96”x7/16” OSB to simply “make somthing big”. Our usual lab didn’t have a CNC machine so we worked out of the IDC this week, borrowing their Shopbot. Unfortunately, hours were somewhat limited and cramming in machining time for everybody was a touch task.
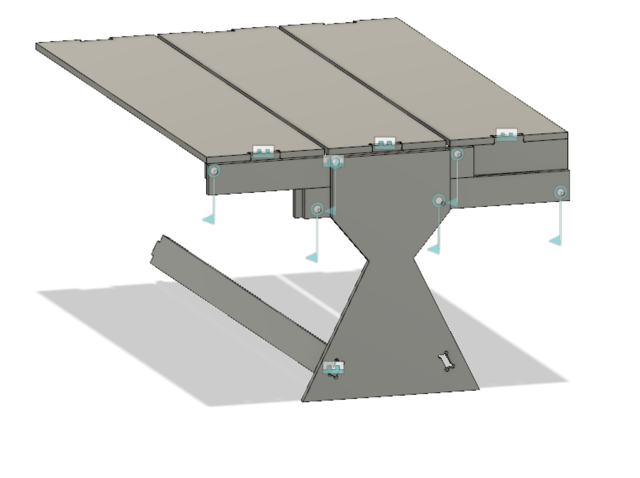
I made a shelf/table for this week, inspired by something I saw in a YouTube video a while back. It would have five sections that would form a table when it laid flat, and shelf when rotated.
I sent this design with some leg pieces to Zach, whose feedback was mainly to make the pieces wider, for better stability. To fit everything onto my sheet of OSB, I ended up chaning the design to only include 3 sections, with wider side-rails and solid sides.
Then, it was time to mill. Here are the feeds and speeds I used:
- bit: 1/4” down-cutter
- material: 7/16” laminated plywood
- pass depth: 0.25 in
- spindle speed: 12000 rpm
- feed rate: 2.0 in/sec
- plunge rate: 1 in/sec
Since the material was warped and the bed was uneven, we set the cut depth to be 0.1” more than the actual depth, just to make sure we cut all the way through. We fixtured the board to the bed using wood screws along the edge.
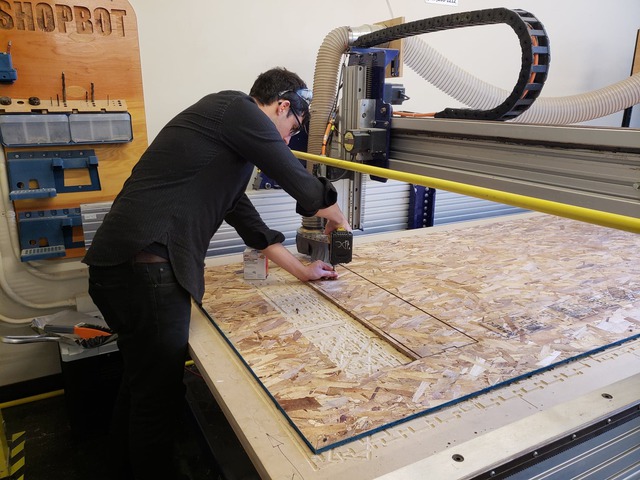
After the first piece milled out, we noticed the tabs, which were supposed to keep the piece attached to the rest of the board so it doesn’t move, weren’t there. Turns out, we set the tabs too thin, and since we set the cut depth to be deeper, none of the tabs would come out. The solution? To pause the machine after the first pass of every piece, hop on the bed to screw the piece down, then resume the job. A bit tedious, but it worked.
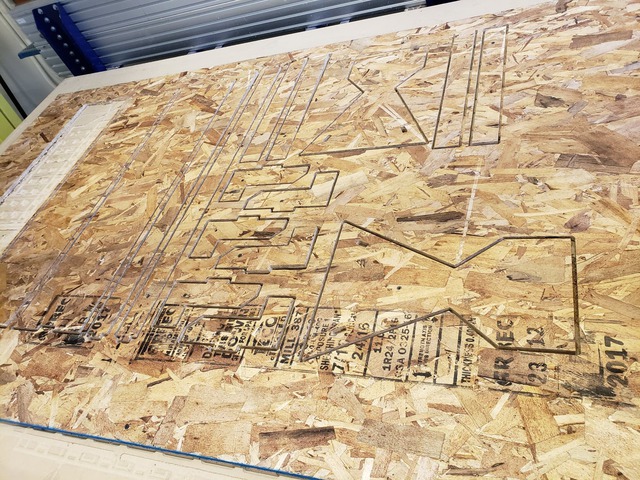
The machine also didn’t recognize any of the holes I put in my design. They were 0.25”, and we were using a 0.25” bit, so the software didn’t recognize them as vaid cuts in the cutting pass. We could’ve added points to another layer and done a drilling pass, but due to constraints on machine time, I ended up drilling out the holes using the drill press instead.
The finished wood was super rough and splintery, and I couldn’t carry it all home before an hour and a half of sanding down the edges.
Then, in the interest of time and simplicity, I assembled everything involving moving parts with nuts and bolts (orginal plan was to use wooden dowels). However, I didn’t anticipate the clearance needed for the head of the bolt and the sides of the table while rotating.
I added washers to create little bit more space, but then the crossbeams connecting the sides at the bottom now weren’t long enough. The wood joints I had also didn’t fit super tightly together, which wood-glue would’ve helped.
All in all, it’s a cool concept, but the finished product just isn’t stable enough to be a functional table.