PROCESS
FlexKit it is an iteration of a shape-changing fashion line I designed in undergrad. Specifically, one of the dresses had tendon based actuators powered by twisted then coil polymer muscles that lifted the skirt. A major frustration for me was that I did not have he resources to do precision fabrication. Also, for this project I always hoped of making a flower that bloomed, but could not get it to work with craft fabrication.
For this project, I was curious to see how a reconfigurable press fit kit could be leveraged as an assembly kit for actuators.
First, I began by characterizing the laser cutter, first to measure the kerf and second to see what distance was needed for a solid press fit. The results are shown below
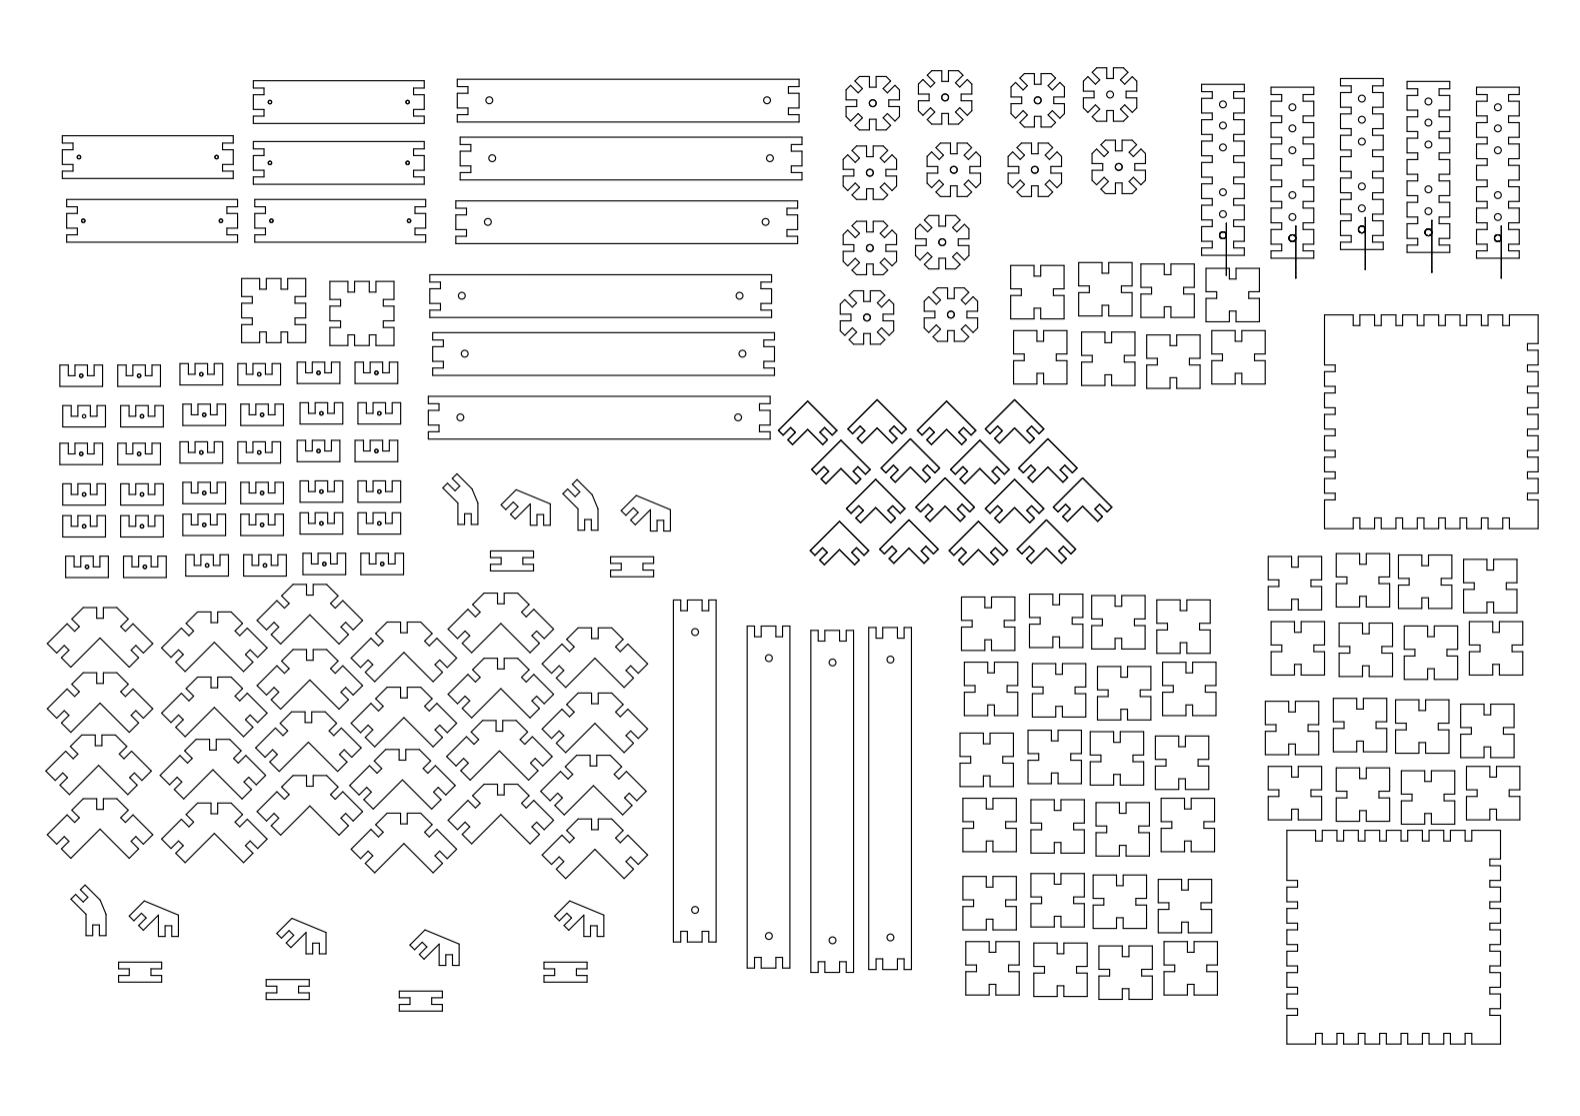
After this, I began by modeling different components in Fusion 360 I thought would be useful. Some act as the bending component of the actuator while others just hold the thread straight. The design files are show below. I really enjoyed the process of parametric modeling. I had previously used it to develop housing for an artificial lung, but without CAD experience I relied on my mechanical engineer teammate to do the modeling. To be in the drivers seat this time was empowering.
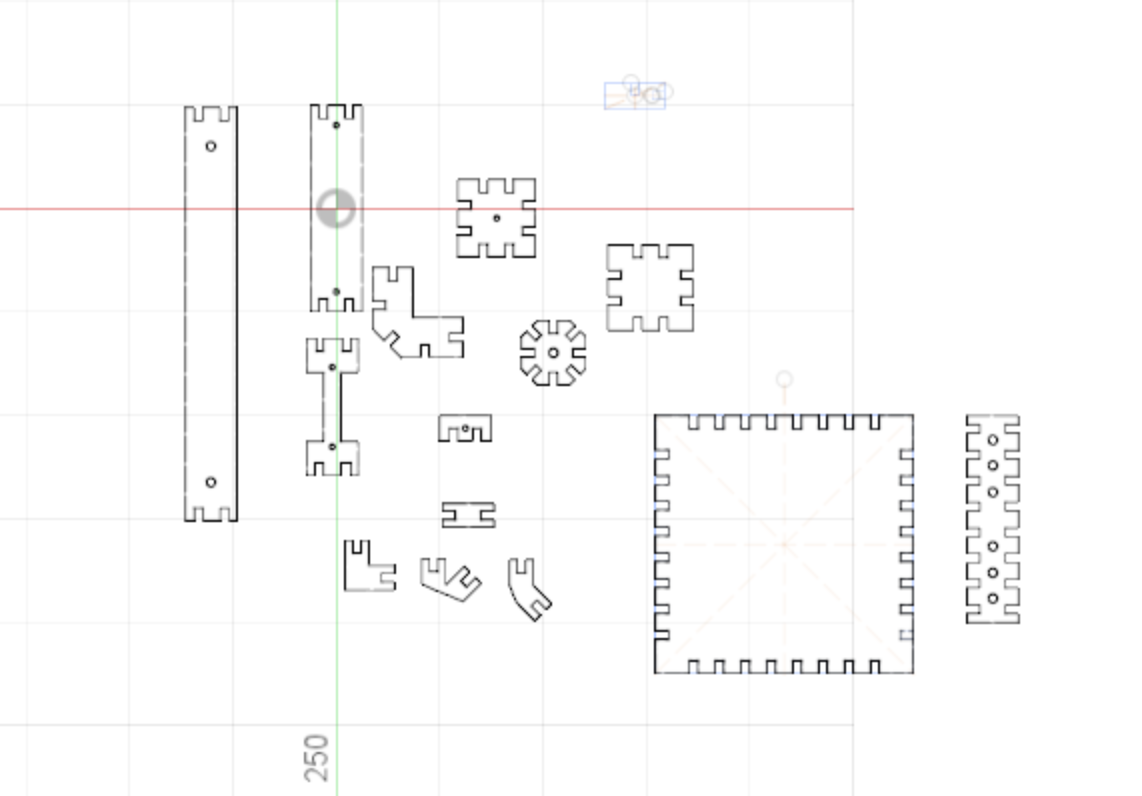
Once I figured I had a nice assortment of parts, I printed a bunch of them. I knew I would be destructively creasing some of them (I will touch on this later) so I printed out and excess amount. An interesting issue I ran into was that the laser cutter would retrace over some segments twice even though there was only one line. After opening in Rhino, I saw that multiple lines were stacked on top of each other for certain components. By simply clicking and deleting the excess lines, and exporting as a dxf, I was back on track.
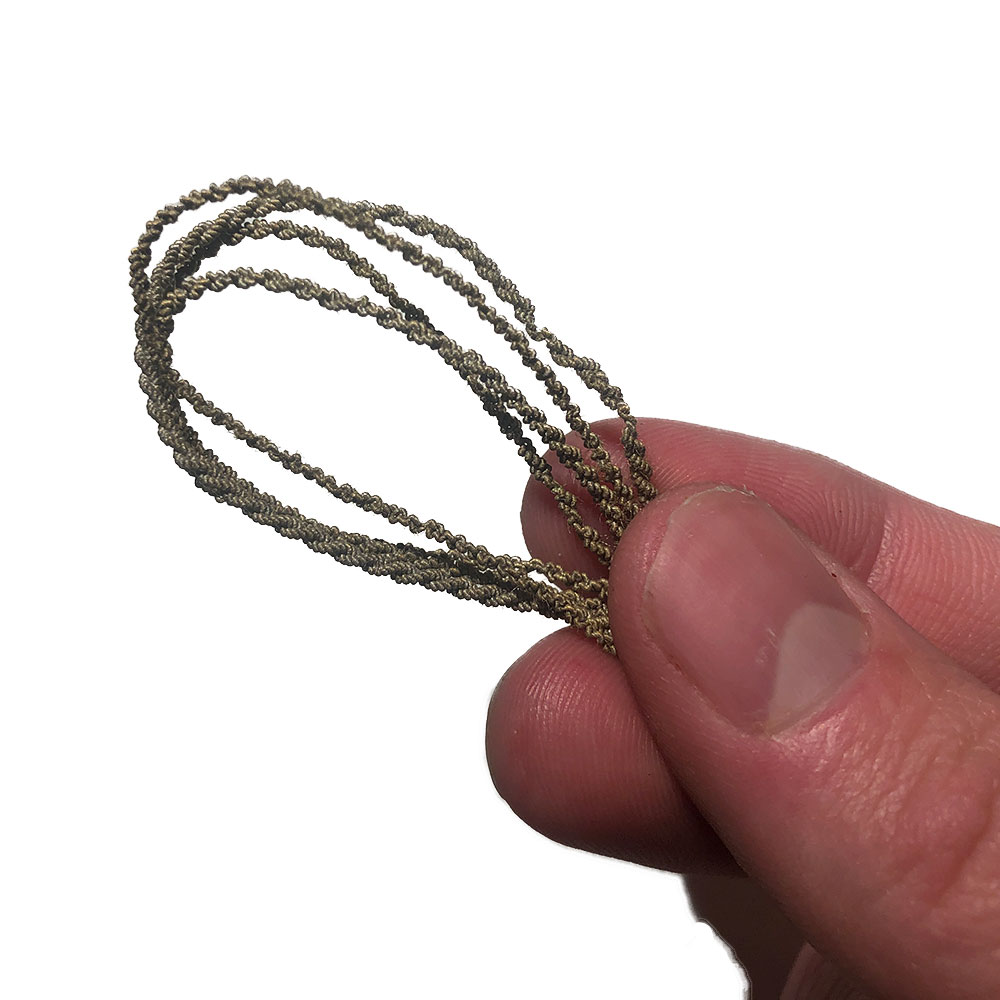
In order to make the artificial muscles, I used Shieldex 4-ply silver coated nylon thread. I twisted this thread using a hand drill with 150g of weight. It is important than I twisted in the same direction the thread was already twisted, if I went in the other direction it would take longer to twist and would break. Once coiled, I placed a 300g weight in the middle, folded the muscle over itself, and allowed it to wrap around itself. I then added 1kg of weight to the muscle, and put .6 A of current across the muscles (about 9 volts for my length of actuator). The muscle will lengthen at first, and after a few heat/cool cycles will start shrinking/expanding reversible. The final muscles are shown below (8 were prepared).
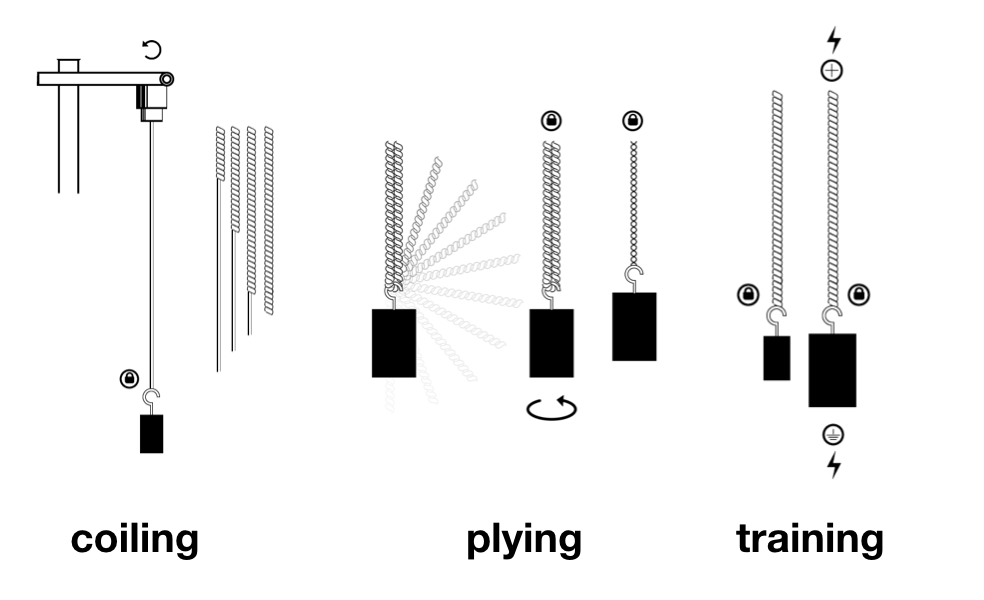
More details on the fabrication exist in literature, but some informal tips I have are: 1. When twisting, try to do it without stopping, stuff always goes wrong when you pause 2. Paperclips are your friend 3. Twist in the same direction the thread is already twisted
Once prepared, I began exploring the different actuator possibilities. These primitive were done without an artificial muscles since they can be tricky to set up.
First, I made a gripper, that is able to pick up a rubber duck.
Then I made a simple bending finger. By creasing the material in specific areas, one can ‘encode’ joints into the cardboard which informs the actuation behavior.
I then began implementing the artificial muscles, the bending finger here is powered by one. A 9-volt batter could power it
I also made a blooming flower. While some of the petals bend, not all do. This is because I did not have equal current going through all the tendons. I could have fixed this by hooking up a separate 9 volt battery to each muscles, but it was getting late and I had a website to make.
VINYL CUT
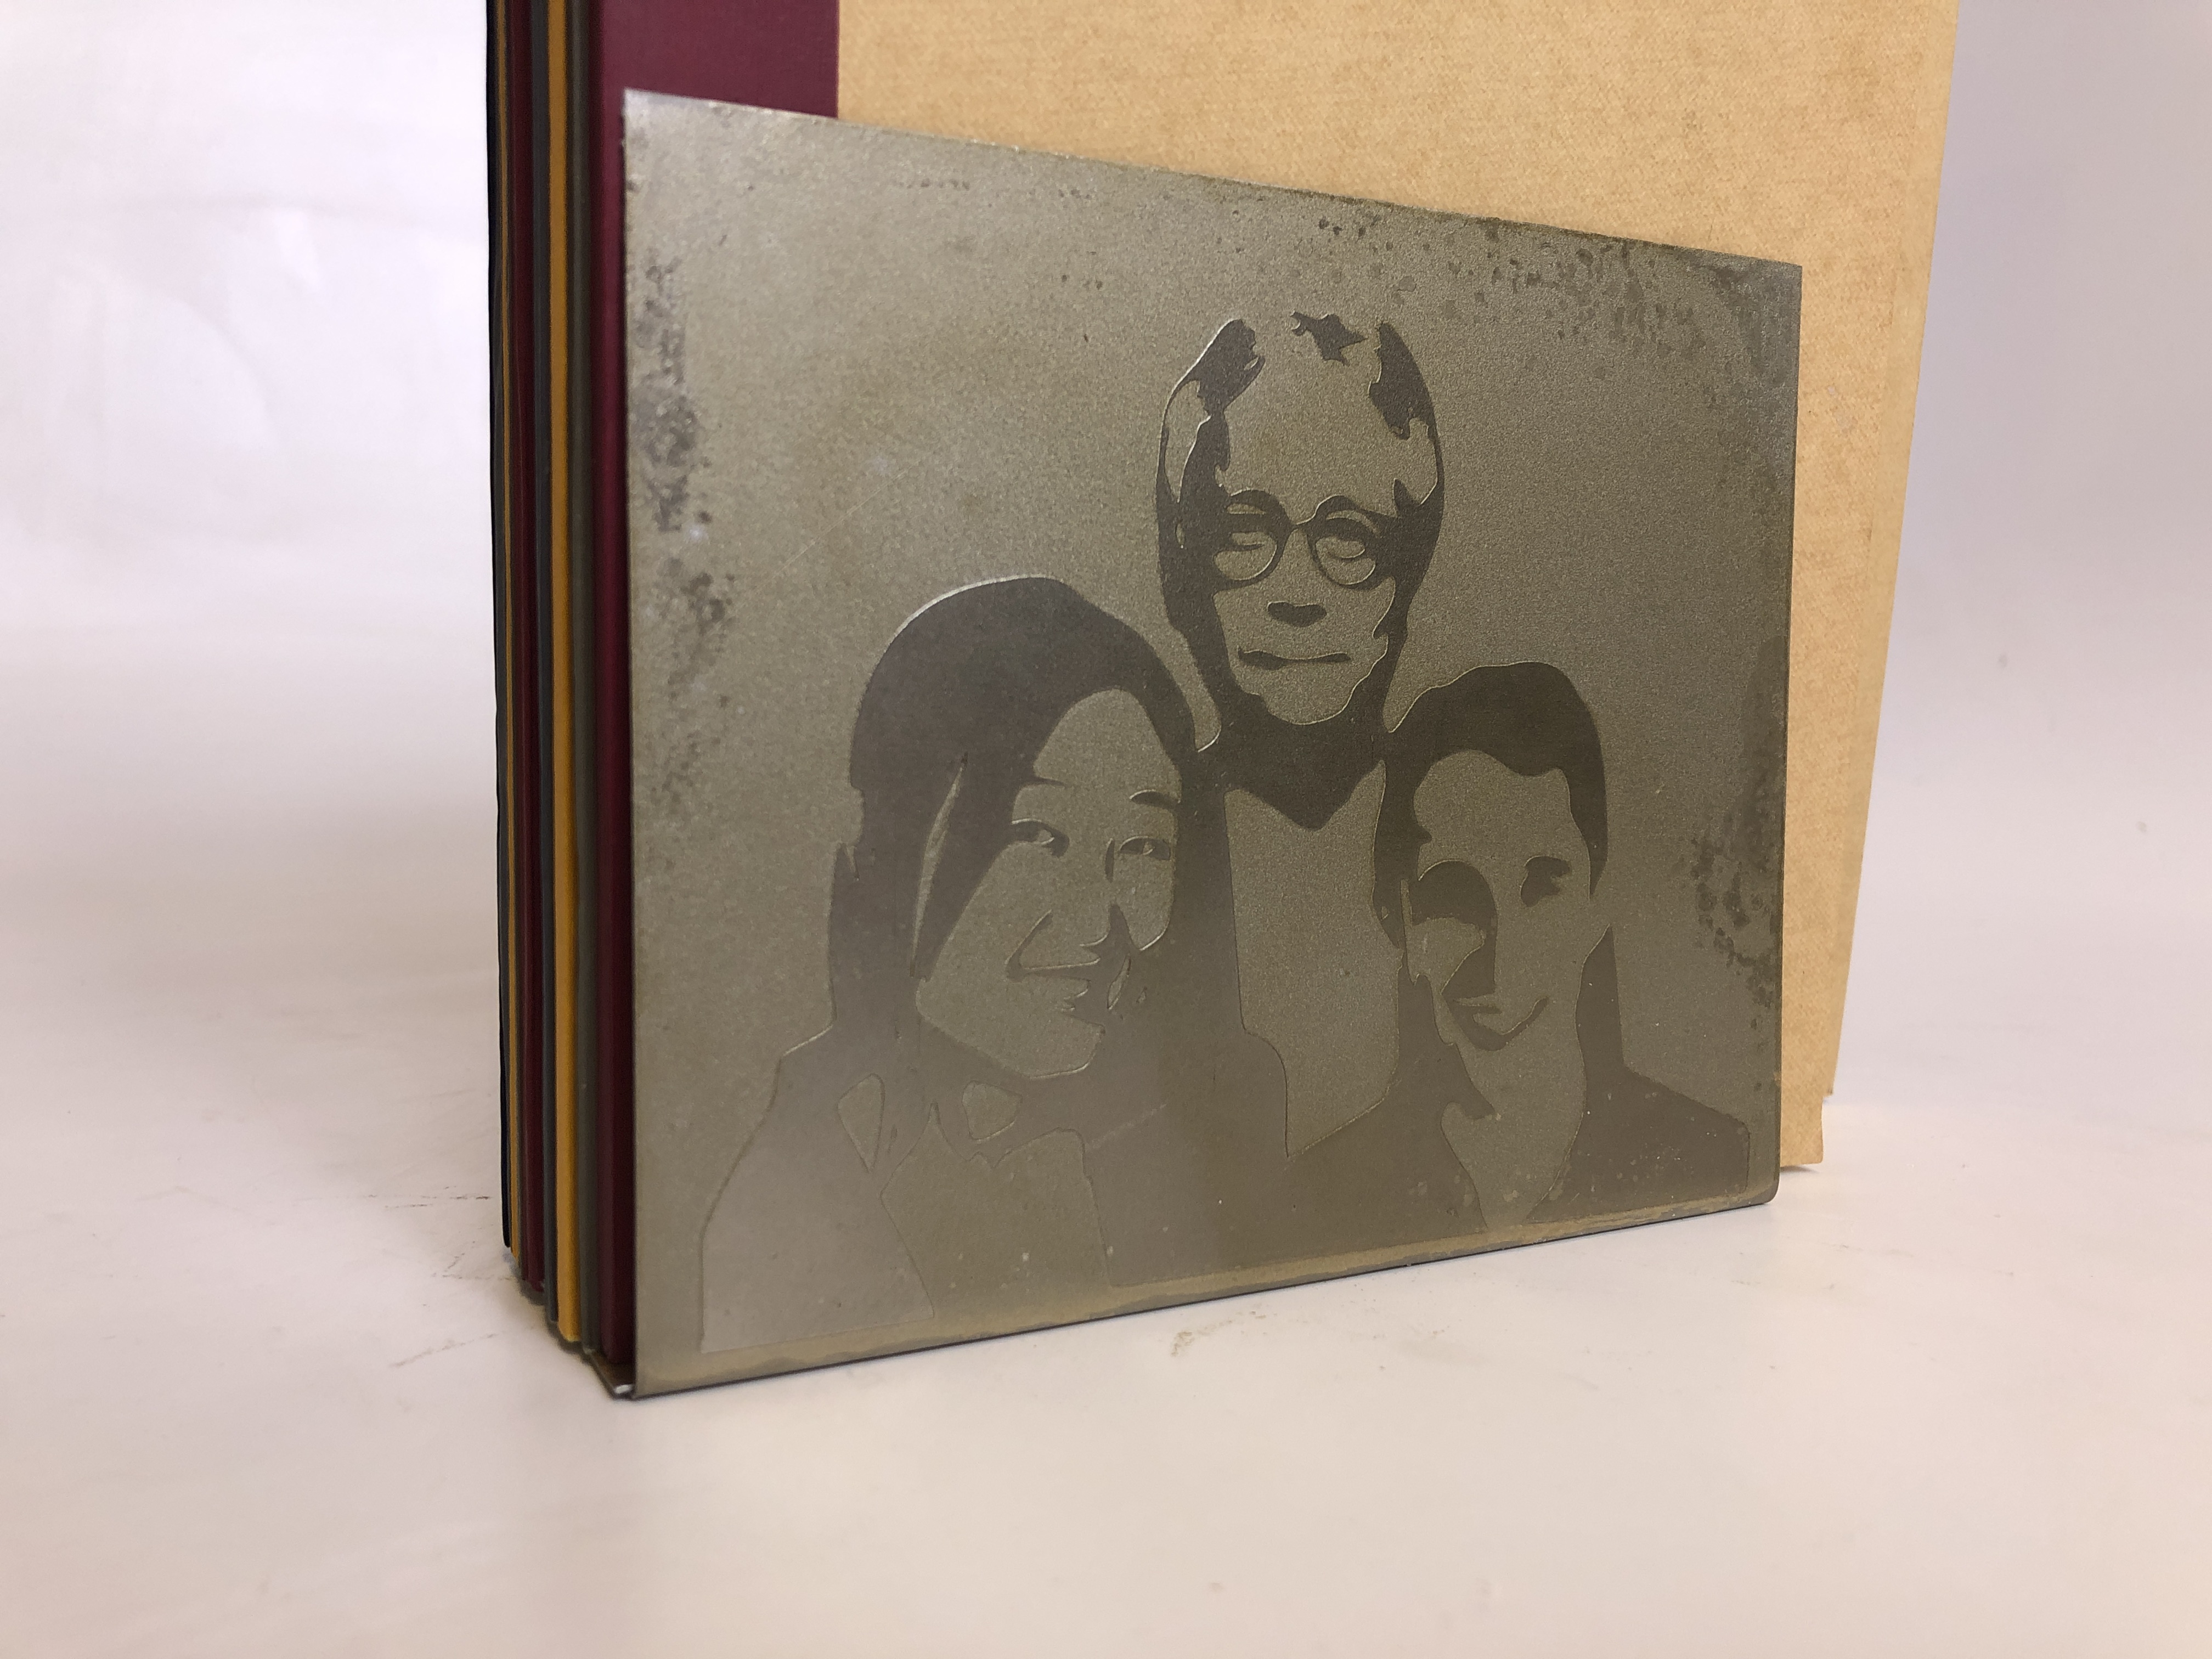
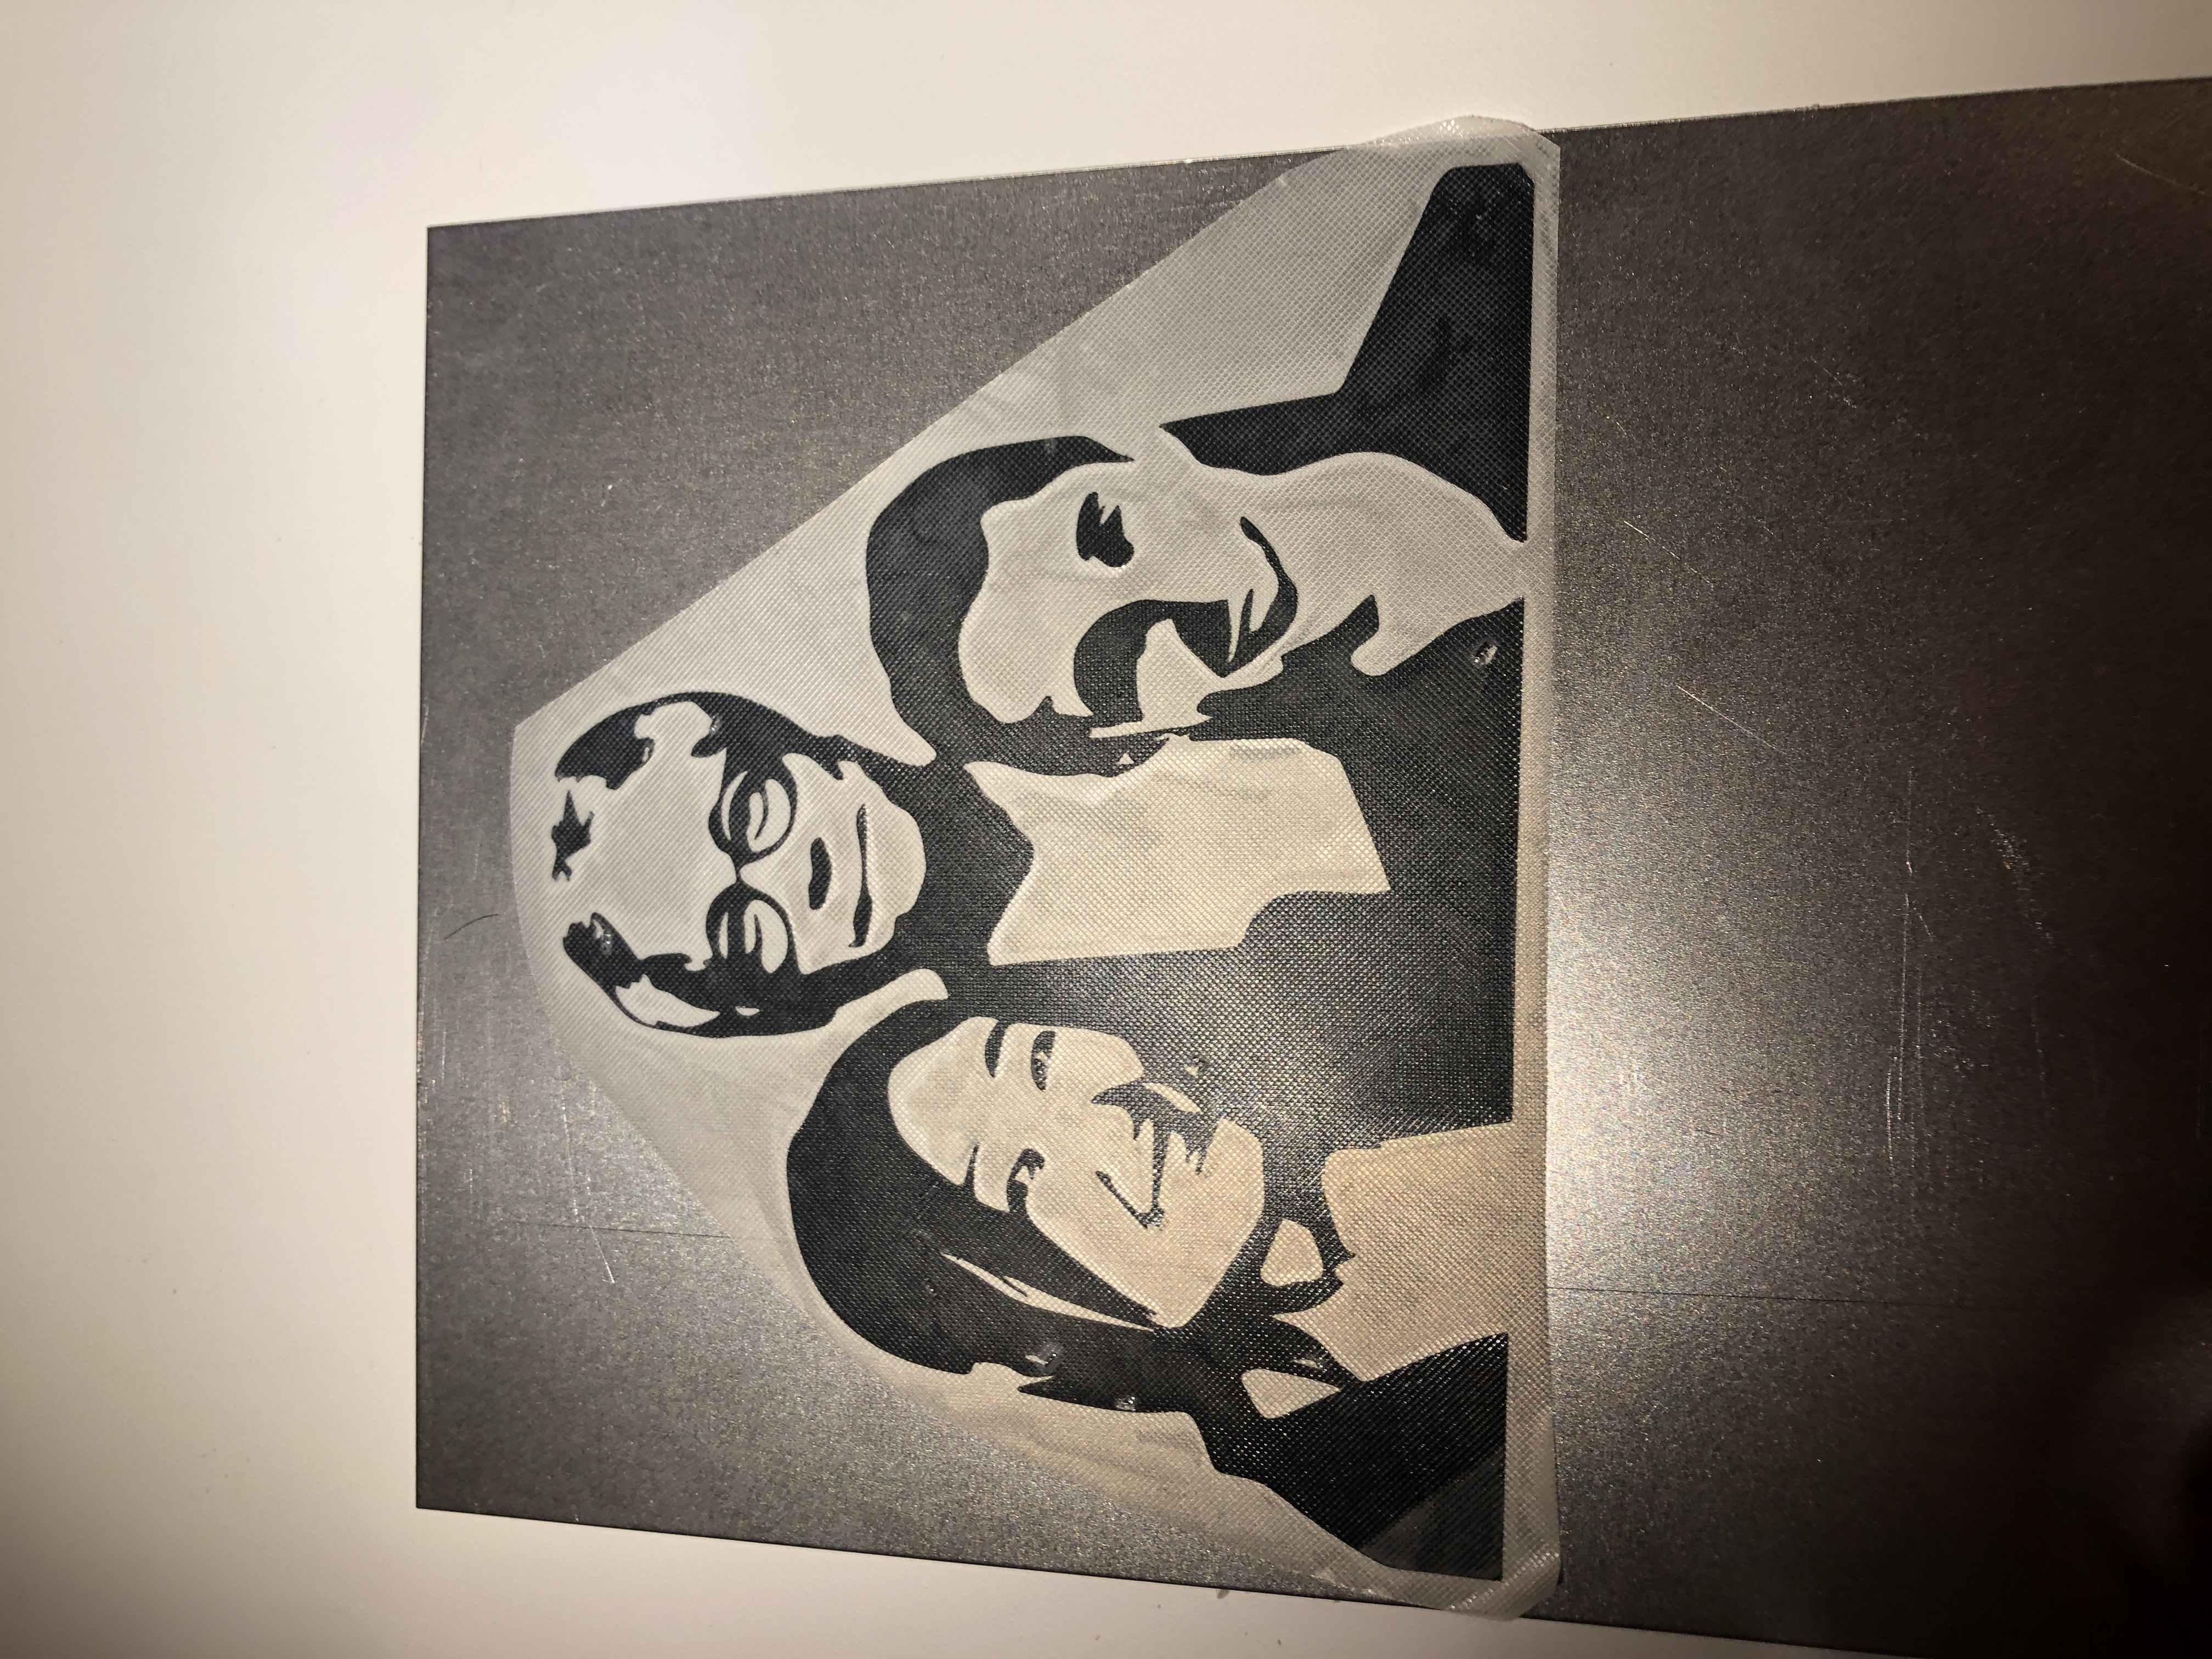
For the Vinyl Cutter assignment, I used the machine to create a vinyl electroetching mask. Once etched in a saltwater bath, I had a bookend of my academia family! (Prof. Lining Yao was my old advisor at CMU, Prof. Hiroshi Ishii is my current advisor at MIT, Lining did her Ph.D. at MIT with Hiroshi).
To make the mask, I composed a collage image of the three of us. I then used Adobe Illustrator ‘Image Trace’ feature to make the black and white SVG. I had to play around with the contrast and white exposure of each image so that they all ended up with similar levels of detail and black/white shading. I also found that lowering the quality of the images made for smoother silhouettes.


Once I had the image, I used the vinyl cutter to cut the image into black vinyl. While some smaller bits got lifted up I was able to save them by pressing them back down. I then used the transfer tape to convert it steel. I found this process to be very easy, the trick is peeling it at a sharp angle. I then transferred the mask to a piece of scrap metal I sheared.
Once transferred, I then used copious amount of electrical tape so attach a wire to the scrap metal. The goal is to prevent the water from touching (and thereby etching) the wire.

I then filled a bucket with water and copious amount of salt. I then placed some scrap metal in the solution and clipped it to the negative power supply terminal, I did the same with the piece of metal to be etched, but connected it to the positive terminal. I ran the power supply with as much current as I could, about 3 amps, for varying times from 20 minutes-3 hours. The longer it runs, the deeper the etch, but there wasn’t a huge difference between the 2 hours and 20 minute final result.
The single most important thing is washing off the metal as soon as you take it. Even a few seconds of hesitation can cause removed iron to reattach leaving a dirty looking surface. I would immediately rinse with water then ethanol (do not let water dry on steel). Once sufficiently cleaned, I sprayed iwth a shellac spray to protect the surface from rusting.
Finally, I used the metal bender in the CBA shop to make a nice bookstand!