Week 8
Let's go home
Molding + Casting
I wanted to make something interactive for this week with molding and casting. Wanting to make use of metal casting, I immediately started to imagine some type of coin/currency that I could mint! I started sketching some ideas and came up with the concept of Adventure Coins. Each coin would be worth one adventure and could be traded in for an adventure if you gave it to another person. It would also be possible to digitally document the adventures that these coins helped create in the world. Here are some initial sketches I made for Adventure Coin.


And here are some instructions for how Adventure Coin would work:

I started my design by finding a mandala generator online to come up with some highly symmetrical patterns to decorate the coin. I ended up using mandalamaker.online. Here are four symmetrical mandalas I made with different amounts of radial symmetry.


I liked this one the best:

I then used google slides (that's right, the cloud-based presentation tool) to design my coin. It's surprisingly versatile! The heads side says "Aventure Coin". The tails side has a link, "bit.ly/advntrcn", to where the instructions and documentation of the adventure coin live.


I thresholded the images so that they would binary black and white.


I then converted these black and white pngs into SVGs and then minified the SVGs. Here they are though in all their glory!


I then imported the SVGs into Fusion 360 and started to design my 3D coin. I extruded the text and design.


You can download the STL files for the coin here.
I then imported the STL File into Aspire to prepare a route for the Shopbot.

I added two dowels to the design so that each half of the mold would be aligned when casting.

I also added two vents... one for pouring and one for ventilation.

Below are the rendered images showing what each half of the mold would look like. I ended up exporting two different traces for each half. One for a rough trace with a 1/8" drill bit and the other for a fine trace with a 1/32" drill bit.


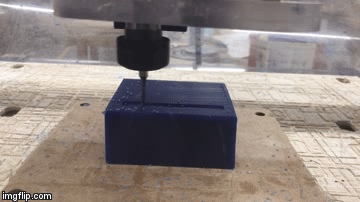
Here is the shopbot at work!
Here are the two finished sides of my mold!


Even after the fine cut, there was still some debris and rough edges lurking around each half. I scrunched up a piece of steel wool and taped it to the end of a metal pick and gently used that to brush away unwanted threads of wax that were still sticking to the mold.

I also used the metal pick to puncture holes for the letter 'B' and 'R' that didn't get etched by the Shopbot.


I then prepared equal parts of the silicone resin mix and gently mixed it together.

I poured the resin in my molds and let it sit for a few hours.

When I took the hardened silicone out to see how the mold looked, I saw that there were a million air bubbles that got in between the surface of my design and the silicone! If I poured metal into the silicone now, the text on the surface of the coin would be illegible :(. So, I redid the silicone mix and tried it again, but for a second time, there were too many air bubbles. I might need to learn from someone else the proper technique for mixing and pouring so that when I try this again, the setting of the silicone works out well.
