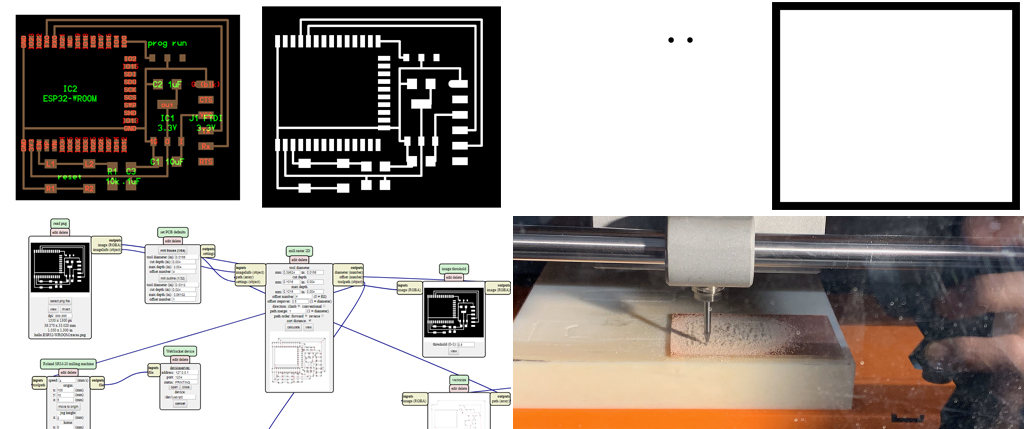
This week’s project consisted in designing building and connecting either a wired or wireless node with a network or bus addresses. I chose to use ESP32-Wroom and to see if I could connect it to WIFI. For this I started by first studying the board its components and connectivity. The board milling this time was composed of 3 different files: traces, interior and holes. I then listed the components : Bouton, Resistor 10K, 2 cpacitors 1uF, capacitor 10uF, 1.3 volts regulator (big), a switch and a 6 pin FTDI connector. In facts, the holes are created to accommodate the big switch which has two miniature cylindrical pins underneath. Designing my own board using Eagle was not possible because the footprint of the ESP32-WRoom is not part of the library. I therefore milled the board provided by CBA’s website. The procedure for milling was a bit different as it included a holes templeate which needed to be milled using 1/32 mill point after the traces.

Soldering
After milling, I was ready for soldering. However, the soldering pins of the ESP32-Wroom are a bit different than what we have been doing with the ATiny. To solder it, I first added a bit of solder underneath, in one of the central pins and then I removed it using the copper ribbon. I then added a bit of solder on the corresponding board, carefully aligned each pin of the ESP32 to the board, and heated the solder both on the board and under the pin. It was not easy, but once it was evenly heated, the component was successfully soldered to the board. After I soldered all the other pins of the ESP32-WROOM. Followed by soldering the other components.
Programming
I was then ready for programming. The first step was to install the component to Arduino. For Mac, I found the instructions in this site :
https://github.com/espressif/arduino-esp32/blob/master/docs/arduino-ide/mac.md
it explains that to install the ESP32-WROOM to Arduino, I had to run the following commend in the terminal
mkdir -p ~/Documents/Arduino/hardware/espressif && \
cd ~/Documents/Arduino/hardware/espressif && \
git clone https://github.com/espressif/arduino-esp32.git esp32 && \
cd esp32 && \
git submodule update --init --recursive && \
cd tools && \
python get.py
The installation procedure went without any error messages. Under tools, I could now find the ESP32 Dev module. Uploading speed 921600. CPU frequency 240MHz. Flash frequency 80Hz. Flash mode : QIO. Flash size : 4Mhz (32Mb). Partition scheme : 4MB with spiffs. Code Debug level : None. PSRAM : Disabled.
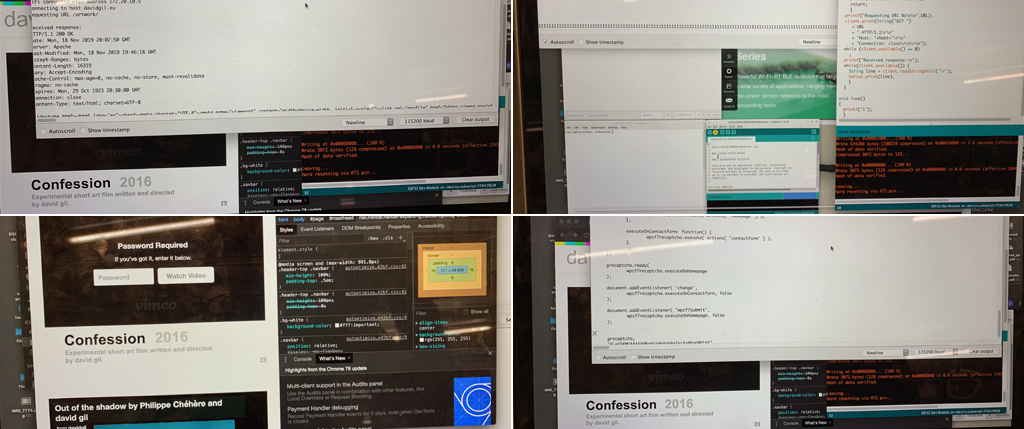
I then opened Arduino to create a new sketch and proceeded to do the coding. My goal being to connect the ESP32-WROOM to my iphone’s wi-fi (david) and then to go into my personal website (www.davidgil.eu) to read my artwork page. The serial was set to 115200 to allow networks to communicate. In my first code I included a loop to repeat the number 1, just to make sure there were not errors in the code. once I uploaded once and I saw the 1 repeated to eterney, I knew the code was correctly read. The following is the final code.
//
// hello.ESP32-WROOM.WebClient.ino
//
// ESP32 Web client hello-world
//
// Neil Gershenfeld 11/13/19
//
// This work may be reproduced, modified, distributed,
// performed, and displayed for any purpose, but must
// acknowledge this project. Copyright is retained and
// must be preserved. The work is provided as is; no
// warranty is provided, and users accept all liability.
//
#include
const char* ssid = "david";
const char* password = "**********";
const char* host = "davidgil.eu";
const char* URL = "/artwork/";
const int port = 80;
WiFiClient client;
void setup() {
Serial.begin(115200);
printf("\nConnecting to WiFi ");
WiFi.begin(ssid,password);
while (WiFi.status() != WL_CONNECTED) {
delay(100);
printf(".");
}
printf("\nWiFi connected with address %s\n",WiFi.localIP().toString().c_str());
printf("Connecting to host %s\n",host);
if (!client.connect(host,port)) {
printf("Connection failed\n");
return;
}
printf("Requesting URL %s\n\n",URL);
client.print(String("GET ")
+ URL
+ " HTTP/1.1\r\n"
+ "Host: "+host+"\r\n"
+ "Connection: close\r\n\r\n");
while (client.available() == 0)
;
printf("Received response:\n");
while(client.available()) {
String line = client.readStringUntil('\r');
Serial.print(line);
}
}
void loop()
{
}