Feedback control project
Project Overview
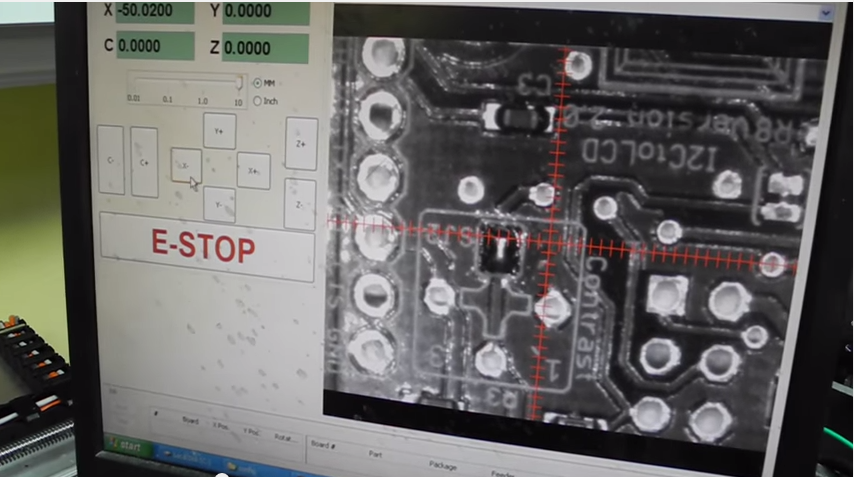
PnP machines usually have a camera attached to its head to move itself to the exact place where it pick/place something.
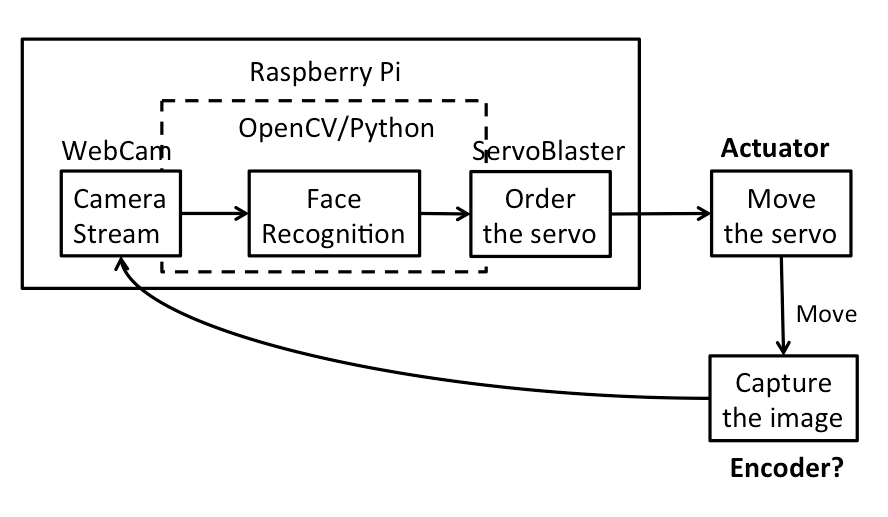
I would implement a feedback control using an image recognition.
I would implement a face tracking function on the webcam using the servo motor as a camera platform.
Face recognition function on OpenCV is based on Haar Feature-based Cascade Classifier.
I would do some research on "template matching" methodology on image recognition which can be applied on visual feedback functions of PnP machines.
Set up Raspberry Pi w/o keyboard
There are plenty of guides to set up Raspberry Pi. I used the one which I set up last semester.
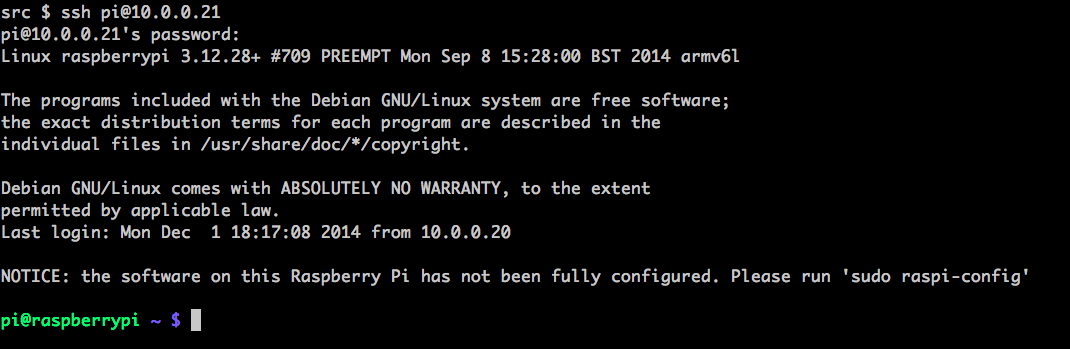
SSH connection to Raspberry Pi
Install Needed libs & packages
$ sudo apt-get update && sudo apt-get install git python-opencv python-all-dev libopencv-dev
Check whether the USB webcam is recognized properly
$ lsusb
Install and setup Motion
$ sudo apt-get install motion
could not run parallel with apt-get on another ssh session
$ cd /etc/motion
$ ls
$ nano motion.conf
Changed below configurations in order to allow remote access
webcam_localhost on ->off
control_localhost on ->off
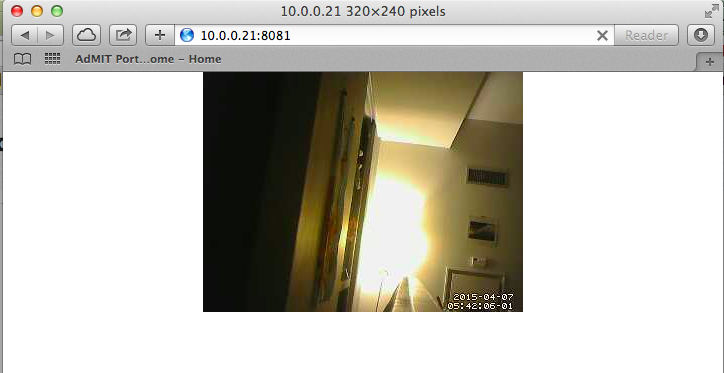
$ sudo motion
Somehow I could not open 10.0.0.21:8081 on Chrome. It was redirected to 10.0.0.21:8080. However, I could open the stream on Safari.
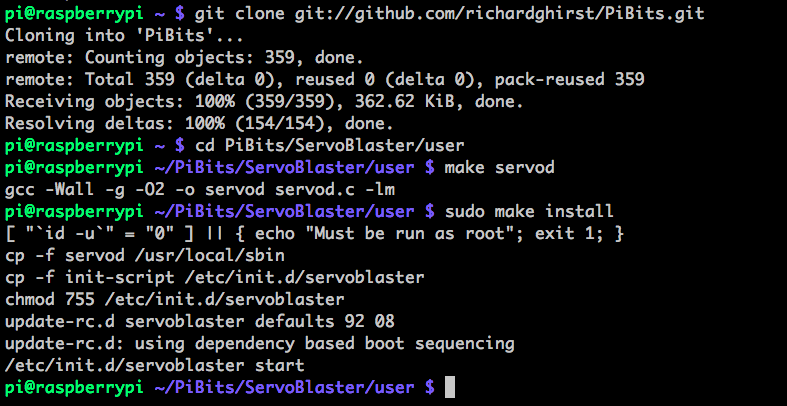
Control a servo motor from Raspberry Pi
$ git clone git://github.com/richardghirst/PiBits.git
$ cd PiBits/ServoBlaster/user
$ make servod
$ sudo make install
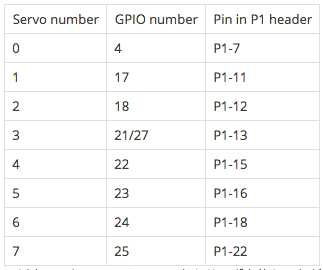
Wire the servo motor and Pi
Logical pin assigns of ServoBlaster.
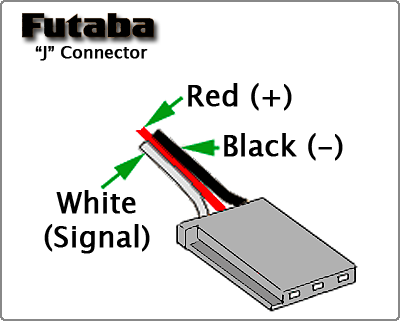
Physical pin assigns of Pi. I used Pin# 02(5V VCC), 07(GPIO 4), 39(GND) directly connected to three wires of the servo motor.
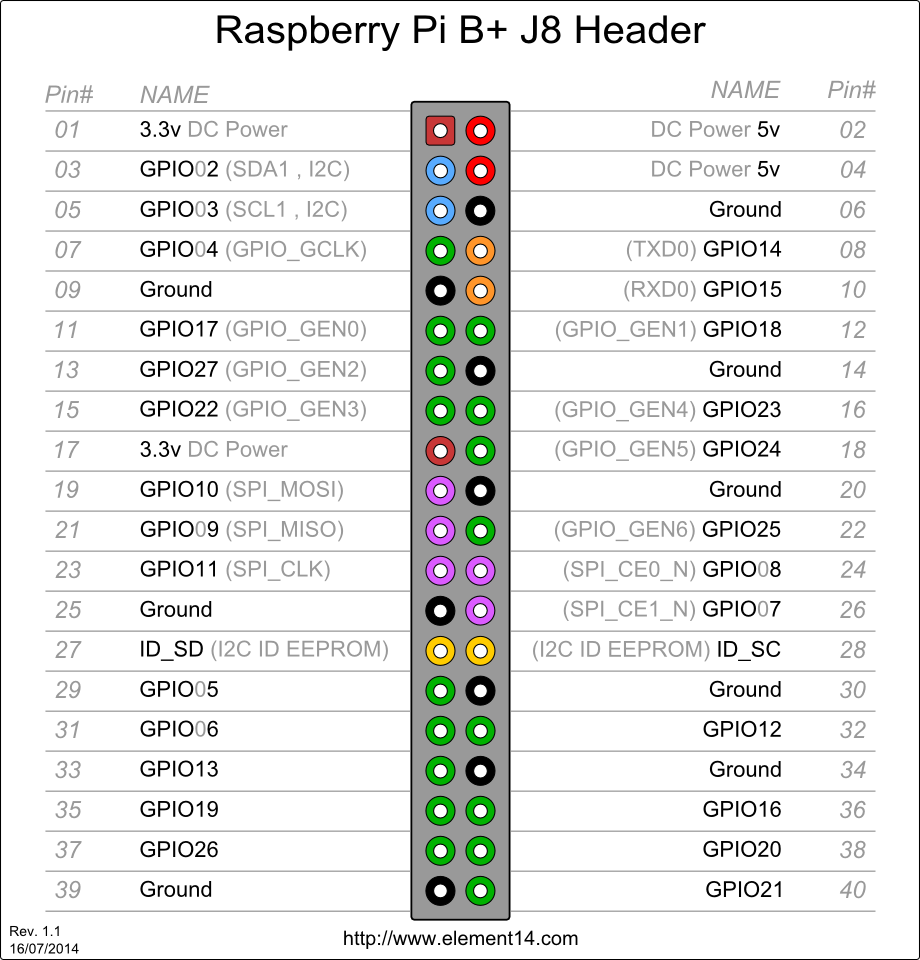
Color wires represent a VCC, GND, and Signal wire.
Could control the servo on the command lines
It worked so so.
$ echo 0=60 > /dev/servoblaster
$ echo 0=140 > /dev/servoblaster
$ echo 0=240 > /dev/servoblaster
It sometimes moved in a weird way. It might be due to a shortage of the power supply. I would separately supply a power not using Raspberry Pi VCC pins.
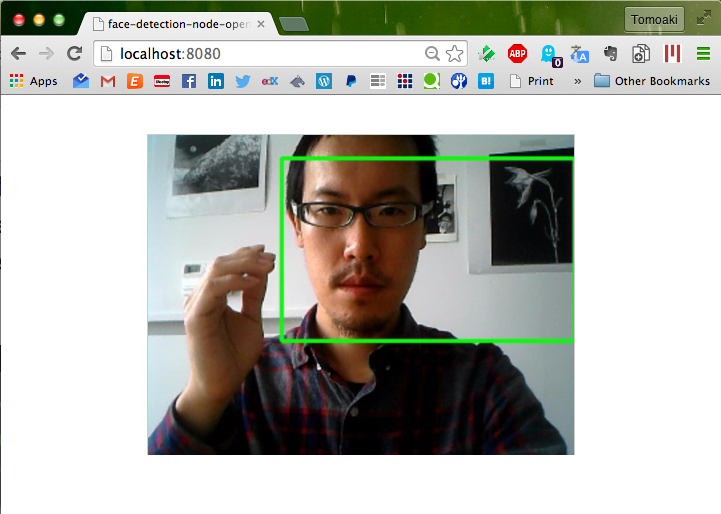
OpenCV programming
$ cd face-detection-node-opencv/server
$ npm install
$ node server.js
Open the browser and access to http://localhost:8080. It sometimes recognizes random objects as a face or fails to track a face but could track my face most of the time.
Feedback control to the servo
The logic I would implement is:
- Detect the center point (intersection of red lines) of the rectangle which is generated by the face recognition by OpenCV
- Calculate the distance between the center line (blue) of the screen
- Order the servo motor to move to the direction which reduce the distance between the red center point and the blue center line
$ sudo apt-get install python-setuptools
$ sudo easy_install -U RPIO
I have got this error: VIDIOC_QUERYMENU: Invalid argument
I have not fixed it yet.
Reference: OpenCV in python. Getting webcam stream works, but error message is printed - Stack Overflow :
Capability - HTML5 VM
I have read fabmodues, gestalt framework, and the gestalt node avr code to understand the current processes.
I also learned about the current RepRap firmwares and communication architecture as a reference. It was mainly to understand more about the difference between G-code, RML or other current languages and what gestalt framework want to achieve.
My current challenges is (1) to understand thread/queue programming in the gestalt framework which is closely related to the packet handling, (2) to what extent I could simplify the communication for the initial implementation.
Nadya gave me a module for client ver. of fabmodules which communicates with gestalt nodes.
Next step would be implementing a javascript module which can communicate with gestalt physical nodes as an output module of fabmodules.
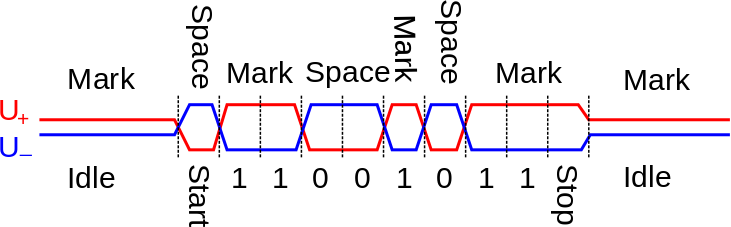
RS-485 (or FABNET)
noise resistant
"RS485 is how the RepRap motherboard communicates with all the tool controllers"
Both RepRap and MakerBot use the RS485 communications channels to control their extruders
Read serial communication module of Gestalt Framework
Communication interfaces are implemented in interface.py.
- gestalt/interfaces.py
-
- CLASSES
-
- class serialInterface(devInterface)
-
- __int__
- initAfterSet
- getAvailablePorts
- acquirePort
- connect
- connectToPort
- disconnect
- setDTR
- setTimeout
- startTransmitter(self)
- transmit(self, data)
- class transmitThread(threading.Thread)
-
- Handles transmitting data over the serial port.
- __init__
- run(self)
- getTransmitPacket(self)
- receive(self)
- flushInput(self)
- class gestaltInterface(baseInterface)
-
- plotter_xy
-
- self.fabnet = interfaces.gestaltInterface('FABNET', interfaces.serialInterface(baudRate = 115200, interfaceType = 'ftdi', portName = '/dev/ttyUSB0'))
- __init__(self, name = None, interface = None, owner = None)
- validateIP(self, IP)
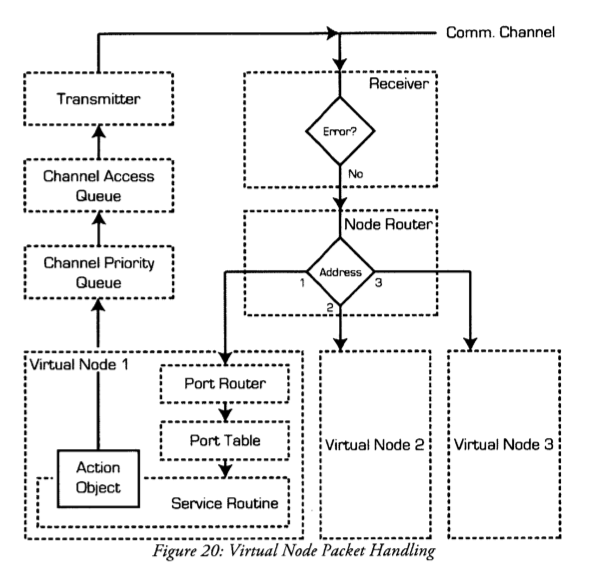
- class nodeManager(object)
-
- __init__(self)
- updateNodesAddresses(self, node, address)
- getIP(self, node)
- getNode(self, IP)
- assignNode(self, node, address)
- transmit(self, virtualNode, port, packetSet, mode)
- commit(self, actionObject)
- startInterfaceThreads(self)
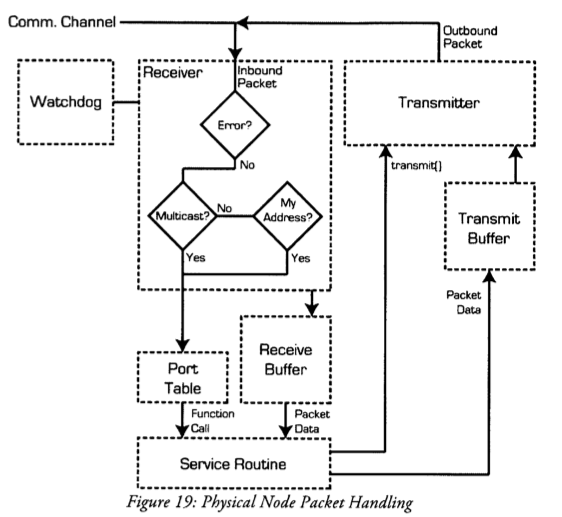
- class receiveThread(threading.Thread)
-
- Gets packets from the network interface, interpreting them, and pushing them to the router queue.
- __init__(self, interface)
- run(self)
- class packetRouterThread(threading.Thread)
-
- Routes packets to their matching service routines, and executes the service routine within this thread.
- __init__(self, interface)
- run(self)
- getRouterPacket(self)
- class channelAccessThread(threading.Thread)
- class channelPriorityThread(threading.Thread)
- class CRC
- METHODS
-
- serialize(packet)
-
- Converts packet into a string for transmission over a serial port.
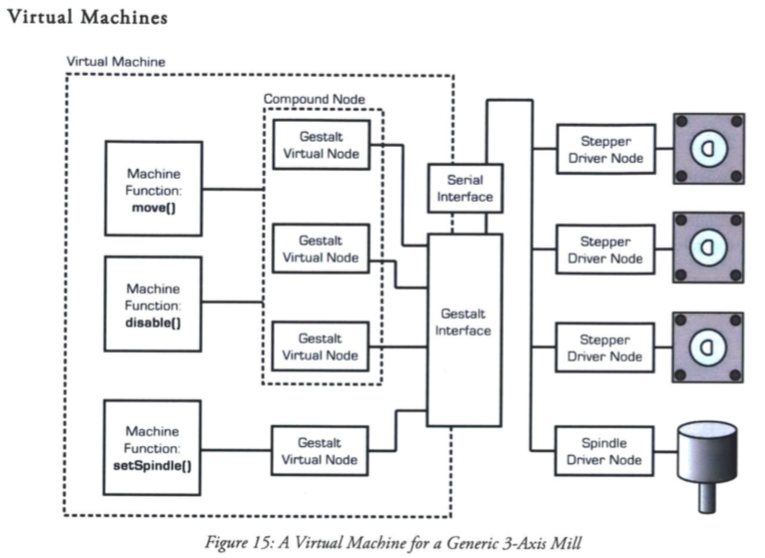
xy_plotter.py is an example implementation of virtual machines.
086-005a.py is an example implementation of virtual nodes.
Virtual Machine
xy_plotter.py
- class virtualMachine(machines.virtualMachine): - machines.virtualMachineクラスを継承
-
- def initInterfaces(self): 通信IFを決める
-
- def initControllers(self): 軸を決める
-
- XYのVirtual nodeとして086-005aを指定
- def initCoordinates(self): 軸
- def initKinematics(self): キネマティクス
- def initFunctions(self): やれることを決める
-
- def initLast(self):
- def publish(self):
- def getPosition(self):
- def setPosition(self, position = [None]):
- def setSpindleSpeed(self, speedFraction):
__main__
stages = virtualMachine(persistenceFile = "test.vmp”)
//インスタンス生成と代入。継承済virtualMachineクラス(指し示す理由は?)
抜粋
initInterfaces
else: self.fabnet = interfaces.gestaltInterface('FABNET', interfaces.serialInterface(baudRate = 115200, interfaceType = 'ftdi', portName = '/dev/ttyUSB0'))
初期化時にinterface = interfaceShell(interfaces.serialInterface())
それによりinitAfterSetが呼ばれ、transmitterThreadが開始する
interfaces.py
self.startInterfaceThreads() #this will start the receiver, packetRouter, channelPriority, and channelAccess threads.
#define standard gestalt packet
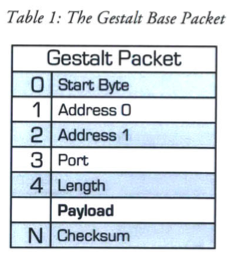
self.gestaltPacket = packets.packet(template = [
-
- packets.pInteger('startByte', 1), //
- packets.pList('address', 2), //
- packets.pInteger('port', 1), //
- packets.pLength(), //
- packets.pList('payload’)] //
- )
packets.py
エンコーダ、デコーダ等
initControllers
self.xAxisNode = nodes.networkedGestaltNode('X Axis', self.fabnet, filename = '086-005a.py', persistence = self.persistence)
self.yAxisNode = nodes.networkedGestaltNode('Y Axis', self.fabnet, filename = '086-005a.py', persistence = self.persistence)
stages.xyNode = nodes.compoundNode(self.xAxisNode, self.yAxisNode)
nodes.py
class compoundNode(object):
'''A compound node helps distribute and synchronize function calls across multiple nodes.'''
initFunctions
self.move = functions.move(
virtualMachine = self,
virtualNode = self.xyNode,
axes = [self.xAxis, self.yAxis],
kinematics = self.stageKinematics,
machinePosition = self.position,
planner = 'null'
)
self.jog = functions.jog(self.move) #an incremental wrapper for the move function
pass
もしファイルがなければ、ボタンで軸決定をする
# This is for how fast the
stages.xyNode.setVelocityRequest(8)
virtualNodes 086-005a.py
class virtualNode
class setVelocityRequest
class actionObject
def init(self, velocity)
velocityをコンバートし、self.setPacket({velocity: xx}).commitAndRelease().waitForChannelAccess().transmitPersistent()
core.py
setPacket
self.packetSet = self.packetEncoder(packet)
packetEncoder (初期化でserviceRoutine.packetSet)
functions.serviceRoutine
packets.packetSet
commitAndRelease
self.release
clearToRelease
threading.Event()
self.interface.commit
commit
put into the queue
waitForChannelAccess
(channelAccessGranted = threading.Event()).wait
interface.pyでthreadingが使われているのは下記
-
- serialInterface
-
- trnsmitter.start() これはserialInterface下
-
- startInterfaceThreads これらはgestaltInterface下
-
- receiver.start()
- packetRouter.start()
- channelPriority.start()
- channelAccess.start()
Queue(同期キュークラス)
複数のスレッドで情報交換、同期するためのもの
マルチスレッドプログラミングにおける「生産者 / 消費者」問題とは、 データ (data) の生産者 (Producer) と消費者 (Consumer) を独立のスレッドとして考え、 生産と消費が連動して進むようにプログラムを設計するにはどうしたらよいか
生産者はデータを次々と生産し、消費者は次々とデータを消費する
市場を固定サイズの queue と考え、生産者と消費者でこれを共有しているモデルを考えます
生産者はデータを生産すると、queue に追加をします。 消費者は queue からデータを取得し消費します
queue が一杯になると、生産者は生産を止めて待たなければなりません
queue が空になると、消費者はデータが queue に追加されるまで待たなければなりません。
このように待ち(wait)が発生するとき、 生産者や消費者はブロック(block)される、と言います。
消費者は queue が空の時、生産者は queue が一杯の時、待ち状態に入ります。
状況が変わると通知され、動き出します。
これらの動きを、wait / notify (notifyAll) メソッドにより実現しています。
# Some random moves to test with
moves = [[10,10],[20,20],[10,10],[0,0]]
# Move!
for move in moves:
stages.move(move, 0) //move命令(VMとしてxy同時)-> functions.pyのmove class.
status = stages.xAxisNode.spinStatusRequest() //次命令まで待つ
# This checks to see if the move is done.
while status['stepsRemaining'] > 0:
time.sleep(0.001)
status = stages.xAxisNode.spinStatusRequest() //次命令まで待つ
---
test.vmp (example)
# This Gestalt persistence file was auto-generated @ 2013-10-16 15:18:45.997847
{
'gigapan.py.Z Axis':[95, 35],
'gigapan.py.Y Axis':[142, 74],
'gigapan.py.X Axis':[5, 24],
}
Virtual Nodes
086-005a.py - 340L // VM cod
- import
- class virtualNode
-
- init
- API functions
-
- setMotorCurrent
- getReferenceVoltage
- enableMotorsRequest
- disableMotorsRequest
- service routines
-
- class enableRequest
- class disableRequest
- class getReferenceVoltageRequest
- class spinStatusRequest
- class setVelocityRequest
- class spinRequest
-
- init
- syncPush
- syncPull
- channelAccess
- splitNumber
- fillFront
- fillBack
- actionSequenceGen
- update
- tbAccelRate
- class syncRequest
examples/machines/gigapan/images/086-005a.py
class spinStatusRequest(functions.serviceRoutine):
class actionObject(core.actionObject):
def init(self):
self.setPacket({}) - core.py: setPacket()
---
def setPacket(self, packet, mode = 'unicast'):
self.packetSet = self.packetEncoder(packet)
self.mode = mode
---
self.commitAndRelease()
self.waitForChannelAccess()
if self.transmitPersistent():
return self.getPacket()
else:
notice(self.virtualNode, 'unable to get status from node.')
どうもMakefileから?およびコードからは、gestalt.cppを使ってVMとのやりとり、
その下のuserレイヤで086-005a.cppを使いステッパーモータを制御するらしい。
gsArduino/gestalt.cpp
sArduino $ grep -e "){" -e "//-" gestalt.cpp
//--INCLUDES--
//--DEFINE IO--
//--DEFINE NODE VARIABLES--
//--EEPROM LOCATIONS--
//--BOOTLOADER--
//--BOOTLOADER CONSTANTS--
//--BOOTLOADER STATE VARIABLES--
//--DEFINE TRANCEIVER STATE VARIABLES--
//--DEFINE PACKET FORMAT--
//--DEFINE PORTS----
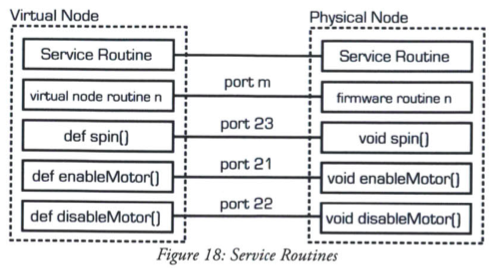
- const uint8_t statusPort = 1;
- const uint8_t bootloaderCommandPort = 2;
- const uint8_t bootloaderDataPort = 3;
- const uint8_t bootloaderReadPort = 4;
- const uint8_t urlPort = 5;
- const uint8_t setIPPort = 6;
- #ifndef compileLite
-
- const uint8_t identifyPort = 7;
- #endif
-
- //DEFINE NETWORK PORTS from 086-005a.cpp
-
- const uint8_t getVrefPort = 20; //reports back the current motor reference voltage
- const uint8_t enableDriverPort = 21; //enables the drivers
- const uint8_t disableDriverPort = 22; //disables the drivers
- const uint8_t movePort = 23; //move
- const uint8_t setVelocityPort = 24; //sets current velocity
- const uint8_t spinStatusPort = 26; //get spin status
- const uint8_t syncPort = 30; //triggers a sync. This is a soft proxy for the sync control line.
- const uint8_t resetPort = 255;
//--DEFINE TRANCEIVER SETTINGS--
//--FLAGS--
#ifdef standardGestalt
//This is being compiled as an independent program, not using the arduino IDE.
int main(){
setup();
while(true){
loop();
}
}
#endif
// -- FUNCTION: SETUP --
// Basic functionality for communication with the PC is configured here.
void setup(){
}
//----RECEIVER CODE-------------------------------------
//--RECEIVER INTERRUPT ROUTINE--
ISR(USART0_RX_vect){ //atmega324
ISR(USART_RX_vect){ //atmega328, default for arduino
if (rxPosition == lengthLocation){ //check if current byte is packet length byte
if ((rxPosition < lengthLocation)||(rxPosition < rxPacketLength)){ //packet is not finished
if ((rxBuffer[startByteLocation]==multicast)&&(rxPacketChecksum==rxData)){ //multicast packet good
if ((rxBuffer[startByteLocation]==unicast)&&(rxPacketChecksum==rxData)&&(rxBuffer[addressLocation]==networkAddress[0])&&(rxBuffer[addressLocation+1]==networkAddress[1])){
//--RECEIVER WATCHDOG INTERRUPT ROUTINE--
ISR(TIMER2_OVF_vect){
if (watchdogTime == watchdogTimeout){
//------TRANSMITTER CODE----------------------------------------------
//--TRANSMITTER INTERRUPT-------------
ISR(USART0_TX_vect){//atmega324
ISR(USART_TX_vect){
if (txPosition < txPacketLength){ //still in packet
if (txPosition == txPacketLength){ //transmit checksum byte
//--ALIAS TO TRANSMITTER INTERRUPT--
//--START TRANSMISSION OF PACKET
void transmitPacket(){
void transmitUnicastPacket(uint8_t port, uint8_t length){
void transmitMulticastPacket(uint8_t port, uint8_t length ){
//------MAIN CODE---------------------------
void loop(){
packetRouter();
userLoop();
}
void packetRouter(){
if (packetReceivedFlag == true){
何もかからなければuserPacketRouterへ
default: //try user program
userPacketRouter(destinationPort);
break;
//--PORT TABLE--
switch(destinationPort){
//------SERVICE ROUTINES---------------------
//--IDENTIFY NODE--ボタンを押して軸を確定させる
void svcIdentifyNode(){
while(counter < 1500000){
//--REQUEST URL--
void svcRequestURL(){
for(offset = 0; offset<urlLength; offset++){
//--SET IP ADDRESS—
void svcSetIPAddress(){
if (rxBuffer[startByteLocation] == multicast){ //wait for button press
while(*IO_buttonPIN & IO_buttonPin){
if (counter == 500000){ //blink frequency
if ((counter2 == 15)||(packetReceivedFlag==true)){ //exit condition, n blinks or packet received (presumeably from other responding node)
for(offset = 0; offset<urlLength; offset++){ //transmit URL
for(offset = 0; offset<urlLength; offset++){ //transmit URL
//--STATUS REQUEST--
void svcStatus(){
void svcResetNode(){
while(1){};
//--BOOTLOADER FUNCTIONS--
void svcBootloaderCommand(){
if (command == 0){
if (command == 1){
void bootloaderInit(){
void applicationStart(){
while (packetOutboundFlag == true){ //wait for response packet to be sent
void svcBootloaderData(){
void writePage(){ //note: code based on http://www.nongnu.org/avr-libc/user-manual/group_avr_boot.html
for (i=0; i<pageSize; i+=2){
void svcBootloaderReadPage(){ //returns page
for (i=0; i<pageSize; i++){
//------UTILITY FUNCTIONS---------------------
//--SET URL--
void setURL(char *newURL, uint8_t newURLLength){
086-005a.cpp - for atmega on the controller board. 392L
- Include
- Variable
-
- stepper control port/pin assignments
- define network ports
- move packet definition
- move status definition
- step control variable and memory
- circular buffer indexes
- direction masks
- bresenham vars
- step generator vars
- Function
-
- userSetup
-
- pin and port configuration
- userLoop
- Utility func
-
- enableDriver
- disableDriver
- setForward
- setReverse
- Step generator
-
- Interrupt routines
-
- ISR()
-
- check for steps to move
- accel/ deccel
- modify uPosition
- major axis step and bresenham algorithm
- check for new packet to load
- set motor directions (DIR)
- set axis steps
- set accel/deccel params
- clear uPosition
- Service routines
-
- services
-
- svcReadMotorRef
- svcEnableDriver
- svcDisableDriver
- svcSync
- svcMove
- svcSpinStatus
- svcSetVelocity
- then
-
- transmitUnicastPacket(XX, X) //Transmit a response
- Packet router
-
- userPcketRouter
-
- switch to various service routines by status requests
-
- switch(destinationPort) ==> correspond to service routines
-
- getVrefPort
- enableDriverPort
- disableDriverPort
- movePort
- setVelocityPort
- spinStatusPort
- syncPort
gestalt/functions.py
gestalt $ grep -e "class" -e "def" functions.py
- class serviceRoutine(object):
-
- def __init__(self, virtualNode = None, packetSet = None, responseFlag = None, packetHolder = None):
- def __call__(self, *args, **kwargs):
- def receiver(self, packet):
- def receive(self, packet): #this should get overridden
- class jog(object):
-
- def __init__(self, move, defaultJogSpeed = 20): #20mm/s
- def __call__(self, incrementalPosition = None, velocity = None, acceleration = None):
- class move(object):
-
- def __init__(self, virtualMachine = None, virtualNode = None, axes = None, kinematics = None, machinePosition = None, defaultAcceleration = coordinates.uFloat(2000, "steps/s^2"), pullInSpeed = 4000, planner = None):
- def __call__(self, *args, **kwargs):
- class motionPlanner(threading.Thread):
-
- def __init__(self, move, queueSize = 50, queueTimeout = 0.1):
- def run(self):
- def addMove(self, newMoveObject):
- def processMoves(self, newMoveObject):
- def generateJunctionVelocity(self, entryMoveObject, exitMoveObject):
- def forwardPass(self):
- def reversePass(self):
- def normalizeVector(self, inputVector):
- def distanceFromVelocities(finalVelocity, initialVelocity, acceleration):
- def velocityFromDistance(distance, initialVelocity, acceleration):
- def intersectionPoint(initialVelocity, finalVelocity, acceleration, seperationDistance):
- def updateAndRelease(self, segment):
- def release(self, segment):
- def flushPlanner(self):
- def resetMachineState(self, velocity = 0.0, acceleration = 0.0):
- def getMoveObject(self):
- class nullMotionPlanner(threading.Thread): #performs no path planning, just releases objects as they arrive
-
- def __init__(self, move, queueSize = 50, queueTimeout = 0.1):
- def run(self):
- def addMove(self, newMoveObject):
- def processMoves(self, newMoveObject):
- def release(self, segment):
- def flushPlanner(self):
- def resetMachineState(self, velocity = 0.0, acceleration = 0.0):
- def getMoveObject(self):
- class moveObject(object):
-
- def __init__(self, move, position = None, velocity = None, acceleration = None):
- self.move = move #the calling move class
- self.accelerationCommand = self.move.defaultAcceleration
- self.entryJunctionMaxStepRate = 0 #default to zero in case this move is the first one
- def commit(self):
- def update(self):
- def release(self):
machines.py
- class virtualMachine(object):
-
- def __init__(self, *args, **kwargs):
- def initInterfaces(self):
- def initController(self):
- def initCoordinates(self):
- def initKinematics(self):
- def initFunctions(self):
- def init(self, *args, **kwargs):
- def initLast(self):
- def disablePublishing(self):
- def enablePublishing(self):
- def initPublish(self):
- def publish(self):
- class coordinates():
-
- class uFloat(float):
-
- def __new__(self, value, units = None):
- def __init__(self, value, units = None):
- def convertUnits(self, targetUnits):
- def uFloatSubtract(self, term1, term2):
- class baseCoordinate(object):
- '''A set of ordinates which can be used to define positions of various machine elements.'''
-
- def __init__(self, inputList):
- def __call__(self):
- def get(self):
- def set(self, valueArray):
- class state():
-
- class coordinate(object):
-
- def __init__(self, inputList):
- def update(self, inputList):
- def commit(self, inputList):
- class elements():
-
- class element(object):
- '''Base class for mechanical elements.
- @classmethod
-
- def forward(thisClass, inputParameter):
- def reverse(thisClass, inputParameter):
- def init(self, inputUnits = None, outputUnits = None, transformation = None):
- def transformForward(self, value): #NOTE: THIS GETS REASSIGNED TO THE NAME "forward" ON INSTANTIATION BY CLASSMETHOD "forward"
- def transformReverse(self, value): #NOTE: THIS GETS REASSIGNED TO THE NAME "reverse" ON INSTANTIATION BY CLASSMETHOD "reverse"
- class elementChain(element):
-
- def __init__(self, elements):
- class microstep(element):
-
- def __init__(self, microstepCount):
- class stepper(element):
-
- def __init__(self, stepAngle):
- class leadscrew(element):
-
- def __init__(self, lead):
- class pulley(element):
-
- def __init__(self, pitchDiameter):
- class invert(element):
-
- def __init__(self, invert = False):
- class kinematics():
-
- class matrix(object):
- '''A base class for defining transformation matrices.'''
-
- def __init__(self, array):
- def __call__(self, inputVector):
- def transform(self, inputVector):
- def dot(self, array1, array2):
- class identityMatrix(matrix):
-
- def __init__(self, order):
- class routeForwardMatrix(matrix):
-
- def __init__(self, routingList):
- class routeReverseMatrix(matrix):
-
- def __init__(self, routingList):
- class compoundMatrix(matrix):
-
- def __init__(self, inputMatrices):
- def transform(self, inputVector):
- class transform(object):
-
- def __init__(self, forwardMatrix, reverseMatrix):
- def forward(self, inputVector):
- def reverse(self, inputVector):
- class direct(transform):
-
- def __init__(self, order):
- class route(transform):
-
- def __init__(self, routingList):
- class compound(transform):
-
- def __init__(self, inputTransforms):
- class hbot(transform):
-
- def __init__(self, invertX = False, invertY = False):
- class chain(transform):
-
- def __init__(self, forwardChain):
- def forward(self, inputVector):
- def reverse(self, inputVector):