| Process | Linux Utility | Windows Utility | output example
|
| 1. MAKING THE BOARD
|
| Below are general steps. You can find detailed instruction on setting up and using the Modela for this purpose as documented by 863 class.
|
| Create schematic and board layout, write as gerber file.
| Eagle. You can use custom elements from Neil's library ng.lbr.
| 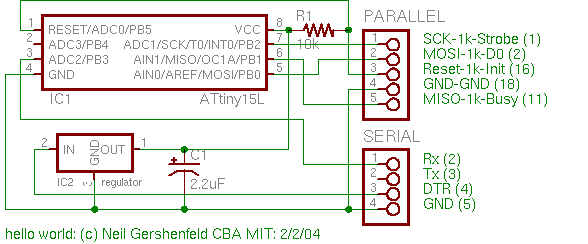 schematic: hello.sch schematic: hello.sch
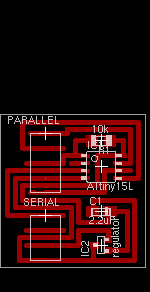 board: hello.brd board: hello.brd
gerber: hello.cmp
|
| Create rml toolpath output(Usage is "python cam.py")
| python and cam.py.
(At this point you might as well get pyserial which you will need later to have the microcontroller talk back to the computer via serial port).
|
|
| Setup serial port parameters
| stty 9600 raw -echo crtscts </dev/ttyS0
| (ML machines run Linux...) In Windows this is something in the control panel.
|
|
| You may need to move the Modela's starting point.
|
move.rml or
move as an interactive script.
| move.rml
|
|
To set the Z-origin, Loosen the set screws holding the bit or install the bit so that only a little of the shank protrudes.
1. Push the DOWN key until the head is all the way down.
2. Tap the UP key to back off the head a small distance.
3. Lower the milling bit until it hits the board and tighten the set screws.
| |
| | Send rml to Modela
|
cat file.rml > /dev/ttyS0 (for Modela)
cat file.camm > /dev/lp0 (for vinyl cutter)
|
type file.rml > com1 (for Modela)
|
| If you need to interrupt the Modela while it's milling, 1. kill the cat from the computer, if it's still going.
2. On the face of the Modela, go into VIEW mode then push both UP and DOWN buttons at the same time. Hold until the light stops blinking. Release buttons after light stops blinking.
| | |
| | 2. PROGRAMMING
| | Assembly Languange Programming
|
|
Use assembler mnemonics to create assembly program (.asm) for the AVR.
| Any text editor
| hello.asm
| | Copy this include file into the directory with the assembly code. It defines all the register and memory names.
|
tn15def.inc
|
| | Convert assembly language (.asm) to machine language (.hex) using avra. (Usage: "avra hello.asm")
|
avra assembler
|
avra-1.0.0-win32.zip
| hello.hex
| | C Languange Programming
| | See
AVR-GCC Tutorial
| GCC
GCC libc
|
winavr is a suite that includes GCC, avr-libs, and debugging and simulation utilities.
| | 3. CONNECTING TO THE MICROCONTROLLER
| | Connect serial cable to computer and run rx.py (usage "python rx.py").
|
rx.py (needs pyserial)
|
| | Uisp is a tool for AVR microcontrollers which can interface to many hardware in-system programmers.
Erase memory in chip:
uisp -dlpt=/dev/parport0 --erase -dprog=dapa -dvoltage=3 -dt_sck=50
Send program to chip:
uisp -dlpt=/dev/parport0 -dprog=dapa -dvoltage=3 -dt_sck=50 --upload if=hello.hex
|
uisp programmer
| included in the WinAVR package, see above.
|
|
| Listen for the micro to say something to you
|
|
| |