this week the assignment was to design a board with an input device. i had two goals for the week i wanted to make a simple rgb led board with a button so that i could practice soldering with the smaller components, and make sure that i finally have a working board. the second was to improve my zipper concept from week 5. i decided to use the xiao esp31-c1 for this project because i needed a board that was wifi enabled.


i wanted to make a hall-effect sensor and replace one of my zipper circuits with
the hall-effect sensor to improve responsiveness with the zipper. i wanted to attach a magnet to the zipper so that
we can monitor its proximity to the sensor (being zipped up) through reading the output from the hall-effect sensor, which i
hope would improve functionality immensely.
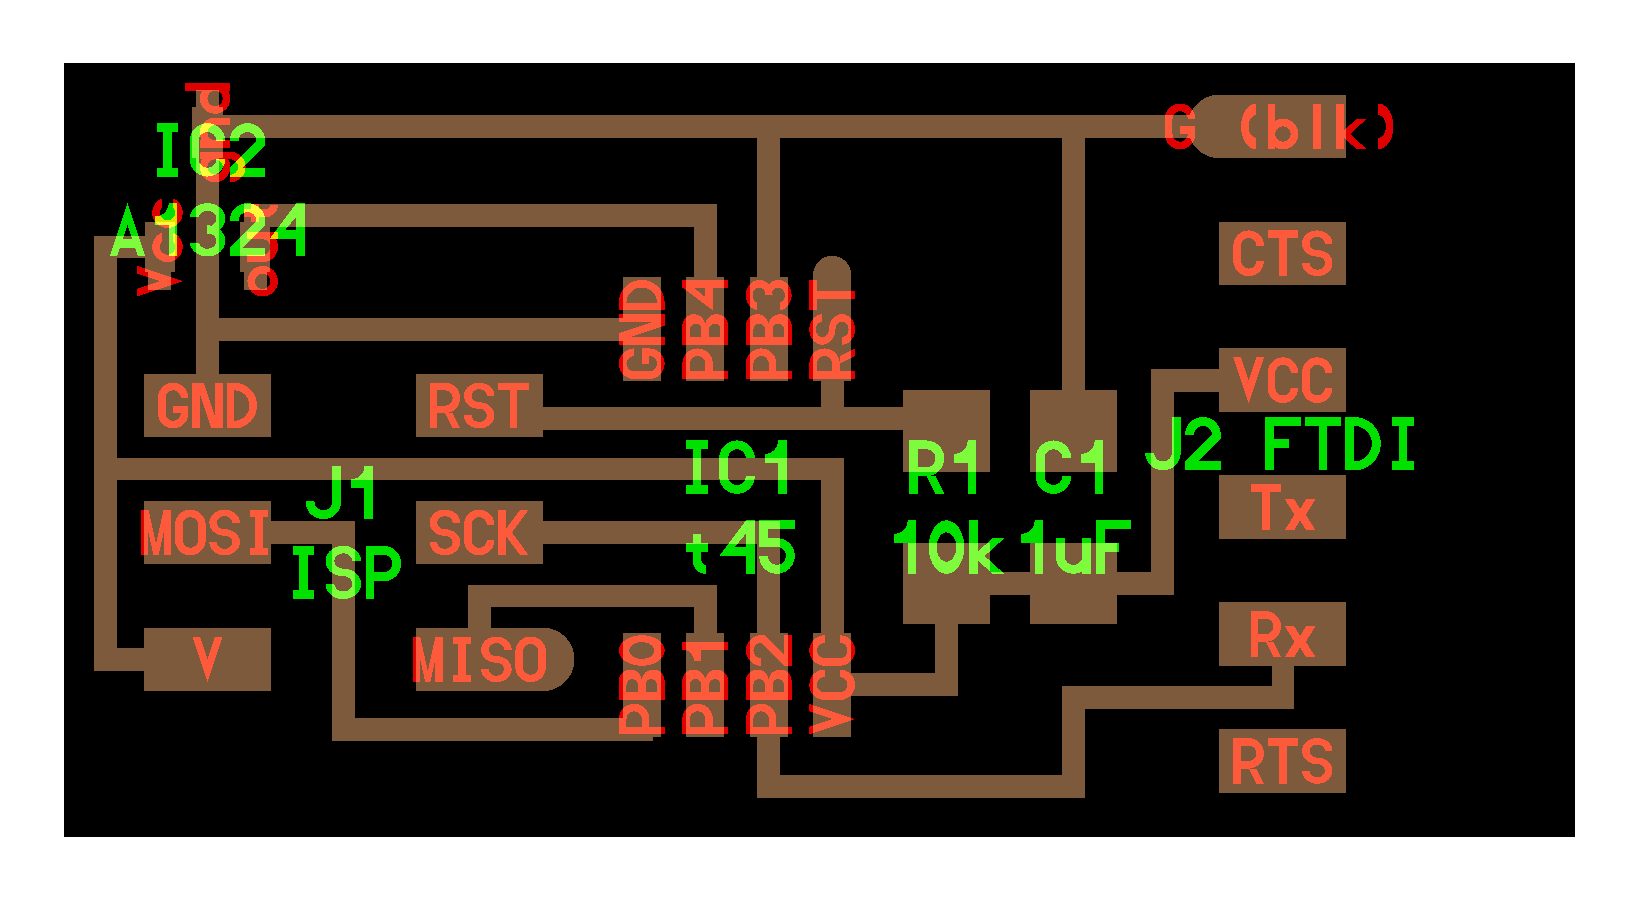
i started by reviewing neil's hall effect sensor
and drawing out the diagram so i could understand the components and interactions.

i reached out to leo and jake to discuss it because it looks much more confusing than it really is since neil uses the ic1 microprocessor, so there's an
additional pull-up resistor and additional connectors required in neil's circuit diagram,
than will be required in mine. i also took a look at the hall-effect sensor and in the arduino kit, and the diagramming they provided online.
the idea is that i don't want to just steal the design, i really want to understand how to make one myself from scratch.


luckily, even though i thought it was confusing at first, it was quite simple!/
the most helpful documentation in the end was the datasheet.
i guess there should be no surprises there, but you can see that it's just three pins, one to data input, one to ground, and one to power through a capacitor at least 0.01 mF.
that was a relief! so i mocked up the sensor and tested it out.

i drew the diagram in kicad with two additional connectors so that i could attach the other circuit (around the button) to it. i've annotated the components below in colors so you can see how everything connects!


as a side note this was actually my second try because i didn't realize it had to be on one of the few analog pins, so i wired it
to a non-analog datapin and used a jumper wire to connect it first. see here.
first, i milled it on the roland srm-20, the same as every week, with a 1/64 endmill for the traces and a 1/32nd endmill for the outlines.
then i had some good practice soldering some of the smaller pieces. here are my hall-effect sensor and capacitor on my finger tip for scale.


to get python onto the esp-32-s3 it's a little bit harder than the rp2040 and the pico, but there are pretty okay
instructions here. i had to download
the esptool package using pip install (inside the anaconda prompt), put the microcontroller into bootloader mode, and then identify which serial
port to call, erase the flash and then deploy the new firmware. the code was:
*open anaconda prompt (or terminal if you didn't use anaconda to download python)
pip install esptool
*check with port the COM is using. Since I'm on Windows, this was mine : Device Manager > Ports > USB Serial Device (COM12)
esptool --port COM12 erase_flash
*download the .app-bin firmware file and then put the path into the command
esptool --port COM21 --baud 460800 --before default_reset --after hard_reset --chip esp32s3 write_flash --flash_mode dio --flash_size detect --flash_freq 80m 0x0 C:\Users\sophi\Downloads\ESP32_GENERIC_S3-20231005-v1.21.0.bin

now that the esp32 has micropython loaded, we're ready to start analyzing readings from the hall effect sensor. to start, we have to adjust by the 'tare', or baseline reading. the typical way to do this is to make an initial reading and then use that to subtract from all other readings. for me, the non-magnetized readings come out at about 2130 consistently. once we remove the tare, we can see the gaussian distance from the magnet to the sensor! very cool.
and now i can use it to replace the barely working circuit that i was using as the previous 'sensor' for my zipper texting pants!


with it nicely integrated "seamlessly!" into my pants, i can test it!
finally done! now i'll always get a call if i leave my zipper down (if i have a wifi hotspot and power).
here's the code !