
Universal Laser Cutter Tutorial
The laser cutter is a potentially dangerous machine. It is very easy to start fires with the laser cutter. The laser cutter can also produce dangerous fumes (e.g., chlorine) if used with improper materials.
People must receive training prior to use of the laser cutter. The cutter must also remain under constant supervision while in use. This document is very partial, and does not constitute training. Please contact shop-admin@cba.mit.edu for further information.
What can happen when you leave a laser cutter
unsupervised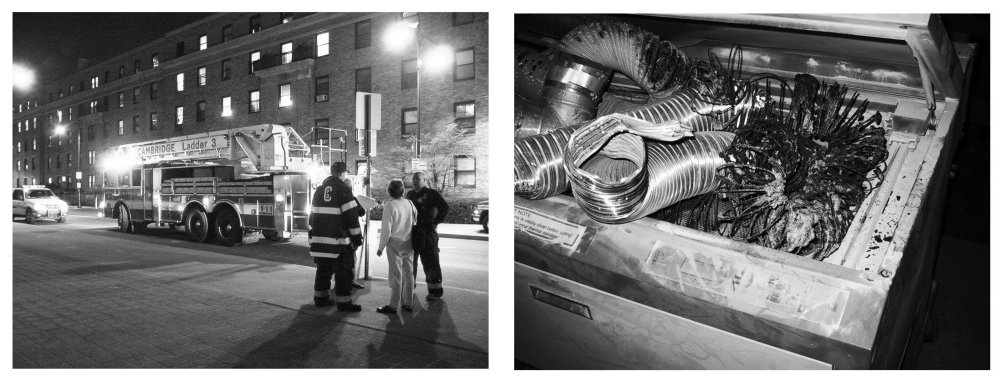
Particular warnings:
Never cut PVC, or other chlorinated plastics (Lexan and PC board are also strongly discouraged). PVC in particular will give off chlorine gas, which is not only highly corrosive to the machine, but also dangerous for any nearby people.
Constant machine supervision really is a must. E.g., with our own machine, in the middle of a cut, I observed the laser begin etching the internal walls of the machine, and igniting the rubber rollers of the laser cutter head. It turned out that a primary mirror had fallen off, and the 100 watt laser beam was reflecting off the skewed and moving mirror. Had the machine not been under supervision, this might have resulted in a serious fire.
Varied cutting speeds, power levels, and pulses per inch (PPI) allow some modulation of this etching, making some limited forms of three-dimensional relief plausible. At heart, though, the laser cutter is a 2D cutting and etching tool, with the third dimension achievable through the stacking or assembly of multiple laser-cut elements or layer
Printing to the laser cutter is currently done through the CorelDRAW software installed on the machine (the special printer driver "X200" drives the cutter) this driver also works with Rhino and AutoCad. Corel Draw can import 2D DXF files; PostScript files; general pixmaps; among others.
The CorelDRAW driver maps graphical lines and arcs to laser cuts. Lines should be set to minimum width hairline (.004") to be preserved as "vector" cuts (lines/arcs). Wider lines will be automatically rasterized, i.e. composed from a series of pixel-like laser burns -- much slower, and of somewhat poorer-quality finish.
Line colors are mapped to different laser speeds, powers, and PPI by the CorelDraw
laser cutter driver. It's probably best to stick to the "black" color for starters.
Once you've executed the CAD design of your laser cut part, you can begin the production process by transferring your file to the laser cutter PC (either via the net or memory stick). Load or import your drawing into CorelDRAW. Change the paper size to the dimensions of the laser cutter bed. To do this, select "Layout...Page setup", page size should be 32" x 18"
Powering On
With your design ready to print, it's time to power on the
laser cutter
Power on the laser cutter itself. The switch is in the
rear-right of the unit.
The cutter takes approximately 30 seconds to power-on/boot.
Your model is loaded, and the laser is powered; let's get down to cutting.
Choose File/Print from within CorelDRAW. You'll see something like:
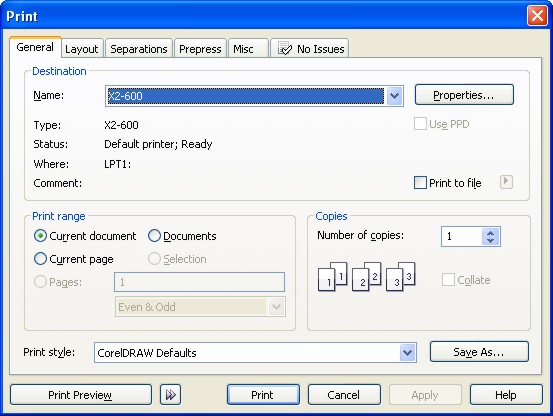
Before we can print, we need to verify the cut power/speed settings. Go to "Properties" on the print popup. We need to verify two numbers in particular for each drawing color: power and speed. Some settings which have been found to work are compiled below.
The laser cutter print-properties menu looks like:
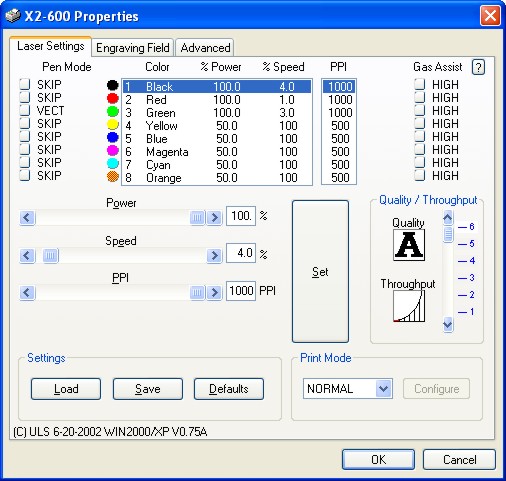
To configure these settings, click on the color you'd like to modify. Then, change the power/speed levels by pulling the sliders or typing directly into the
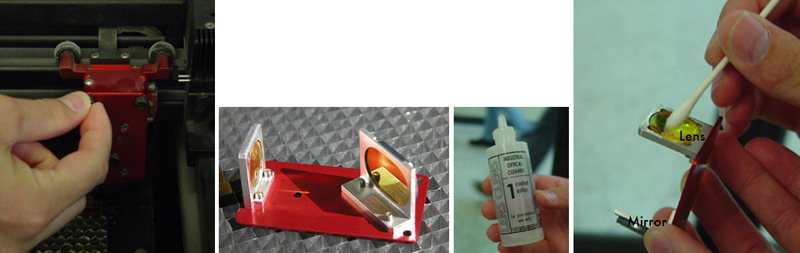
The lens should be removed from the machine (with the three thumbscrews) and checked for material accumulation at the beginning of each cutting session. If the lens is dirty (with "removable" grit; some is permanently impacted), it should be cleaned with a clean cue-tip and one or two drops of cleaning fluid. Please ask for training with this, if you're not overly familiar.
The laser cutter lens accumulates material residue as a normal part of laser cutter use. When "dirty cuts" are performed, or burning occurs, the lens gets dirty at a much faster rate. When the cutter is used with a dirty lens, particles can ignite and destroy the lens. We've lost 4-6 lenses this way. Lenses are >$200 a piece, so it's important to be careful about this.
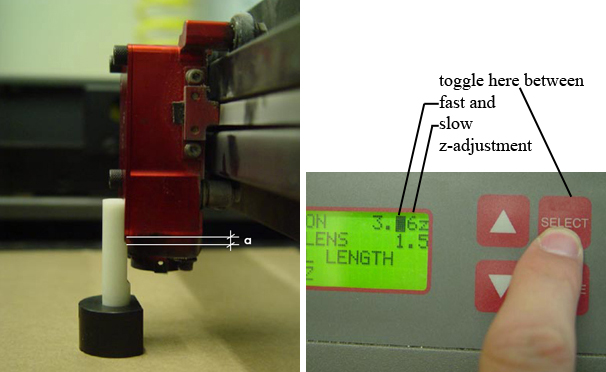
The laser cutter must be focused before use. This is done using the plastic focus tool, and the Z adjustments of the laser cutter. Please request training from shop-admin@cba.mit.edu. If not properly focused, the laser cutter won't properly cut. This not only results in a poorly cut part, but also produces lots of extra material residue and gas, which is especially problematic with acrylic and other plastics.
The laser cutter origin (the top-left of the cut) is configurable through the laser cutter menus. The origin is frequently moved during typical cutting sessions, to best utilize the remaining material from a piece of stock. Be sure to check the origin before beginning your cut, as the system retains origin settings from previous runs -- even if the machine has been powered off in the interim.
As a part of registration, it's good to do a draft unpowered cut (described below). Otherwise, especially with our current cutting table, it's possible to cut the ruler-borders of the cutter itself, which is to be avoided.
Stock
Most folks may wish to choose acrylic for their laser cutter assignment (so far as raw materials are available). Small quantities of translucent quarter-inch acrylic stock should be available near the laser cutter. The paper film on top and bottom of the acrylic should be peeled off to minimize chance of flaming.
The laser cutter stock situation is evolving. While acrylic scraps and corrugated cardboard are often available near the cutter, individual users are basically responsible for purchasing their own stock (and replenishing existing stock that they use). Please be respectful of stock purchased by others, especially of thick and colored acrylic stock (which can be expensive.).
I strongly encourage people to do early cutting runs in corrugated cardboard. It's cheap, structurally robust (for medium-sized pieces), easy to mark on with a pen and hack with a knife, and environmentally sound. Note that when laser-cut, corrugated cardboard is quite sharp.
J. Freeman, Inc 65 Tenean St. Dorchester, MA 02122 phone: 800-841-9442) is the standard local supply for acrylic. McMaster-Carr is a fairly good mail-order source; search for "acrylic."
At J. Freeman if you're really stocking up, you're best off to purchase 4'x8' sheets; the back room cut these down to size. Given the 18"x32" bed size of our cutter, Ron has suggested we use 16"x32" tiles, This produces 9 tiles.
Note that acrylic, cardboard, and wood are all readily flammable (especially acrylic and cardboard). Acrylic also gives off noxious fumes. And again, PVC (which appears in many forms, including a foamed form) and some other materials are highly toxic. In short, if you're not sure of the material, ask! And if you notice strange green gases, etc. coming from your cut, shut off the laser cutter immediately, and do not continue cutting without advice from experienced building folks.
Please let acrylic cuts sit for 30 seconds in the laser cutter bed before opening -- more, if heavy etching or cutting has been done, especially of thick acrylic (e.g., 1/4").
Light materials (e.g., cardboard, thin plastic, paper, and vellum) generally need to be taped down to the laser cutter bed with masking tape. Otherwise, vibration and the air displacement of the moving cutter head will move materials during cutting.
The order of cutting is an important parameter. When the outer border of a part is cut, the piece will often "fall out" of the stock material (if only by a fraction of a millimeter). The part will often slightly skew rotationally as well. If further cuts interior to the part are made, they'll often be improperly registered.
To change the order of cutting, right-click on the part and Corel, and use the "order" submenu. Pieces sent to the "back" will cut first; pieces sent to the "front" will cut last. The outside border of parts should generally be sent to the front. However, it should be noted that this has the annoying affect of making interior drawings hard to select (as the part frame "occludes" these inner features). If you have problems, talk to an experienced user.
It's worth noting that the laser cutter beam has a finite width, which changes both as a function of the material, and as a product of its depth within the material. The cut width will be wider at the upper surface than at deeper locations within the material. This can significantly influence the fitting of laser-cut parts, especially for press-fit joins.
Some example settings. Getting such numbers "right," and adjusting them for new materials, reminds me a bit of cooking. I'm constantly guestimating numbers, trying them out, adjusting them, etc. The laser cutter manual also has suggested settings for many materials.
|
Material |
Power |
Speed |
|
1/8" Acrylic: vector cut (single pass)
1/8" Acrylic: raster etch |
50
30 |
2
70 |
|
1/8" Cherry: cut (three passes)
1/8" Cherry: raster |
80, 80, 80
20 |
8,12,12
20 |
|
Corrugated cardboard (1/8") |
80 |
16 |