Week 6 | Molding and Casting


NOTES

Lecture Notes
molding
types
-injection (for consumer products mostly)
-insert
-vacuum
-blow (good to make bottles)
-flexible, soft (what we are doing this week)
materials
-machinable wax (what we are doing this week)
-low-temp wax (melts at room temp)
-rigid foam (good for large construction)
-gesso
-alginate gel (making peoples face/hand, special effects for masks)
-urethane rubber, plastic ( urethane need ventilation while silicone doesn't - same
for urethane and silicone but urethane stronger than silicone - good for
casting plastic parts - for transparency use the clear plastic)
-silicone (oomoo, safe to use)
-PDMS (polydimethylsiloxane) (good for nanoscale feature but expensive)
-latex (doesn’t do deep section cures, only for surfaces, takes weeks to make a
large mold, do not use this, only good for surface cures and not volume)
-thermoplastic, thermoset polymers (thermoplastic sets once, thermoset can be
set many times and reused, these are polymer used for injection molds)
-calcium sulfate (used as a coagulate in tofu and yogurt)
desicant, coagulant,, gypsum, drywall
dryStone (powder, infinite shelf-life, deep section cure, exothermic need to
cool if doing large pieces, good surface finish)
plaster (not for structure but for drying internally)
-Portland cement
calcium silicate, aluminum/iron oxide, calcium sulfate
Hydro-Stone (this one is slightly better in structure than calcium sulfate, but
use calcium sulfate for white - or color needed)
-metal, ceramic powders
-low-temp alloys
-food
additives
-fibers (tension, compression, composites) (molding and casting good for
compression but not flexible, later we can do this with composites)
-fillers: density, conductivity, flexibility, color, ...
- We will use about $5 in silicone and $5 in cement
- Check out http://www.foreignaffairs.com/articles/138154/neil-gershenfeld/how-to-make-almost-anything?page=show
Molding and Casting Notes
I. FORM - made out of wax block (positive)
-
-need to put small holes to for air to escape difficult areas
-
-design by thinking how the fluids are going to fill it
-
-align two piece molds using pegs/registers (better if cone shape around the 4 corners)
-
-closed two piece mold versus open one piece mold
-
-close two piece molds needs a hole to pour in material
See tutorial of Desktop ShopBot for 3D Molding
II. MOLD - made out of silicone (negative)
Step 1: Wear gloves and Bad clothes
Step 2: Secure walls of wax mold
1) Lego pieces
2) Card board
3) Tape
Step 3: Mix part A and part B silicone rubber compound
-Yellow bottle = part A
-Blue bottle = part B
-1A: 1B by volume
-100A:130B by weight
-25A shore (elasticity zero is super squishy)
-mix thoroughly and in a figure 8 to avoid bubbles
-15 minutes Pot Life (Pot Life - The amount of time that a catalyzed
material remains workable (pourable for a liquid or trowelable for paste)
after components have been mixed together - see definition here)
Step 4: Pour mixture into form
-more material the better to give mold a better form
-pour a fine slow bead not in fast clumping
-tilt to avoid bubbles
-tap/agitate/vibrate to release more air bubbles
-vacuum in a chamber to take away air bubbles even more
Step 5: Wait
-put in fridge to slow down curing process to give bubbles time to float up
-oomoo 25 needs 25-75 minutes to cure (see spec sheet)
Step 6: Clean up
-Do not pour liquid in sink, throw away
III. CAST - made out of cement (positive)
-
-Same steps as Molding
-
-Using DryStone Casting material
-Add powder to water (not reverse)
-mix 2-4 minutes until lump of slurry
-pour and let rise at own level
-30 minutes dry
-If trimming, do so immediately after de-molding
-Needs 2-4 hours for setting
-heat can accelerate process
- If using two piece mold
-use tape and rigid surface or vice/clamp to hold pieces together
-squeeze shake and rotate around
- Extra material on cast, just sand away
-
IV. VACUUM - how to use
Step 1: Put block inside a large container so it can 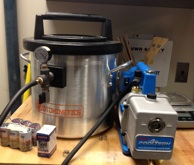
hold overflow (to keep chamber clean) when material
starts to expand.
hold overflow (to keep chamber clean) when material
starts to expand.
Step 2: Look up max PSI of material
(240 PSI for silicone aka 1600 kPa )
Step 3: Close value on chamber (lever horizontal)
and vacuum pump (lever vertical)
Step 4: Turn on vacuum pump until you read your desired PSI by reading the gauge. Or when you see the material bubble up and then POP, which is your desired PSI
Step 5: Maintain this pressure level by closing the value on the vacuum pump. (wait 3 minutes or so..this actually depending on your pot life of material)
Step 6: Release value on the chamber
Step 7: Do this again if desired, but keep remembering the pot life of material.
ATTEMPT 1

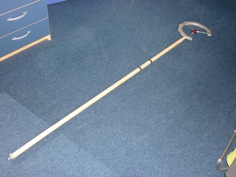
Inspiration
Light up wand for Halloween!
Modeling
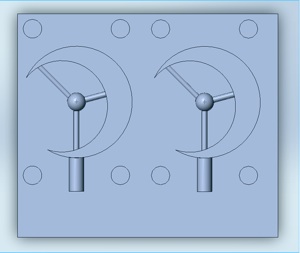
Two sided mold for moon shape end piece for wand
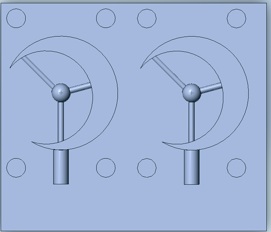
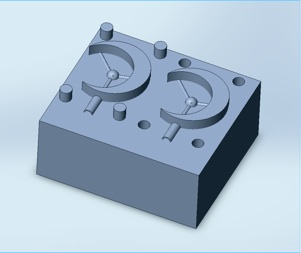
Wax Form
Using desktop shopbot came out great!

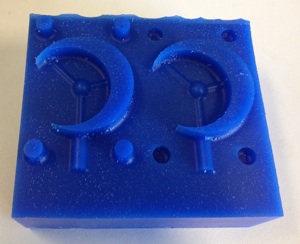
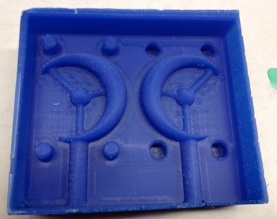
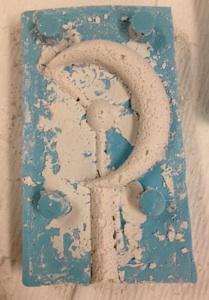
ATTEMPT 2
Silicone Mold
Using the vacuum pump I had no bubbles!
Except I realized the following problems:
-
1) hole to pour in the cement needed to extend to the end of the wax
-
2) moons were not going to line up correctly once folded/double sided
-
3) I really need to define some edges for ease-of-use
but i still tried to do a one-sided cast
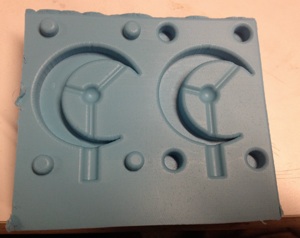
Drystone Casting
Obviously some issues....
The following needs to be fixed:
-
1)The extending 3 lines obviously need to be thicker
-
2)Need fillet the edges to avoid bubbles
-
3)Ends of moons need to be thicker
4) Make wand holder thicker
Following Fixes:
-
1)Filet sides of moon edges with .10”
-
2)Filet ends of moon with 0.0125”
-
3)Filets all other rod connections with 0.0125”
-
4)Middle circle from .25” in diameter to .35in
-
5)Rods from .075” diameter to .15”
-
6)Wand holder from .20” diameter to .30”
-
7)Extended Wand holder to end of wax block to pour in cement
-
8)Made a 1/16 inch margin/wall
-
9)Mirrored image of moon
-
10) Resized bounding square to 25mm x 45mm and took out partition due to size constraints


ATTEMPT 3
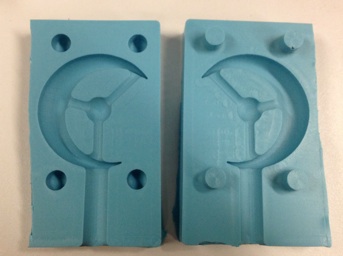
Wax Form
Using desktop shopbot came out great!
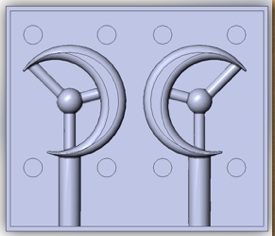
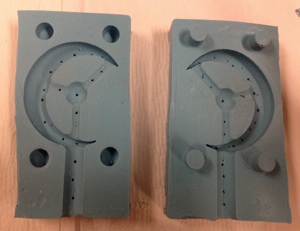
Silicone Mold
Using the vacuum pump I had no bubbles!
And my two sided mold fit!
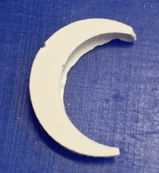
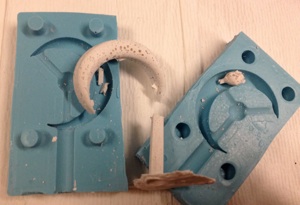
DryStone Casting
Even when using the vacuum pump, I had some serious air bubble issues. Also some of my finer features still kept falling apart...
my swiss cheese moon

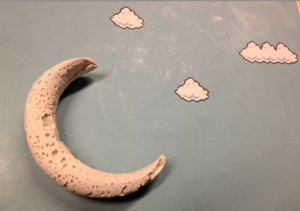
Future Work/Wishes
Silicone Mold
With holes punctured everywhere to help air bubbles escape!
DryStone Casting
A little better with air bubbles but still pretty bad..and this crumbled immediately...
Figure out what am I doing wrong...
-
1)wrong mixture of water/powder for drystone?
-
2)wrong vacuum pressure?
-
3)bad mold for the desired end piece?
-
4) too long in vacuum chamber? need to sit out more?
-
5)bad technique in pouring?
-
6)need to better squeeze two-mold together? with vice?
-
7).......?
After Notes:
To get rid of bubbles:
-Pour with a fine bead
-De-air
-Poke the mold on the fine features
-Use a syringe
Hydrostone has 15 minute dry time
Play with viscosity of plaster
And tilt model
before
after