Week 13: Machine Building
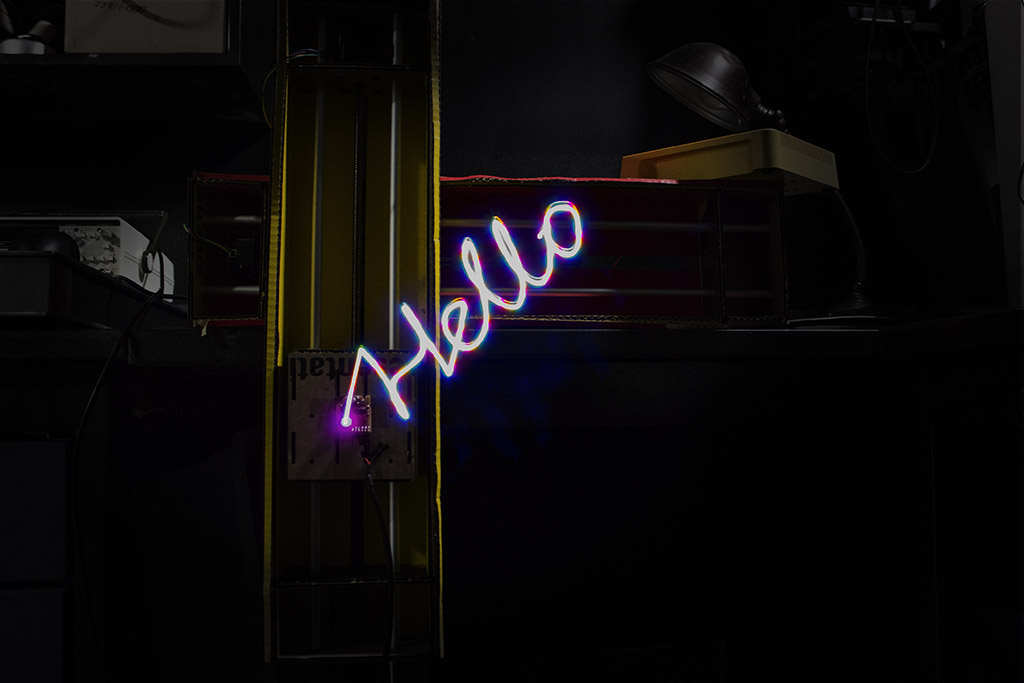
This week’s assigment, as a section, was to use the Gestalt framework, consisting both hardware and software to build a machine that makes something. We made a proof-of-concept light painting machine that produces pictures like the one you see below. You can find out more about the entire process on our project page.
I particpated along the whole process, from stuffing the initial boards, to testing the code, to running the final tool paths. On this page, I’d like to document some specific details of Gestalt.
Installation on Windows
The Gestalt software came to us having only been tested on Linux. The Mac users had their own issues getting started, but here’s a checklist for Windows users:
-
Install Python 2.7—not Python 3.4. There are numerous differences between Python 2 and 3, and Gestalt has been built with Python 2. Make sure to add Python to your
PATHso you can run it from a command prompt. -
Install pySerial. There are many ways to do this, but perhaps the most “correct” way to do it is to first install
pip, the Python package manager.pipcomes with Python 3.4 and later, but since we’re on Python 2, we will have to go through a jankier process.First, download this script for installing pip. (It’s not a virus.) Then, run the following commands:
> python get-pip.py
> python -m pip install pyserial
(
python -m pipis an alias for justpipon Windows.) -
Build the gestalt software. First, check out a copy of the repository. Then, go to the directory and run
> python setup.py installThis builds the code and installs it locally so you can
import
gestalt
from Python code. Otherwise doing this will throw an error, and you may be tempted to make a bunch of copies of the files to try and fix it, which is sure to cause more havoc. -
Test! At this point you should be able to get a basic two-node, two-axis machine running with the provided
xy_plotter.pydemo file. Make sure to set the correct serial port – it’ll beCOM3instead of the/dev/ttyUSB0that is used for Linux.
You can see this file for our modifications from the
xy_plotter.py file, used to draw the light paintings for this week.
Building Custom Gestalt Nodes
A little earlier in the week we entertained the idea of building a custom gestalt node as our end effector, instead of using a separately controlled (or in our case, uncontrolled) LED. This would have allowed us to specify both the position and color of the light “paintbrush”. We decided that it was probably a little too ambitious to do this right before the final project, but I’ll document my exploration here in case someone wants to try in the future.
The whole system is very cool, as it integrates the hardware and control software for building machines with various actuators and effectors. The host computer can communicate with all of the nodes simultaneously over an RS-485 bus, and can use software to set up different kinds of actuation. I’m personally a fan of good design in software libraries, so it’s even more impressive to see a modular software and hardware system.
Node Hardware
What would it take to build a node that controls an RGB LED with PWM?
First, check out the schematic and boards for the gestalt nodes. We can ignore most of the circuitry for the stepper motor. However, the following parts are necessary:
-
There is an 18.432 MHz crystal used to time the ATmega328p, because it is an exact multiple of the 115200 baud transmission rate on the bus.
-
A Texas Instruments 75176-series IC is used to interface between the microcontroller and the RS-485 bus.
At this point, we’d pretty much ruled out building a custom mode, because the bit-banging required of a microcontroller running at a different frequency would complicate things quite a bit, not to mention missing the RS-485 transceiver altogether.
However, once we’ve connected to the RS-485 bus, controlling an RGB LED using the PWM pins of the microcontroller is pretty easy; the whole node would be pretty lightweight and not require the massive TL78 regulator currently used for the stepper motors.
Attaching to the Bus, and Software
Suppose we had the fictional node as described above; how would we control it from software?
The gestalt software allows a virtual machine to be defined in python code, corresponding to different possible physical arrangements of the actuators. The virtual machine code for the 2-axis plotter includes the following:
class virtualMachine(machines.virtualMachine):

    def initInterfaces(self):
        if self.providedInterface: self.fabnet = self.providedInterface     #providedInterface is defined in the virtualMachine class.
        else: self.fabnet = interfaces.gestaltInterface('FABNET', interfaces.serialInterface(baudRate = 115200, interfaceType = 'ftdi', portName = '/dev/ttyUSB0'))

    def initControllers(self):
        self.xAxisNode = nodes.networkedGestaltNode('X Axis', self.fabnet, filename = '086-005a.py', persistence = self.persistence)
        self.yAxisNode = nodes.networkedGestaltNode('Y Axis', self.fabnet, filename = '086-005a.py', persistence = self.persistence)

        self.xyNode = nodes.compoundNode(self.xAxisNode, self.yAxisNode)

    def initCoordinates(self):
        self.position = state.coordinate(['mm', 'mm'])

    def initKinematics(self):
        self.xAxis = elements.elementChain.forward([elements.microstep.forward(4), elements.stepper.forward(1.8), elements.leadscrew.forward(8), elements.invert.forward(True)])
        self.yAxis = elements.elementChain.forward([elements.microstep.forward(4), elements.stepper.forward(1.8), elements.leadscrew.forward(8), elements.invert.forward(False)])
        self.stageKinematics = kinematics.direct(2) #direct drive on all axes

    def initFunctions(self):
        self.move = functions.move(virtualMachine = self, virtualNode = self.xyNode, axes = [self.xAxis, self.yAxis], kinematics = self.stageKinematics, machinePosition = self.position,planner = 'null')
        self.jog = functions.jog(self.move) #an incremental wrapper for the move function
        pass

    # ... other functions
From what I understand, the functions serve the following purposes:
-
initInterfacessets up the communication between the software virtual machine and the serial bus. -
initControllerssets up software to control the two nodes for each axis, using the communication protocols defined in086-005a.py. -
initCoordinatesstores the initial coordinates of the machine. -
initKinematicsspecifies the motor stepping, the number of turns on the leadscrew, and the screw handedness. This appears to be different from the code in086-005a.pywhich issues lower level motor commands over the bus. -
initFunctionsspecifies the operations that can be run on the virtual machine, which current consist of just themoveoperation—simultaneously moving the x and y axis nodes. There appears to be a stub for ajogfunction, which will presumably move the motors more quickly.
At a high level, implementing an LED node would then involve the following steps:
-
Write low-level Python code to communicate with the node over the serial bus. This would allow three numbers to be sent to the node for PWM duty cycle, for example in 8-bit format (0 - 255).
-
Define a new node in a virtual machine using
networkedGestaltNodeand this file. -
Define the “kinematics” for LEDs. Since LEDs will immediately change to their desired brightness value when instructions are sent, this will be much simpler than what is required for stepper motor control.
-
Define a high-level function to set the LED color (brightness of each component). Currently the
gestalt.functionsmodule only contains themoveandjogfunctions—the reason for the extra step is to allow intermediate code to optimize the movement process from the high-level instructions. Most of this functionality could be skipped for an LED brightness control.
Although the whole system could be more robust, it’s very exciting to see the product of a fruitful marriage of hardware and software. I’m sure the future years will be able to build even more advanced machines.