
Week One: Press-fit construction using computer-controlled cutting (laser cutter, vinyl cutter)
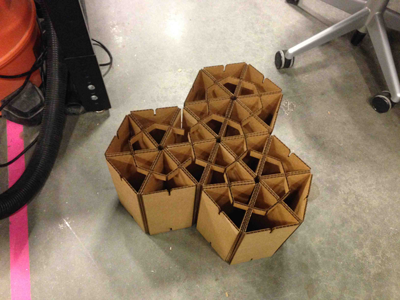
The plan is a table, with the base made of tesselated triangular columns.
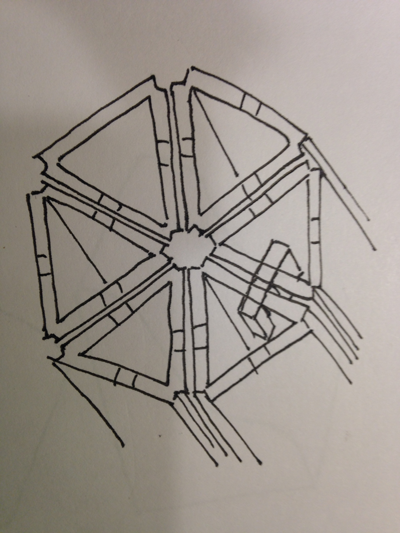
The tabletop will be glass or acrylic, or something else clear, so that the horizontal cross-section will be visible.
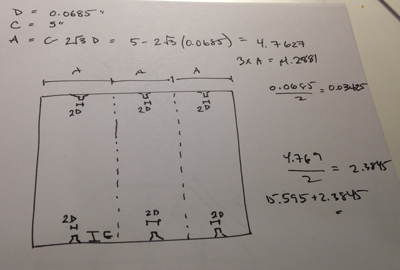
Preferably this will be a large coffee table for the living room in the new apartment my roommates and I just moved into. The size of my table is limited by two things: the number of triangular columns I can make in about two hours, since there will be lots of other people wanting to use the laser cutter over the weekend when I am planning to work, and the area of the triangles, which I want to be small for sturdiness and aesthetics. My estimate, without knowing exactly how long it will take to cut each piece, is that I can do enough cutting for about 100 pieces in two hours. If I want a 5’x3’ table, that means the triangles need to have side lengths of approximately 5.”
I’d like to make each triangular column out of a single piece of cardboard for strength, and I think I can make hinges by scoring the cardboard with the laser on a lower-power setting. I might also be able to avoid having to close the seams if I make them all face inward toward the center of each hexagon.
The columns will have notches at the top and bottom and be attached to each other with small press-fit connectors.

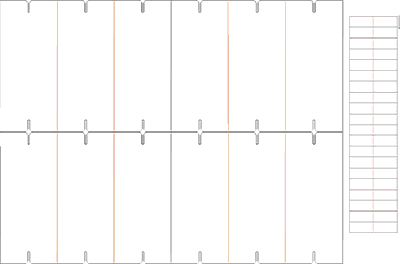
I did my design in Corel Draw. The columns are on the left and the connectors are on the right. Black represents a complete cut, orange represents a score. Draw was well-suited to this 2D project where precise dimensions were important. Parametric modeling would have been nice, and I could have tried out Grasshopper or Antimony for this, but I didn’t leave myself enough time before to get comfortable with these before my scheduled timeslot on the laser cutter.
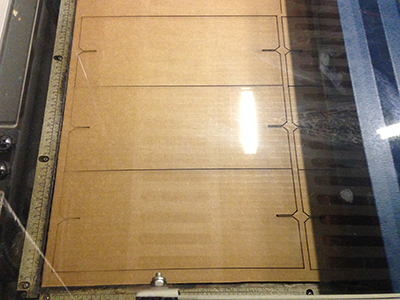
My plans for a 5’x3’ table base were way too ambitious. This is not as simple as just hitting print. It’s taking a long time to get the settings right so that all the edges are completely cut through and the hinges are not. The main problem is that the cutting depth varies a lot across the workspace. The cardboard bows, so that the center of the sheet is at least a centimeter closer to the laser than the edges. This means the laser is not properly focused when it’s cutting near the center of the sheet, so the cut becomes wider and shallower there. More mysteriously, the cuts are also shallower in the bottom half of the workspace. One option is to turn the power way up, but there’s already a lot of smoke, and I would rather not start any actual fires if I can help it. (The burnt-cardboard smell is nice, though. It feels like being at a bonfire on this warm, cloudless fall day that I’m more or less spending in a giant cement tomb.)

I found something out accidentally that turned out to be useful for solving this problem: if you have two identical lines on top of each other in your drawing, and are vector printing, the laser cutter will just cut that line twice (at least this is true with the Epilog driver). So now I’m deliberately duplicating all the black lines, so that they are all getting cut twice. This allows me to get a clean cut without raising the power too high or lowering the speed too much, hence avoiding fire. I’ve also given up on cutting out the whole sheet all at once and am only using the top half of the workspace, flipping the cardboard around and using the other half so I don’t waste material. My final settings, which get consistently good results, are:
Complete cut (black lines): Power 55, speed 70, frequency 700 Hz, two passes
Hinge (orange lines): Power 1, speed 90, frequency 700 Hz
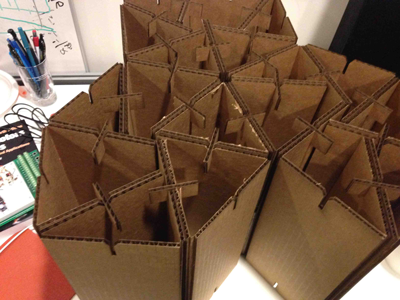
I was wrong about being able to ignore the seams and just let the triangles hold each other in the right shape. It doesn’t look nice:
I chatted with a few other people in the shop about the best way to fix this. Whoever came up with the idea I decided to use, forgive me, because I forgot who said what (Chikara? Tomer? Ben?). But it worked:
I cut a circle out of acrylic and put it on top. Now it’s table-shaped! As my power electronics professor this semester would say, the acrylic is not a vision of Grecian beauty--it’s scratched up, and the edge is a bit rough. (It’s also not actually attached to the base at all.) But I’m out of time in the shop, and would like to use glass eventually anyway, so I’m not going to worry about it.
