Week 7
Molding and casting.
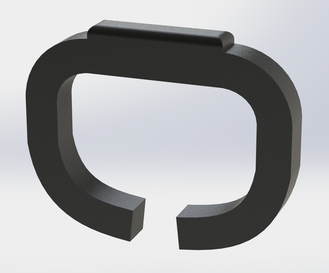
Wearable Bracelet

Introduction
This week, I took the opportunity to move forward with my final project. I decided to create the molds for a wearable bracelet, in which I want to embed sensors/small printed circuit boards. I designed the positive molds in SolidWorks, machined the positive molds in machinable wax on the ShopBot Buddy Alpha, used OOMOO 25 for creating the negative molds, and cast drystone in the negative molds to obtain my wearable. Eventually, I want to use a flexible material so the bracelet can be placed on the wrist easily.
Design
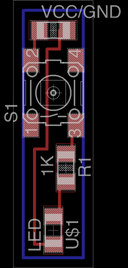
I designed the positive molds in SolidWorks. I want to pot a printed circuit board in the top compartment of the bracelet, so I also designed a thin circuit board using Eagle. For proof-of-concept, I created a simple circuit with a switch, an LED, and a resistor.

Make
Machining Positive Molds
This week, I learned about the importance of chip load. Chip load refers to the desired amount of material you wish to cut. The chip load should be within a certain range to ensure that the material is cut effectively. This is the formula for chip load:
Chip Load = Feed Rate (inch/min) / [Spindle Rate (rpm) * # of Cutting Teeth]
Desired Chip Load: 0.001"/rev - 0.020"/rev
For example, from suggestions by TFs, I found a spindle rate of 15.5K rpm and a feed rate of 1 inches/s to be good for cutting machinable wax. I used a 1/8" upcut endmill with 2 flutes for cutting teeth. This gave me a chip load of 0.002", putting me inside the desired chip load range.
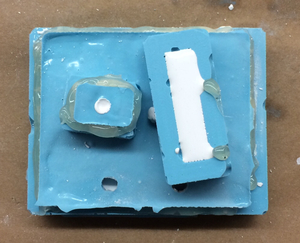
Here are the positive molds after machining.
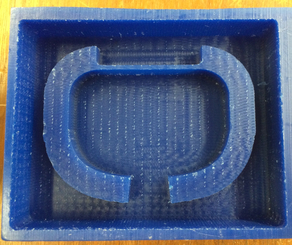
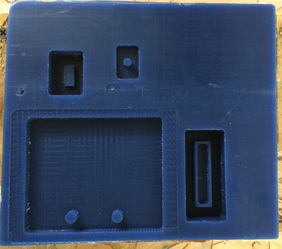
To save time in machining, I used a higher stepover of 0.02". Next time, I will probably drop this down to 0.01" to obtain nicer results.
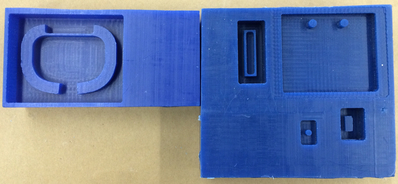
Creating Negative Molds
I used OOMOO 25 to create negative molds. The OOMOO 25 is soft and flexible, unlike the machinable wax, such that the final product can be easily peeled away from the negative molds.
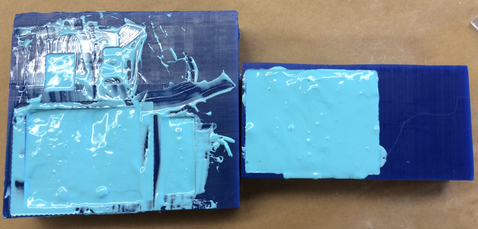
I used old OOMOO to create my first batch of negative molds, and obtained poor results. Old OOMOO is more viscous and difficult to work with, causing more trapped bubbles.
According to the datasheet, the curing time for OOMOO 25 is 75 minutes. I found the curing time to be a bit longer in practice. I baked the negative molds in an oven at 150 degrees for 60 minutes, and waited another 60 minutes before the molds felt safe enough for removal from the wax positives.
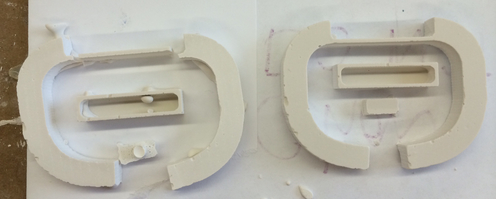
Here are the resulting negatives. Poor quality. Lots of bubbles.
Below are the results after using new OOMOO. I took more time and care pouring the OOMOO into the positive molds, allowing the OOMOO to spread throughout the molds on its own.


Negatives with the new OOMOO. Higher quality. Few bubbles.
Casting the Final Product
I used drystone to create the final product. To prepare the drystone, mix drystone and water in a ratio of 100:20 respectively. Mix well to obtain a mixture that can be poured relatively easily.
I used hot glue to seal the top and bottom negative molds while casting.
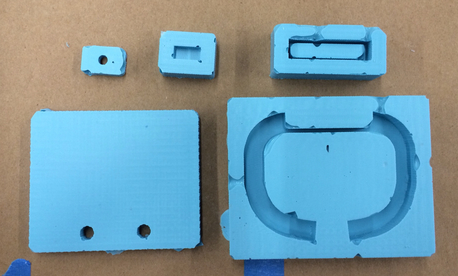
After an hour two of waiting, I obtained the following results. The negative molds created with newer OOMOO resulted in better quality castings.
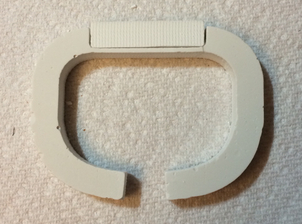
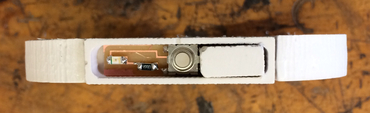
The PCB I fabricated fits in the compartment! Next step would be to pot the PCB using additional drystone (I'm going to wait until I have a silicone rubber material).
Lessons Learned
1) Pay attention to the chip load, which is a function of the spindle rate, feed rate, and number of cutting teeth (flutes of endmill). The chip load should be in a desired range to ensure that the wax is cut, rather than torn off or melted.
2) Watch the expiration date on the materials you use. In this case, using old OOMOO resulted in more trapped air bubbles, and in turn, poor quality negative molds. Using new OOOMOO improved the negative molds dramatically.
3) Mix materials well for effective curing. I obtained better results by mixing the two parts of OOMOO in one cup, transferring the mixture into a new cup, and mixing once more.
4) Be patient when pouring the OOMOO into the positive molds. To minimize the number of trapped air bubbles, pouring the OOMOO slowly into the positive molds will improve your results. If possible, pour in the center of any surface, allowing the OOMOO to fill the space itself.